Sticking to a $1200 budget for a gaming PC build can be complicated. With a massive range of components to choose from, finding the right combination of parts that strikes a balance between performance, pricing, and ease of building is a hard decision to make.
To simplify the process, we’ve compiled this in-depth build guide for a fantastic mid-range $1200 gaming PC. We’ve included a full write-up of the process of building this PC and a discussion of why each component was chosen based on its performance, pricing, or use case.
At the end of the article, you’ll find a small section on the expected performance metrics from the Ryzen 5 7600X and Radeon RX 7700 XT combo. We’ve also provided a dedicated build video, which we recommend following alongside this article to visualise how to put this system together.
Build Process
Step 1: Getting the CPU Installed
Because we’re sticking to a lower mid-range budget, the CPU we’ve chosen for this PC build is the Ryzen 5 7600X. We’ve featured this processor in multiple budget PC builds due to its excellent price point and outstanding single-core performance in modern games.
The Ryzen 5 7600X has fewer cores than its more expensive counterparts, the Ryzen 7 7700X and Ryzen 9 7900X. The lower core count allows the Ryzen 5 7600X to maintain its rated boost clock speed of 5.3GHz in modern games, resulting in excellent framerates across many titles.

The Ryzen 5 7600X will be installed in the Gigabyte B650 Gaming X AX, which is the motherboard we’ve chosen for this system. As always, we advise removing the motherboard from its packaging and placing it on top of the box, which provides a sturdy and soft surface to work on without damaging or scuffing the PCB.
To install the CPU, lift the retention arm holding the CPU socket cover in place and move the socket cover out of the way, exposing the pins on the motherboard. Grab the CPU by the sides (do not grab it from the bottom, as you could risk damaging it), and line up the golden arrow with the same-shaped arrow on the board.

This arrow is typically located at the top left of the socket, and both arrows should be in line with each other. The CPU can then be carefully lowered into the socket.
No extra movement is required to get the CPU inside the socket; it should simply drop in correctly, provided you’ve lined up the arrows correctly. If the CPU isn’t properly lined up, give it a slight nudge to get it in the socket.
Next, lower the metal CPU socket cover and push the retention arm back under the small hook. When doing this, the plastic plate that protects the CPU socket should pop off, but if it doesn’t, you can carefully remove it beforehand and place it back in the motherboard box. It can be helpful to keep it if you need to return or refund your motherboard.

Speaking of which, the motherboard we’ve chosen for this PC build is the Gigabyte B650 Gaming X AX. This board sits on the B650 chipset, primarily aimed at budget systems. Despite being a cheaper board, the B650 Gaming X AX still offers a bountiful set of features, which includes support for RAM speeds up to 8000MT/s, three Gen4 SSD slots, and solid networking options, comprised of WiFi 6E and 2.5 Gigabit LAN.
| Specification | Gigabyte B650 Gaming X AX |
|---|---|
| Form Factor | ATX |
| Supported Memory | 192GB DDR5 8000MT/s |
| PCI-E x16 Slots | 1 x PCI-E 4.0 |
| PCI-E x4 Slots | 1 x PCI-E 5.0 2 x PCI-E 4.0 |
| Front IO | 1 x USB 3.2 Gen2x2 Type-C 1 x USB 3.2 Gen1 2 x USB 2.0 |
| Rear IO | 1 x USB 3.2 Gen 2 Type-C 1 x USB 3.2 Gen2 Type-A 3 x USB 3.2 Gen1 Type-A 2 x USB 2.0 |
| Audio | 3 x Audio Jacks |
| Networking | WiFi 6E 2.5 Gigabit LAN |
Furthermore, the Gigabyte B650 Gaming X AX also has a robust set of rear IO, including eight ports. These include a USB 3.2 Gen2 Type-C port, a USB 3.2 Gen2 Type-A port, three USB 3.2 Gen1 Type-A ports, and three USB 2.0 ports.
Step 2: Seating the RAM
The next step in this PC build is installing the RAM. We’ve chosen the Teamgroup T-Force Delta DDR5 RGB Black kit for this AMD system. We’ve used these DIMMs in a couple of previous builds due to their affordable price point compared to other RAM on the market.
The Teamgroup T-Force Delta RGB kit has a 32GB capacity, a rated speed of 6400MT/s, and a CAS latency of 40. Admittedly, we could have picked a lower latency option for this system, but as this $1200 PC build is primarily aimed at gaming, CL40 should be ample. This highly affordable set of DIMMs offers excellent performance and fits nicely with the other dark components we’ve picked out.

Installing RAM is arguably one of the most straightforward steps, requiring no additional tools. You’ll want to prepare slots two and four by pushing the clips down, exposing the full DIMM slot. We’re using slots two and four because this is the most efficient configuration for two RAM DIMMs.

Next, line up the RAM sticks with the slots on the motherboard. RAM can only go in one way, so if your stick isn’t lining up correctly, spin it around and try again. Once you’ve lined up the slot, apply even pressure on both sides of the DIMMs, pushing them down into the slot. Once the RAM is in correctly, you’ll hear a satisfying click, which shows that the clips have fully secured each DIMM.

Step 3: Secure the M.2 SSD
The storage drive going into this PC build is the Crucial P3 Plus 1TB. This Gen4 drive offers read speeds of up to 5000MB/s and maximum write speeds of 3600MB/s, making it perfect for gaming. Usually, we’d choose a 2TB drive to ensure plenty of capacity for additional games and applications. Still, because we’re sticking to a tighter budget, this 1TB variant is much more affordable, sitting around the $80 mark.

Remove the heatsink covering the primary M.2 slot on this motherboard to install this drive. Unfortunately, there are no quick-removal clips or buttons to remove the heatsink, so make sure you have a Phillips screwdriver small enough to unscrew it. An M.2 screwdriver’s thread is usually about 1.85-1.98mm in diameter.

Once the cover has been removed, push the M.2 drive into its slot. You then need to use a screw to hold the M.2 drive down. SSDs usually come with a screw in the box, but if it doesn’t, motherboards normally have a couple of spares for your drive. Screw the M.2 SSD down tightly, and then remove the tape on the underside of the cover, place it back in its slot, and secure it in place.
Step 4: Getting the Motherboard in the Case
The next step in the PC building process involves installing the motherboard in the PC case. Alternatively, you could install the CPU air cooler before doing this, but because the cooler we’ve chosen doesn’t require a mounting backplate for AMD systems, it makes sense to get the board inside the case first.
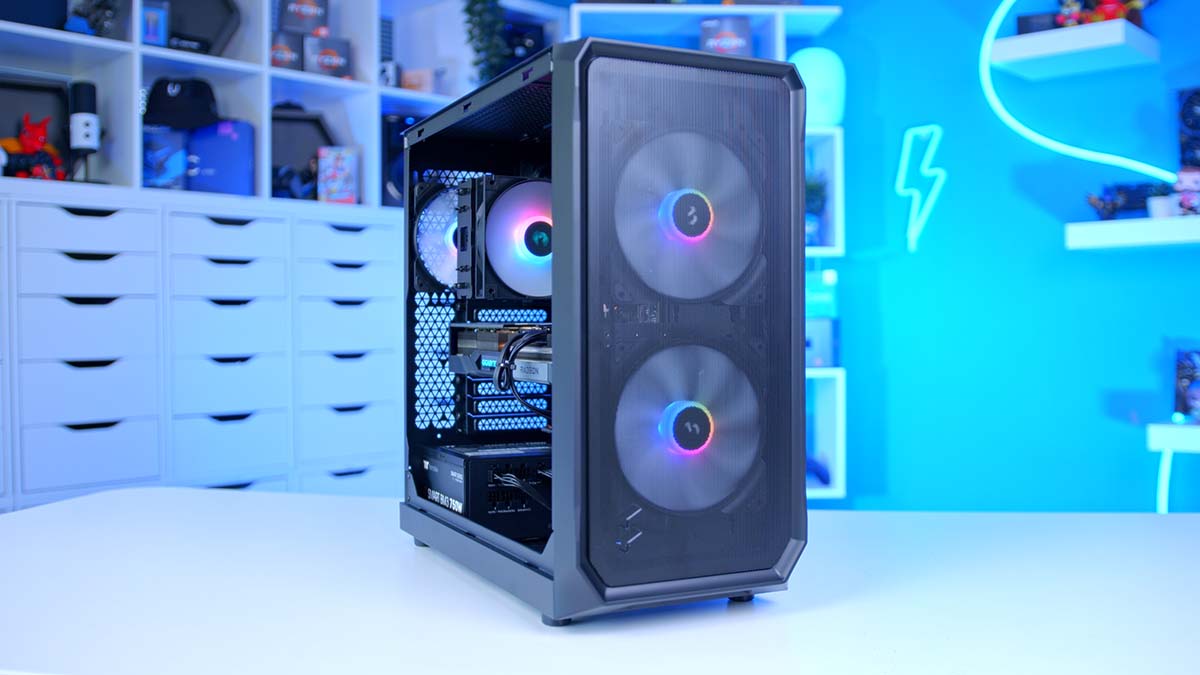
The case we’re using to house all of our components is the Fractal Design Focus 2. This budget chassis builds on and enhances the design of a prevalent case from a few years ago, the Focus G. The Focus 2 offers a similar aesthetic, with a metal mesh front panel and tempered glass window on the side, but it has a more modern style that caters to minimalist setups.

The Fractal Design Focus 2 comes with two pre-installed 140mm RGB fans at the front of the case, which provide additional airflow. This chassis also offers solid cooling support, with space for a 360mm radiator at the front and a 240mm liquid cooler at the top. This case accommodates CPU coolers up to 170mm tall, which is ample for our air cooler in this build. There’s also 405mm of length for longer graphics cards.
| Key Specs | Fractal Design Focus 2 |
|---|---|
| Form Factor | Mid-Tower |
| Motherboard Support | Mini-ITX, Micro-ATX, ATX |
| Case Dimensions (L x W x H) | 472mm x 215mm x 451mm |
| Front IO | 2 x USB 3.0 Type-A 1 x Audio Jack 1 x Mic Jack |
| PCI-E Slots | 7 |
| Colour | White or Black |
| Max Clearance | 170mm CPU Cooler Height 405mm GPU Length 250mm PSU Length |
| Drive Support | Up to 6 x 2.5 inch (2 included mounts) Up to 2 x 3.5 inch |
| Fan Support | Top: 2 x 140mm Front: 3 x 120mm Rear: 1 x 120mm |
| Radiator Support | Top: 240mm Front: 360mm Rear: 120mm |
| Pre-Installed Fans | 2 x 140mm |
Before installing the motherboard, lay the case flat on your workspace; this makes it easy to secure the board without the risk of dropping it in the case. The Fractal Design 2 comes with a small box which contains all of the screws needed to secure everything in place.
Line up the motherboard with the standoffs located around the motherboard tray. There’s no need to install a rear IO shield here because the Gigabyte B650 Gaming X AX has an integrated shield on the board. The rear IO should nicely line up with the cutout towards the top left of the case, providing access to all your USB ports, audio jacks and networking.

Next, secure all of the screws into the standoffs to hold the motherboard in place. Ensure the correct screws are used, as the incorrect ones could make any future upgrades quite tricky. The screws you need have a small flat lip around the head, and there will be more of these than any other screw in the case box.

Step 5: Mounting the Air CPU Cooler
Installing the CPU cooler is very simple because we’re building an AMD system over Intel, which generally has more steps, along with installing an additional backplate. To get started, remove the four screws and plastic mounting blocks that sit around the CPU socket. Keep these screws in your motherboard box, as they can be used for a potential future upgrade.
Next, place the small orange hexagonal plastic caps on the four threads around the CPU socket. These should sit securely on the threads, providing effectively no movement.

Then, grab the square AMD mounting plate and line it up with the threads. After this, grab the longest threaded screws, and screw these into the threads through the plate, which will hold it in place. This plate is what the CPU cooler will mount onto.

The CPU air cooler we use for this PC build is the DeepCool AG400 BK ARGB. Not to be confused with the AK400 (a similar CPU air cooler), the AG400 is a cheaper RGB alternative that provides excellent cooling aimed at budget builds. The DeepCool AG400 BK ARGB offers a streamlined heatsink stack designed to shift heat away from the CPU optimally. This air cooler has an addressable 120mm fan that can spin up to 2000RPM, ensuring adequate airflow to keep the Ryzen 5 7600X nice and cool.
Before we screw down the cooler, make sure the plastic cover is removed from the bottom of the CPU cooling block. We also need to apply thermal paste to the processor’s IHS (integrated heat spreader, which is the metal on top of the CPU). Fortunately, DeepCool provides a small sachet of this with the AG400 cooler. Squeeze a rice grain/pea-sized amount of thermal paste on top of the CPU.

Next, line up the AG400 cooler with the metal plate we installed earlier. Once the cooler is lined up, start torquing the spring-loaded screws to hold the cooler in place. We recommend turning both screws bit by bit, ensuring they’re screwed down equally. The springs will start to creak once the screws have been torqued enough, so this is a good sign to stop turning them.
As a small note, if the screw closest to the RAM is quite hard to torque, we recommend removing the fan. The 120mm fan is held in place by two metal clips that sit in the heatsink fins, making the fan relatively easy to take off.
Step 5.5: Mount an Additional Rear Fan (Optional)
Unfortunately, the Fractal Design Focus 2 only comes with two 140mm fans pre-installed at the front of the case. For this reason, we’ve decided to add another fan at the back of the case to provide extra airflow for this system.

To get this fan installed, you’ll need four fan mounting screws. Most manufacturers typically supply these alongside a pack of fans, but they can be picked up relatively cheaply online if yours doesn’t have any. Once the fan has been screwed in, the cable will need to be plugged into an available header on the board or an adapter.
Step 6: Installing the Graphics Card
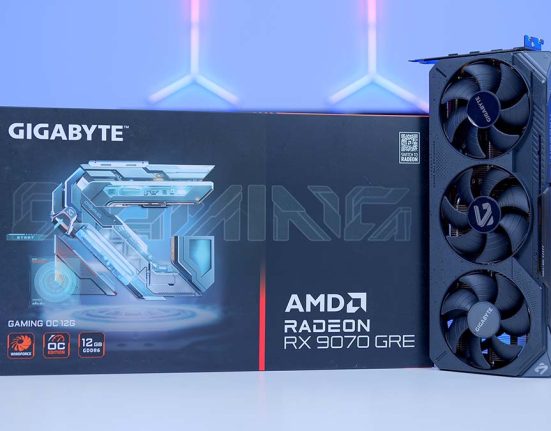
We’ll install the graphics card for the next step of this PC build. The GPU we’ve picked for this $1200 build is the Sapphire Pulse RX 7700 XT. The RX 7700 XT is a prominent card in the mid-range space due to its solid 1440p performance while being highly affordable. At $399, the Sapphire Pulse RX 7700 XT is one of the best 1440p gaming GPUs and serves as a great pairing with the Ryzen 5 7600X CPU we’ve also picked out.

Taking a look at performance, the RX 7700 XT is primarily aimed at 1440p games, offering great framerates across both Esports and AAA titles. Across our testing, we’ve found that the RX 7700 XT provides around 70-90FPS in games like Hogwarts Legacy, Cyberpunk and Starfield, while in games like Apex Legends and COD Warzone, framerates can exceed the 100FPS mark easily.
The Sapphire Pulse variant of the RX 7700 XT stood out as the best option for this build primarily because of its price. While there are more robust triple-fan variants that provide better cooling or a slight performance boost with overclocking, the Sapphire Pulse model is an MSRP option, making it one of the cheapest RX 7700 XT cards. This aligns nicely with our $1200 budget, avoiding any potential overspending.
| Specification | Sapphire Pulse RX 7700 XT |
|---|---|
| Video Memory | 12GB GDDR6 |
| Memory Bus | 192-Bit |
| Core Clock Speed | 1.43GHz |
| Boost Clock Speed | 2.54GHz |
| Stream Processors | 3456 |
| Ray Accelerators | 54 |
| Compute Units | 54 |
| Power Consumption | 245W |
| GPU Length | 280mm |
To get this GPU into the Fractal Design Focus 2 case, the PCI-E covers at the rear of the chassis need to be removed. The Sapphire Pulse RX 7700 XT is a 2.5-slot graphics card, so two covers need to be unscrewed and put to the side.

After the PCI-E covers have been taken out, you’ll need to align the graphics card with the PCI-E slot and push it into place. Push the card down into the slot, and you’ll hear a slight click, indicating that the latch at the end of the slot has secured the GPU. Use the screws that were attached to the PCI-E covers to hold the RX 7700 XT in place, alleviating any sag.

Step 7: Power Supply Install & Cabling
The penultimate step of this PC build is installing the power supply and wiring up all of the components. To power this $1200 build, we’ve picked out the Thermaltake Smart BM3 850W unit. This 80 Plus Bronze-rated semi-modular power supply can supply up to 850W of power, which is more than ample for this build, with room for upgrades in the future.

Because this is a semi-modular power supply, the motherboard and CPU power cables are soldered to the unit and can’t be removed, but additional cables like PCI-E for graphics cards and SATA for fans and drives can be plugged in optionally. Before getting the Smart BM3 850W into the case, we recommend plugging in any cables you need beforehand. For this build, the only extra cable needed in the power supply is PCI-E for the RX 7700 XT graphics card. This build doesn’t use an NVIDIA-based GPU, so we don’t need to install the 12VHPWR cable.

The Thermaltake Smart BM3 850W must be slid into the case from the side, lining up the screw holes with the mounting points at the back of the case. Then, take the four hexagonal screws and screw the power supply into the chassis, which will firmly secure it.

Now, we can start wiring up this PC build. Only three cables need to be plugged in from the power supply, which will save some time. Starting with motherboard power, using the extended rectangular cutout towards the right side of the case, thread the motherboard power cable through and plug it into the large header on the right of the motherboard. This cable is notched and can only be plugged in one way.

This motherboard requires an eight-pin and four-pin connector, situated at the top left of the motherboard, to power the CPU. Because this build doesn’t use a liquid cooler, these should be very easy to plug in. Again, CPU power is keyed, so the connectors can only be plugged in one way.

To power the Sapphire Pulse RX 7700 XT, we need to plug in two eight-pin PCI-E headers. One cable should be enough; most PSUs have two headers per cable. However, an additional PCI-E cable can be plugged in to power the graphics card if you want to keep things clean and tidy.

Step 8: Additional Cables & Power On
The final major step of any PC build involves plugging in the rest of the cables and wires and cable management, and then your PC build can be turned on. Fortunately, no extra cables need to be wired up besides the fans, CPU cooler, and front panel headers. Alternatively, if this isn’t your first PC build, plugging in these cables mid-way through can save some time instead of leaving it all until the end.

Regarding cable management, the Fractal Design Focus 2 has relatively narrow channels and only comes with a couple of cable ties. For this reason, we advise being more patient with cable management to avoid misplaced wires that could result in cable bulge. We’ve written a complete guide on cables and wiring, so we recommend reading through this if you’re unfamiliar with the process. Once everything has been plugged in correctly, switch on the build!
Performance
From our testing and benchmarking, the Sapphire Pulse RX 7700 XT and Ryzen 5 7600X perform well at 1080p and 1440p high settings across Esports and AAA games. This budget system is more than capable of handling the demands of 1440p, offering smooth framerates across a range of titles.
Gallery


![FI_[SR190] HYTE X50 Ryzen 5 9600X & MSI RTX 5070 Ti](https://geekawhat.com/wp-content/uploads/2026/01/FI_SR190-HYTE-X50-Ryzen-5-9600X-MSI-RTX-5070-Ti-551x431.jpg)