Building a Mini-ITX gaming PC can be frustrating. Because Mini-ITX PCs are so small, working in the available space to install all your components and plug in cables isn’t the most straightforward task for the average builder.
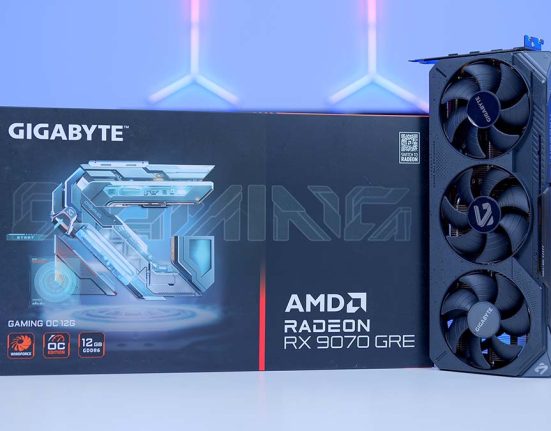
This is why we’ve put together this awesome Mini-ITX PC build guide. We’ve configured a system with the Cooler Master NCORE 100 MAX, a small form factor case that prioritises ease of use by including a power supply and cooler to simplify the building process. We’ve paired this case with the AMD Ryzen 7 7800X3D and a Palit 4070 Ti SUPER JetStream OC RTX to provide well-rounded performance at 1440p with decent legs at 4K.
In this guide, we’ll walk you through the building steps from start to finish and explain why each part we’ve chosen suits this system perfectly. We’ll cover performance towards the end, and we also have a full build video, which is worth following alongside this written guide to provide a visual aid.
Build Process
Step 1: Installing the CPU
The first part of any standard PC build involves installing the CPU into the motherboard, and while this step isn’t particularly hard, it does require some care and patience. The CPU we’ve chosen for this powerful Mini-ITX system is the AMD Ryzen 7 7800X3D. A staple of the Ryzen 7000 range, this CPU is a powerhouse of performance in gaming and is more than capable of handling the throes of 1440p and 4K.

The 3D V-Cache is what makes the Ryzen 7 7800X3D such a great option. The cache acts as blazing-fast storage that the CPU can access to read, write, and execute instructions very quickly. Because games have a mass of instructions that the CPU needs to sift through, the 3D V-Cache makes this much easier, resulting in high framerates across many games.
As always, take the motherboard out of its box and place it on top, as this is a nice cushioned surface to work on. To install the CPU, unhook the metal retention arm that secures the CPU socket cover in place and raise the cover to expose all of the pins on the motherboard PCB.

Next, remove the CPU from its packaging and pick it up by the sides. Avoid touching the bottom of the processor, as you could damage the CPU’s contact pads. Find the golden arrow on the processor (for AMD, this is usually the top left) and the same arrow on the motherboard. Both arrows should be facing in the same direction; this indicates that the processor is facing the correct way up.

Then, slowly lower the processor into the socket. CPUs don’t require force or pressure to be correctly installed, as they should drop into the socket and sit snugly in place. Once the CPU is in the socket, lower the cover, push down the retention arm, and place it underneath the hook. The pressure it takes to get the retention arm back in place may feel like you’re damaging the CPU, but don’t fret—this is normal.

As you lower the arm, the plastic protector normally pops off, but you can remove it before securing the socket cover. We recommend keeping this protector if you need to return or refund your motherboard.
Speaking of which, the motherboard in this PC build is the Gigabyte B650I AORUS Ultra. This board is an excellent fit because of its solid set of features and the fact that it’s a Mini-ITX option. The Cooler Master NCORE 100 MAX only supports Mini-ITX motherboards, so the B650I AORUS Ultra stood out as a solid selection for this PC.

On the features front, the B650I AORUS Ultra has a Gen4 graphics card slot, a single Gen5 M.2 slot, and two additional Gen4 M.2 slots, so there’s plenty of storage space for future upgrades.
| Specification | Gigabyte B650I AORUS Ultra |
|---|---|
| Form Factor | Mini-ITX |
| Supported Memory | 96GB DDR5 6400MT/s |
| PCI-E x16 Slots | 1 x PCI-E 4.0 |
| PCI-E x4 Slots | 1 x PCI-E 5.0 2 x PCI-E 4.0 |
| Front IO | 1 x USB 3.2 Gen2x2 Type-C 1 x USB 3.2 Gen1 2 x USB 2.0 |
| Rear IO | 1 x USB 3.2 Gen2 Type-C 2 x USB 3.2 Gen2 Type-A 2 x USB 3.2 Gen 1 Type-A 2 x USB 2.0 |
| Audio | 2 x Audio Jacks |
| Networking | WiFi 6E 2.5 Gigabit LAN |
This board also offers an integrated IO shield comprised of seven USB ports on the rear IO, integrated WiFi 6E, 2.5 Gigabit LAN support, and solid RAM overclocking capability up to 6400MT/s.

Step 2: Seat the RAM
The RAM in this build is the Panther DDR5 RGB 32GB 6000MT/s CL40 kit from Apacer. We’ve used this RAM a few times for other PC builds, and it is incredibly reliable. It also adheres to this system’s darker aesthetic while providing some vibrancy in the form of RGB lighting on each DIMM.

The Apacer Panther DDR5 kit offers a rated speed of 6000MT/s and a latency of CL40. Admittedly, we could have picked out a higher-performance kit for this system with stronger latency timings, but the Apacer Panther RAM serves as an affordable option while providing us with the solid speeds we need for gaming.
To install this RAM in the B650I AORUS Ultra, the clip at the top end of each slot must be pushed down to expose the whole slot. The RAM slots on this board only require one clip to be pushed down.

Once the clips have been pushed down, line up each DIMM with a slot, ensuring the RAM is the right way around and aligns with the small notch towards the centre of each stick. Push the RAM sticks into the slots, applying even but firm pressure on each side until you hear a click. Both of the clips should be holding the RAM firmly in place.

Step 3: Mount the SSD
One of the unique qualities of this motherboard is that it comes with three SSD slots instead of two, which is a more common offering with the Mini-ITX form factor. To make space for this, the primary slot is encased in a heatsink, which is raised above the other two Gen4 slots. Because of this, the primary SSD slot must be unplugged and removed from the board before we can install the storage.
Firstly, unplug the small connector coming out of the slot. Then, grab a small screwdriver and unscrew the four screws securing the SSD to the posts on the board. This should free the M.2 slot from the board, allowing you to install the Gen4 drive.

The SSD we’ve opted for in this PC build is the Samsung 990 Pro, one of the fastest PCI-E 4.0 drives on the market. We’ve used the Samsung 990 Pro countless times because of its reliability, endurance ratings, and substantial speeds. The 990 Pro offers 7450MB/s on the sequential read speeds and 6900MB/s on the write speeds, which is more than ample to keep game loading times to a minimum.

The top heatsink can now be removed, exposing the M.2 slot. Place the drive in the slot and screw it in place using the very small screw that comes with the 990 Pro. Once the drive is secured, place the heatsink back on top, remove the small piece of tape that covers the thermal pad, and screw this heatsink back onto the posts on the B650I AORUS Ultra motherboard. Ensure the small cable from the side gets plugged back in, too.

Step 4: Motherboard Install & Cabling
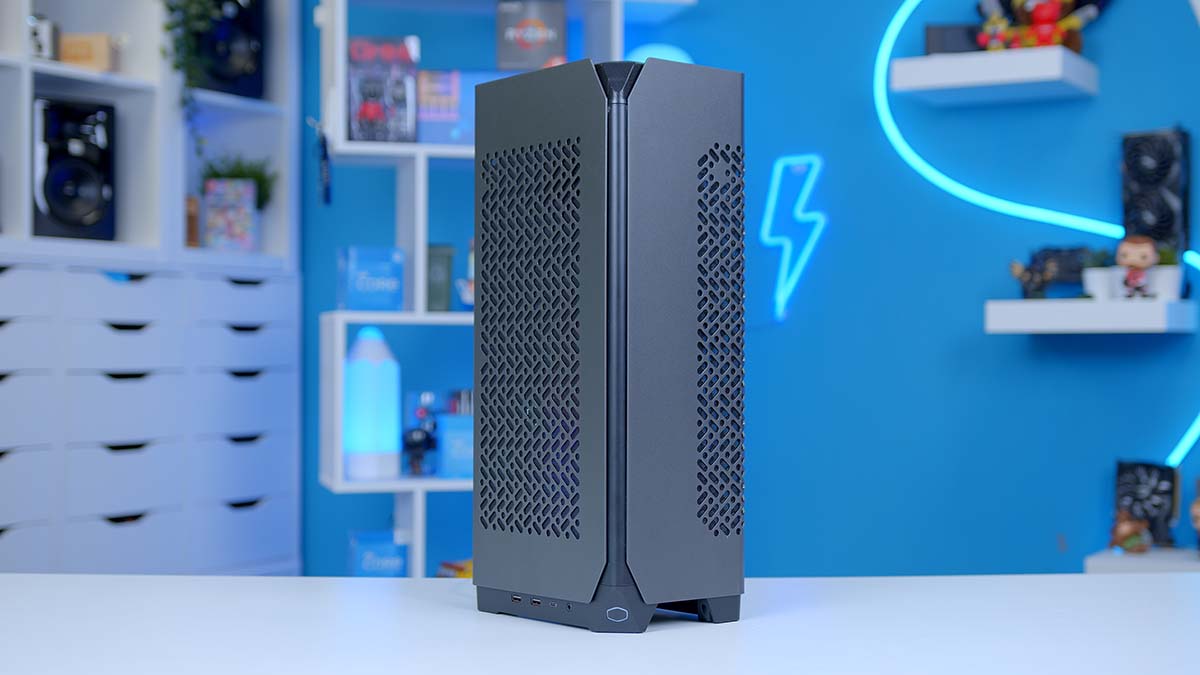
The Cooler Master NCORE 100 MAX is the star of this PC build, housing all of our components. We’ve chosen the NCORE 100 MAX because it is a highly unique Mini-Tower case with an included power supply and CPU cooler. As a direct competitor to the NZXT H1, the NCORE 100 MAX offers a unique building experience, alleviating the hassle of small form factor systems.

This case supports large graphics cards up to 336mm long, while the custom 38mm thick 120mm cooler is compatible with AMD AM5, AM4, and Intel LGA 1700 sockets. This sophisticated case is designed to make building a Mini-ITX system extremely simple, and during this PC build, we felt that the NCORE 100 MAX achieves this goal very easily.
| Key Specs | Cooler Master NCORE 100 MAX |
|---|---|
| Form Factor | Mini-Tower |
| Motherboard Support | Mini-ITX |
| Case Dimensions (L x W x H) | Normal Mode: 155mm x 212mm x 481mm Expansion Mode: 172mm x 212mm x 481mm |
| Front IO | 2 x USB 3.2 Gen1 Type-A 1 x USB 3.2 Gen2x2 Type-C 1 x Audio Combo Jack |
| PCI-E Slots | 3 |
| Colour | Black or Bronze |
| Max Clearance | 48mm CPU Cooler Height 337mm GPU Length (357mm in Expansion Mode) 100mm PSU Clearance |
| Drive Support | Up to 1 x 2.5 inch |
| Fan Support | N/A |
| Radiator Support | N/A |
| Pre-Installed Fans | 1 x 120mm |
Before we place the motherboard in the case, it’s worth adjusting any cabling and getting the connectors in the right place, as there will be far less space to work with once the board has been secured. This will make plugging in any power connectors and the front panel cables that come with the case much more manageable.
Once you’ve moved the cables into a more accessible place, remove the panels off the sides of the case and lay the chassis flat on the table. Carefully lower the motherboard into the Cooler Master NCORE 100 MAX case and tighten it down with the included screws.

After installing the motherboard in the case, we recommend plugging in any cables. Because the power supply and liquid CPU cooler are already installed, you can plug in any headers, power connectors, and front panel cables right now. This will be the best time to get your cables plugged in because once the CPU cooler is tightened down, there will be very little space to work with.
Make sure to plug the PCI-E riser cable into the graphics card slot as well. After a couple more steps, we’ll install the GPU, so make sure the PCI-E cable is plugged in to save some time later.

Step 5: Thermal Paste & Cooler Mounting
Because the NCORE 100 MAX is designed to make the PC build process much easier, Cooler Master has done all the hard work for us regarding the CPU cooler. The NCORE 100 MAX has a custom 120mm radiator pre-mounted to the chassis, so all we have to do is apply some thermal paste and then tighten the CPU block head onto the processor.

However, you’ll want to double-check that the CPU cooler mounting hardware is correct. For this AMD system, the CPU cooler needs two mounting brackets that have a screw and latch on each side. These latches will attach to the stock cooler notches at the top and bottom of the CPU socket, securing it in place. These brackets are secured to the cooler by removing the four screws around the CPU blockhead, which can then be secured in the holes on the brackets.
Cooler Master has provided a tube of thermal paste with the NCORE 100 MAX, so we’ll apply it to the CPU IHS (integrated heat spreader) before mounting the cooler. Squeeze a rice grain/pea-sized amount of thermal paste onto the centre of the IHS; once we fully secure the CPU cooler, this will spread evenly across the top of the CPU.

Next, line up the blockhead of the CPU cooler so that the latches sit inside the notches on the plastic pieces at the top and bottom of the CPU socket. Getting these in place can be awkward, but just be patient and keep trying until both latches are sitting snugly on the notches.

Then, you can start torquing each of the thumbscrews. There are no Phillips threads on either of these screws, so the cooler must be secured in place using thumb power. Tighten these screws until they’re both stiff. Again, use just your thumbs and fingers; pliers are not needed.

Step 6: Install the Graphics Card & Power On
This is it; we’re at the final step of this PC build, thanks to the simplicity and versatility of the Cooler Master NCORE 100 MAX case. To install the graphics card, you’ll need to stand the case up and spin it around so the back faces you. This is where the graphics card goes, as you’ll be able to spot the other end of the PCI-E riser poking out in this portion of the case.

The GPU we’re installing in this Mini-ITX PC build is the ‘not so mini’ Palit RTX 4070 Ti SUPER JetStream OC. Fortunately, the NCORE 100 MAX supports graphics cards up to a length of 336mm, and the Palit 4070 Ti SUPER sits just below this at 328.9mm. This will be a tight fit in the standard configuration, but the NCORE 100 MAX can be expanded by adjusting the case panelling to accommodate 357mm long graphics cards. If you’re worried about clearance, we recommend opening up the case to its wider configuration.
| Specification | Palit RTX 4070 Ti SUPER JetStream OC |
|---|---|
| Video Memory | 16GB GDDR6X |
| Memory Bus | 256-bit |
| Core Clock Speed | 2.34GHz |
| Boost Clock Speed | 2.64GHz |
| CUDA Cores | 8448 |
| RT Cores | 66 |
| Tensor Cores | 264 |
| Power Consumption | 285W |
| GPU Length | 328mm |
The RTX 4070 Ti SUPER is a powerful graphics card offering solid performance at 1440p and decent legs at 4K. NVIDIA RTX 4000 graphics cards are also spectacular for ray traced gameplay, so those looking to bump up graphical fidelity can enjoy ray tracing in a range of modern and Esports titles. Furthermore, framerates can be bolstered using DLSS and Frame Generation, which are two of NVIDIA’s pillar technologies designed to improve smoothness in intense games.
To install this card, the PCI-E covers at the bottom of the chassis need to be removed first. Unscrew these and put them in the accessories box if required later. The RTX 4070 Ti SUPER can then be placed into the PCI-E slot with a firm push.

You’ll know that the card is correctly installed as the screw holes on the PCI-E bracket will line up with the case PCI-E covers, allowing you to tighten the GPU down with the screws that were removed earlier. Secure the RTX 4070 Ti by screwing it down, and then plug in the included 12VHPWR power connector.

Finally, double-check that all your cables are plugged in and ensure all the power connectors and headers are seated correctly. Doing this with all the components installed might be more challenging, so be patient and thoroughly check all the headers. Put both metal panels back on the case, plug in power and any peripherals you need, and switch on the build!

Performance
From our testing and benchmarking, the Ryzen 7 7800X3D and RTX 4070 Ti SUPER are an excellent combo, providing outstanding performance at 1440p and 4K across AAA titles like Cyberpunk 2077 and F1 2023, and Esports games like Apex Legends. The build configuration we’ve put together is highly capable across several games and offers excellent metrics with ray tracing switched on.
Gallery


![FI_[SR190] HYTE X50 Ryzen 5 9600X & MSI RTX 5070 Ti](https://geekawhat.com/wp-content/uploads/2026/01/FI_SR190-HYTE-X50-Ryzen-5-9600X-MSI-RTX-5070-Ti-551x431.jpg)
![FI_[DP064] ASUS Prime AP303 + 9070XT](https://geekawhat.com/wp-content/uploads/2026/03/FI_DP064-ASUS-Prime-AP303-9070XT-551x431.jpg)
![FI_[DM93] Corsair 3200D Launch](https://geekawhat.com/wp-content/uploads/2026/03/FI_DM93-Corsair-3200D-LAUNCH-551x431.jpg)