The ASUS ROG Hyperion GR701 BTF is an enthusiast-level PC case designed for top-end PC builds. Cases like the ROG Hyperion haven’t seen the light of day in recent years due to the market favourably shifting towards more affordable cases. ASUS is looking to keep the enthusiast market alive with their ASUS ROG Hyperion GR701 BTF chassis, a case we’ve tested thoroughly to see whether this high-end option is worth picking up compared to existing designs.
Like other ROG products, the Hyperion is a case designed to facilitate all your PC building needs and more. With dual 420mm radiator support, 46mm wide cable routing channels, dual USB Type-C ports on the front IO, and a luxury metal chassis that supports BTF boards, the ROG Hyperion is built for a top-end system. In this review, we’ll fully analyse the ROG Hyperion by assessing the specs, design, features, and build quality.
Buy the ASUS ROG Hyperion GR701 BTF on:
Specification
The ASUS ROG Hyperion GR701 is a full tower that utilises a traditional box design with a highly unique aesthetic. As this is a full tower chassis, the ROG Hyperion GR701 is built to accommodate large components, with plenty of space for massive graphics cards and feature-rich motherboards. The ROG Hyperion offers space for E-ATX motherboards, which are the biggest consumer desktop boards you can buy, and there’s also room for graphics cards up to 460mm in length, as well as 420mm liquid coolers.
As a BTF case, the ROG Hyperion supports the latest ‘back-to-front’ cable design, where the headers have been shifted to the back of the PCB, resulting in a cleaner-looking build. It’s also worth noting that as a BTF (Back to The Future) case, the ROG Hyperion supports all of the latest ASUS BTF motherboards, allowing you to build an immaculate system with no visible cables at the front of the chassis.

The front and top of the ROG Hyperion case offer room for 420mm liquid CPU coolers, while the rear of the chassis has space for a 140mm cooler at the maximum. The ROG Hyperion also has plenty of clearance for CPU air coolers and power supplies, with 190mm and 240mm of space, respectively. Fan support is also fairly respectable, with the ROG Hyperion being able to house seven 140mm fans and three 120mm fans at the side if the optional panel is swapped out.
| Specification | ASUS ROG Hyperion GR701 BTF Edition |
|---|---|
| Form Factor | Full Tower |
| Motherboard Support | Mini-ITX, Micro-ATX, ATX, E-ATX |
| Case Dimensions (L x W x H) | 639mm x 268mm x 659mm |
| Front IO | 4 x USB 3.2 Gen1 Type-A 1 x USB 3.2 Gen2 Type-C 1 x USB 4.0 Type-C or 1 x USB 3.2 Gen2x2 Type-C 1 x 3.5mm Combo Jack |
| PCI-E Slots | 9 + 3 (vertical) |
| Colour | Black White Red |
| Max Clearance | 190mm Cooler Height 460mm GPU Length 240mm PSU Length |
| Drive Support | Up to 5 x 2.5 inch Up to 2 x 3.5 inch |
| Fan Support | Front: 3 x 140mm Top: 3 x 140mm Rear: 1 x 140mm Side (optional): 3 x 120mm |
| Radiator Support | Front: Up to 420mm Top: Up to 420mm Rear: Up to 140mm |
| Pre-Installed Fans | 4 x 140mm |
| MSRP | $499.99 |
The ROG Hyperion has ample mounting options for SATA drives, with five 2.5-inch bays or two 3.5-inch bays. It’s worth noting that drive bays can also be mounted to the side panel, providing extra room for those who need plenty of mass storage devices. On the front IO, the ROG Hyperion comes with five USB ports, four of which are USB 3.2 Gen1 Type-A ports and a single USB 3.2 Gen2 Type-C port. Additionally, ASUS has included an extra Type-C port, which doubles as a USB 4.0 port or USB 3.2 Gen2x2 port, depending on what your motherboard offers.
At $499.99, the ASUS ROG Hyperion sits at a price similar to other enthusiast cases we’ve reviewed. The HAF 700 EVO from Cooler Master specifically comes to mind as a point of comparison, as similar features are offered at the same price. While I don’t imagine the MSRP of the ASUS ROG Hyperion will appeal to everyone, the near $500 price point doesn’t seem unreasonable considering the features on offer.
Suggested Article: How to Build an Insane Cable-Free High-End Gaming PC
ASUS ROG Hyperion GR701 BTF Edition Design
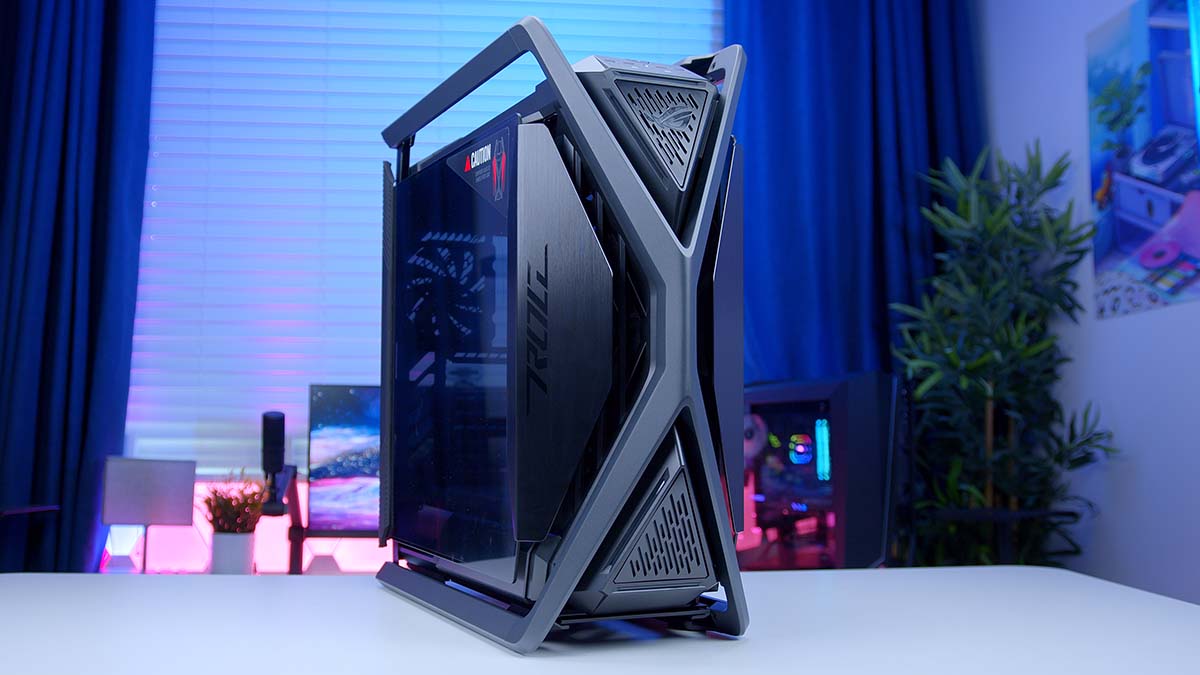
The ASUS ROG Hyperion case is one of the few chassis we’ve recently reviewed that doesn’t use the fish-tank style seamless glass approach. While many of these cases look great, it’s nice to see a premium case adhere to a more traditional ‘box’ aesthetic that uses premium materials. Upon taking the ROG Hyperion out of the box, you’ll first notice the big metal X that spans the front and top of the case.

This metal X and the rest of the case are constructed of a die-cast aluminium alloy frame that ensures rigidity and stability. The top of the X also doubles up as carry handles, with a load-bearing capacity of up to 80kg, making this chassis relatively easy to move around. The aluminium frame, while chunky, adds an extra layer of protection around your build, and the brushed metal aesthetic provides a luxury look while keeping to the signature ROG gamer style.

The front of the case features ventilation around the X-frame with a mesh backing to minimise any blockages. There are also two additional triangular vents at the top and bottom of the front panel, which further assist airflow and add a splash of colour and customisable lighting with RGB. I feel ASUS has missed a trick by not making the top vent, which features the ROG logo and the power button. While this is a novelty feature, I think it would add to the overall building experience of this case.

ASUS has taken a bit more of a unique approach regarding the case’s side panels. Both side panels are angled towards the front of the case to follow the curvature of the X-frame, which gives them a quirky look compared to the traditional rectangular panel we see on other cases.
The tempered glass side panels are also hinged on both sides, providing easy access to the inside of the case. These panels can also be lifted off their hinges without any tools if they’re obstructive when building.

Moving to the other side panel, we see the same hinged tempered glass panel covering the case’s SATA drives and cable management. Although we’ll touch on it later, cable management in the ROG Hyperion is solid. There’s a vast amount of Velcro ties to tidy up wires and channel them appropriately. There’s ample clearance between the motherboard tray and the case’s side panel, so cable bulge shouldn’t be an issue.
It is confusing that ASUS has opted for tempered glass around this side of the case, as it’ll make the cable mess very visible. However, this encourages builders to manage cables well so that this side of the chassis looks as clean as the rest of the case.

The PSU shroud of the ROG Hyperion is quite interesting as it features a small window for the power supply. While this won’t be useful for every power supply unit, options like the ROG LOKI and ROG THOR have a built-in display to showcase power draw or other system stats. This PSU window is a nice value-add for those who have already purchased a compatible ASUS power supply.

Furthermore, the internal side panel of the case is a ROG-themed lighting panel that features addressable RGB lighting. This can be swapped out to support extra SATA drives or additional case fans, but the RGB panel is an excellent addition for those who don’t plan on adding extra components.

Building in the ASUS ROG Hyperion GR701 BTF Edition
The ROG Hyperion is an incredibly feature-rich case designed to house big PC builds with many fans, coolers, and other flashy components. But what is the building experience like compared to other cases? We built an insane top-end system with the ROG Hyperion to find out what building in this chassis is like.
Internal Space
As we’ve discussed in the specs, the ROG Hyperion is a full tower case, so it’ll be no surprise that E-ATX (extended ATX) motherboards are supported in this case. Much like the other BTF builds we’ve done in the past, you have to get the board into the case before you do anything else. The ROG Maximus Z790 BTF slipped into the case easily. There’s ample space inside, and all of the cutouts for the individual headers are pretty large. The case is pre-configured to support E-ATX boards straight out of the box, so we didn’t have to mess around with any standoffs.

The ROG Hyperion has a considerable amount of clearance for graphics cards. This case can house cards up to 460mm in length, which means there’s about 100mm of extra clearance, even with some of the biggest GPUs installed. Because of this, you’ll be able to install a front-mounted liquid cooler with effectively no hassle, as there’s a massive amount of space between the CPU and the front panel.

It’s also worth noting that the ROG Hyperion has an integrated graphics card support bracket, which can be adjusted with a Phillips screwdriver. This support bracket accommodates both vertical and horizontal installs, minimising any sag.
At the rear of the case, the ROG Hyperion provides a mass of room for cable management and routing. This case has a 34mm deep central channel for cables, while the width is 46mm. Cables and wires are relatively easy to clean up and maintain in this case, and we didn’t experience any bulge issues despite using a BTF board.
It’s great that ASUS has been more accommodating for zero-cable PC builds. In our experience, some other chassis, like the MSI Maestro, tend to sacrifice cable management space to make the front of the case clean. And while I’m sure many will appreciate this, it complicates the building experience.

Radiator and Fan Mounting
Because the ROG Hyperion is a full tower case, cooling support is solid across the board. With space for up to two 420mm radiators or seven 140mm fans, there’s no shortage of airflow.

As a worthwhile note, three additional 120mm fans can be added to the side if the ROG lighting panel is removed. ASUS doesn’t explicitly mention whether you can install 140mm or 120mm fans on the side panel, but after measuring, we’ve concluded that only 120mm fans will fit.

Getting fans and radiators installed in the ROG Hyperion was relatively straightforward. The top panel can be removed, while the front is accessible by removing the 420mm fan unit, which is held in by some screws. Any cables or wires can then be threaded through the mass of cutouts towards the back of the chassis and plugged into the included fan and RGB hub.

The ROG Hyperion has four 140mm fans pre-installed, with three at the front and one at the rear. It’s great that this premium case has some fans, but it would be nice to see higher-end options. These 140mm fans offer no RGB lighting, which is a shame considering how luxurious the ROG Hyperion is.
Ease of Building
The most apparent hassle factor of the ROG Hyperion case is its size. Full tower cases are never easy to haul around, and their stature makes it even harder to stash away under a desk. While the carry handles make this easier, spinning around the ROG Hyperion to access the cables and rear panelling was no easy feat, primarily because this case is so heavy.
Despite this, building in the ROG Hyperion was an enjoyable experience. All of the components we picked out for this system slotted in nicely and efficiently, and the fact that this case supports BTF motherboards makes cable management much more straightforward. In this case, James noted that installing a custom loop would probably pose quite a challenge. The bulk of the case does restrict internal space, especially around the front panel, which means pipe bends must be tight and close together.
James also wasn’t a fan of the power supply installation method. The PSU shroud must be entirely removed from the case, the PSU slots in, and then all of the shrouding must be reinstalled, which seems unnecessary. We’d much prefer the power supply to be installed from the side, which is what most traditional cases tend to offer.

Features We Like
Multi-Functional Side Panel
One of the unique features of the ROG Hyperion is that this case comes with a side panel that offers a range of different functions. At default, the side of the case features a ROG-themed panel, brightening up the inside of the chassis with some RGB. However, this can be swapped to support up to three 120mm case fans or 2.5-inch SSDs.

This is a highly innovative way of providing different functional elements of a case. Still, it’s also a great way of spicing up the aesthetic without costing you any additional cash.
Hidden Storage Drawer
Towards the bottom of the main side panel is a hidden storage drawer that can house case accessories or frequently used PC-building tools. Most traditional cases typically provide an additional box to house any extra accessories, but the ROG Hyperion throws this idea out of the window by giving this hidden storage drawer. At the same time, this feature isn’t mind-blowing; it’s a nice value-add that will save some hassle with future upgrades.

Fan & ARGB Hub
It’s always great to see an included fan and RGB hub because it saves you from taking up any motherboard headers. The hub has six PWM headers and eight 3-pin addressable RGB headers for those with plenty of additional lighting components or accessories.

Front IO
The ROG Hyperion is one of the few cases on the market that offers six USB ports on the front IO. There are four USB 3.2 Gen1 Type-A ports alongside two USB Type-C ports, one of which doubles up as either USB 4.0 or USB 3.2 Gen2x2, depending on your motherboard. The front IO also features a button to change the RGB lighting settings and a 3.5mm combo jack for a microphone or pair of headphones.

Features We Don’t Like
Minimal RGB Lighting
For a ROG-branded case, we were expecting more in terms of RGB lighting. ASUS ROG components are known for their flashy and vibrant look, so it’s a shame that no internal RGB strips or fans come with the Hyperion case. While this won’t be a point of contention for some, we feel that ASUS could have offered more RGB for a near-$500 case.

Enforces Good Cable Management
While I imagine the dual-tempered glass panel approach will appeal to some, it effectively forces builders to manage their cables well. If you’re like me and prefer to shove cables into various channels and take the ‘out of sight, out of mind’ approach, the second tempered glass window isn’t a desirable feature. I would prefer this panel to be ventilated metal so cables can be hidden away without external judgment.

Conclusion
ASUS ROG Hyperion GR701 BTF Edition

Product Name: ROG Hyperion GR701
Brand: ASUS
-
Features
-
Design
-
Versatility
-
Value For Money
Summary
The ASUS ROG Hyperion GR701 is one of the best enthusiast cases to release in the past few years. This full tower chassis is designed to house big builds, with space for 420mm radiators, graphics cards up to 460mm long, and E-ATX motherboards. This case also comes with a couple of unique features, such as the multi-functional side panel and hidden storage drawer, that minimise hassle and allow prospective buyers to increase airflow or spice up the look of the build. Additionally, the die-cast aluminium alloy frame looks highly sophisticated and is extremely durable while providing handles at the top of the case so it can be easily moved around.
My only qualms with the ROG Hyperion case are the convoluted power supply install and price point. I feel that ASUS has made the PSU installation unnecessarily complicated, causing us a fair amount of hassle during the building process. Furthermore, with an MSRP of $499.99, the ROG Hyperion is not a cheap case by any means. While some qualities and design aspects of this case somewhat justify the high price point, I feel more premium features, such as RGB lighting and fans, an LCD screen, or explicit custom cooling support, would make the pricing easier to swallow. However, the ROG Hyperion is worth considering if you’re looking for a top-end case designed to provide a relatively hassle-free and clean PC build.
Pros
✅ Component clearance
✅ Hidden storage drawer
✅ Cable management room
Cons
❌ Expensive
❌ Complicated PSU install
❌ Large chassis
![FI_[DP064] ASUS Prime AP303 + 9070XT](https://geekawhat.com/wp-content/uploads/2026/03/FI_DP064-ASUS-Prime-AP303-9070XT-551x431.jpg)