Introduction
Valve‘s portable Steam Deck console has been a hit sensation in the PC gaming space since it’s initial release over a year ago now. Valve has reshaped the portable PC market, providing a consistent way of playing your favourite games at reasonable framerates without you having to break the bank. There have been a number of different competitors enter this space recently seeking to dethrone Valve’s portable king, but none of them seem to be capable of doing so.
So what makes the Steam Deck so great versus the alternatives? Well, it’s affordable, with the top-end model sitting at $584.10 before tax, which for a point of comparison is at a similar price to the PS5. It offers very strong performance in a wide range of titles, including ones that aren’t officially supported. It works great as an emulation station and portable Linux machine. And my personal favourite, it is in theory – customisable.
The Steam Deck is relatively easy to disassemble, just requiring you to remove a few screws, and once you’ve got access to the innards you can swap out a variety of different components to suit your needs. And this is exactly what we’ll be breaking down in this article. Corsair were kind enough to send us their latest 1TB MP600 Mini Gen4 SSD, which we’ll be installing into this Steam Deck today, with a break down of exactly how to do it!
Suggested Article: Best Corsair SSDs to Buy in 2023
What is a Steam Deck?
Admittedly this full on how-to guide is somewhat out of our recent remit as much of our newer content has been buyers guides or reviews. However, as the Steam Deck technically counts as PC hardware, here we are putting together a guide on how to install a new SSD into it. But first it’s worth briefly establishing what Steam Deck is, before we jump into our ‘How To’ guide.

The best way to establish what a Steam Deck is, is to envision a Nintendo Switch, but with the hardware of say a decent mid-range gaming PC. Whilst the Steam Deck doesn’t necessarily have insane hardware that allows you to play your favourite games at the highest settings at the best resolution, it does a bloody good job of providing a reasonable gameplay experience, crossed with decent visual quality. The Steam Deck uses a Linux-based operating system, which utilises Debian 8 code providing you with full control and customisation.
In terms of controls and display, the Deck uses a 1280 x 800px (16:10 aspect ratio) screen which is an IPS LCD panel. You’ve also got access to a vast number of ways to control the Steam Deck including capacitive touch analog sticks, track pads, bumpers, triggers, a D-pad, numerous buttons and grip buttons too. The Steam Deck also has a gyroscope, providing you with a way to use motion controls, and all of the buttons in every game are fully customisable. Needless to say, the Steam Deck is well equipped with very capable hardware and customisation. This is one of the strongest portable gaming systems on the market that you can pick up right now.
Compatibility Questions
Before we jump into the full guide, there are some quick questions that we should answer concerning compatibility. We’ve briefly discussed both of these major compatibility sections below:
Does the 64GB Steam Deck Have an M.2 SSD Slot?
If you’re familiar with PC hardware, and you’ve looked at the Steam Deck page, you’re probably fretting about whether the 64GB Steam Deck supports NVMe drives. In short, it does! While the Steam page says that the drive is a 64GB eMMC option, which would indicate it is soldered, you’ll be happy to find out that it isn’t. All Steam Decks will have the same hardware minus the screen capability between them, so once you’ve opened your Steam Deck, you’ll find an empty M.2 SSD slot which your new drive will simply slip into.

What Type of Drive Do I Need for the Steam Deck?
Although the Steam Deck utilises a standardised Gen4 slot, it only supports the smallest sized SSD on the market. This size is known as 2230, which denotes the width and length in millimetres. This size is a bit more niche compared to a 2280 drive, so they can be a bit harder to find, but there are a number of drives you can find on the market that will work perfectly in your Steam Deck, and we’ve recommended some below.

Corsair MP600 Mini

The MP600 Mini from Corsair is the actual drive that we’ll be installing in the SSD today, and it is an incredible option. This Gen4 SSD offers 4800MB/s on both the read and writes, making it ideal for modern games, especially newer titles that have Direct Storage available to them. This is a pricier option, but well worth considering.
Buy the Corsair MP600 Mini on:
Sabrent Rocket 2230

Sabrent are a lesser known player in the SSD space, but many of their drives are extremely capable and perfect for the Steam Deck. You’ve got access to a range of different capacities, with 256GB at the lowest. These drives can also reach up to 5GBps on the reads and writes, making it a strong competitor.
Buy the Sabrent Rocket 2230 on:
WD PC SN740

And finally is the SN740 PC drive from Western Digital. Again, capacity options are strong, with consumers being able to choose a 2TB drive at the maximum. Read and write speeds are also incredibly strong too, with the SN740 being able to surpass that 5GBps mark on all of their drives, which is insanely fast.
Buy the WD PC SN740 on:
Steam Deck Disassembly Checklist
Now we’re getting into the main part of this article, which is our ‘How To’ guide. However, before we dive right into it, it is worth briefing you with a quick checklist of the things you’ll need. These are:
- A Phillips Screwdriver in PH1 size.
- A plastic opening pick.
- Precision tweezers.
- A flat surface to work on.
- And optionally a silicon desk mat, or magnetic screw pot to put all of the screws in.
- A USB-C capable USB stick with a 4GB capacity as a minimum, or a USB-A to USB-C adapter, and a standard USB stick with a 4GB capacity as a minimum.
Disassembly Guide
Without further ado, here is the full guide on how to disassemble your Steam Deck and replace the SSD. We’ve covered each part step by step, with a full video at the end covering the entire process.
Keep in mind that if you plan on modifying your Steam Deck, opening it up may void your warranty, so any defects or issues will have to be fixed by you instead of sending it off to get repaired.
1. Remove the Screws
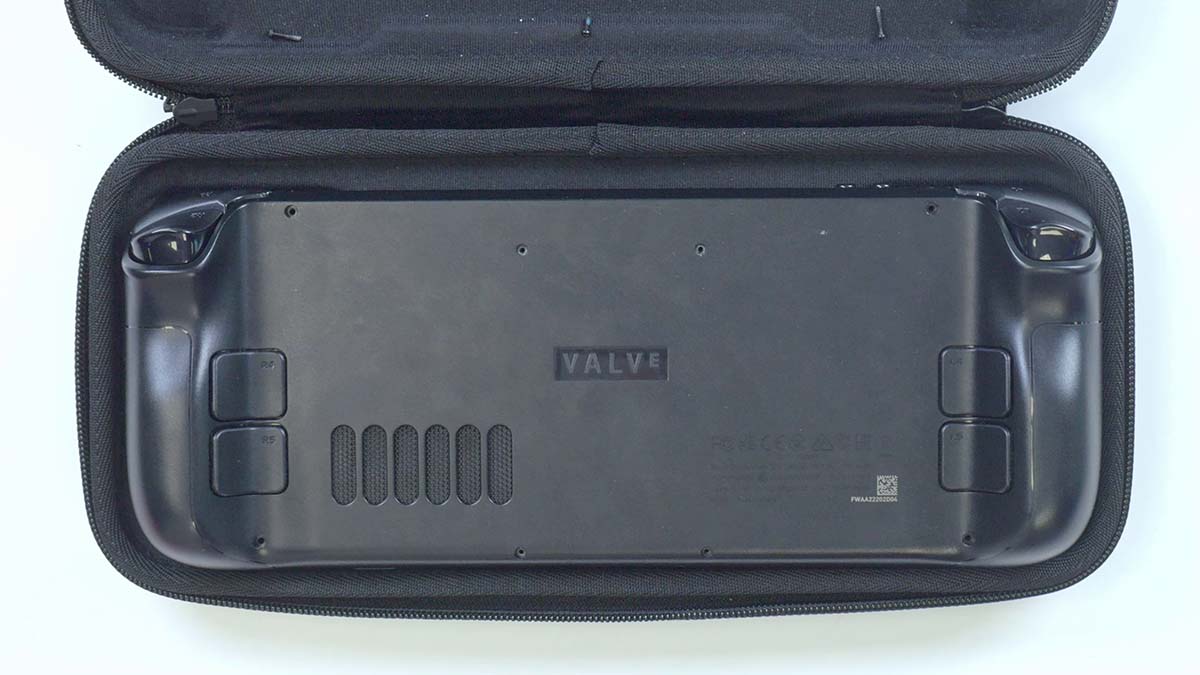
After finding a flat surface, you’ll want to turn off your Steam Deck, and place it face down in the face. This provides a cushioned area for the Steam Deck to sit which will stop it from being scratched up while you disassemble it. After flipping it over, there are 8 screws on the back of the Deck that you’ll want to remove. We’ve highlighted all of these in the image supplied. Once you’ve taken these screws out, place them somewhere safe so you don’t lose them.

2. Carefully Remove the Backplate
After your screws are removed, you’ll now want to take off the backplate. In the video and images that we provided we didn’t have a handy opening pick to hand, so we carefully pried off the backplate with a bit of force. We suggest using a pick as you can easily wedge the flat pick into the Steam Deck and slide it around the chassis. The backplate is only held in by plastic clips so be careful not to damage them, but you should be able to take this off pretty easily.

The backplate also doesn’t have any ribbon cables attached, so you should be able to simply remove it without having to carefully inspect it and then disconnect any hidden cabling.
3. Unscrew the Protective Shrouding
Next up, you’ve guessed it, we’re removing more screws. Fortunately there are only three this time holding the metal shroud in place. These screws need to be removed so that we can get access to the battery and the SSD slot. The two screws at the top left and bottom left are somewhat smaller, I found they were quite tight, so be sure to not cross-thread them when removing them. The larger recessed screw towards the top right however will be under some taped foil, we removed this earlier on to make things a bit easier.

This screw bit is slightly larger, but the PH1 will be perfect. Again, just be careful when applying torque as you don’t want to thread this screw. Once all of the screws are removed, put them in a safe place, and simply remove the metal shrouding. There are no sneaky hidden cables here, so you don’t need to worry about pulling a ribbon cable off in the removal process.
4. Disconnect the Battery
The next step is a bit more complicated in comparison to some of the other steps, so you’ll want to make sure you’re careful here. Here we’ll be disconnecting the battery from the Steam Deck to ensure there’s no more charge or electricity flowing through the components in this system. In my experience of disconnecting this battery, it can be a little bit tough. Valve have done their best to make it easy, but it can be somewhat difficult. We’ve highlighted where the battery connector is in the Steam Deck, and this is where you’ll want to look.

The easiest way to do this is to pull the fabric tab and apply some tension to the left side of the Steam Deck. As you’ll see from the video, I had to give this quite a tug to get it out, so you’ll want to hold on to the plastic chassis somewhere and give it a good tug. Pulling the fabric on the actual connector itself is going to be the best way to do this, as there’s too much tension on the connector to remove it with a spudger or tweezers.
5. Unscrew and Remove the SSD
In this step we’ve got one more screw to remove, which is the screw that fastens the SSD in place. Removing this will be exactly the same compared to removing a desktop SSD drive. Once you’ve taken out the screw, the SSD will almost spring up at an angle, making it available to remove. Again, remember to keep the screw, but once you’ve taken it out, you can simple pull out the SSD and set it aside.
6. Move EM Shield, and Install the New SSD
For the next part, we’ll be taking off the EM shield and installing our new SSD into the slot. The EM shield is the metal foil jacket on the old SSD. This is used to reduce any interference with WiFi antennas and any other metal components. There are two ways to remove this jacket, the first is to just slide it off. I found this was the best method, as it required the least amount of hassle.

Once you’ve taken this off, simply slide it onto your new SSD. Make sure the orientation of the EM Shield is correct. The way to know that its facing the right way is that the two prongs of the shield will be facing towards the actual PCI-E connector on the side, and the flat side will be facing the screw.
The other method of taking off the EM Shield is to undo the actual cover by unsticking it. If you use some tweezers or your fingernails you’ll be able to undo the cover, then place it onto your new drive and make sure it sticks back to itself. Now all you need to do is screw the SSD down. Don’t apply too much torque here as you don’t want to damage the drive or the screw.
7. Connect the Battery and Screw the Metal Plate In
Now that the new SSD is installed its a simple case of reversing all of the initial things we did prior to this. In this step you’ll want to reconnect the battery. Admittedly, putting the connector back in is much easier than taking it out. Simply push it into it’s slot and this should be fine. Make sure to give it a little bit of a wiggle and a push just to ensure that the connector is seated correctly.

Now its just a case of putting the metal shielding back on by using the three screws we put aside earlier. If you’re not sure where they go, we recommend referring back to step 3, which highlights all of the individual screwholes.
8. Reinstall the Backplate and Screws
Now we’re on the final hardware step in this guide. In this section you’ll want to reinstall the backplate. As we’ve alluded to in the first steps, the backplate is held on with a load of plastic clips, so you’ll want to move around the backplate and apply a bit of force to get them all to click down. The backplate should be flush with the top half of the Steam Deck, so make sure you’ve pressed down all of the chassis to ensure that the backplate is on firmly.

Once you’ve done this, its simple a case of reinstalling all of the screws that you took out at the start. You should have eight screws left over to screw back in. Again, if you need to know where these go, refer back to the first step towards the top of the article.
9. Download SteamOS, Rufus and 7Zip
Presumably, you’re unlikely to have installed the Steam operating system on an SD card. So if this is the case, you’ll want to grab that USB drive that we said you’d need in the preliminary checklist. Firstly, boot up a PC or laptop and jump onto Google, there are a couple of things we’ll need to download. These programs are SteamOS, Rufus, and 7Zip. We need SteamOS because this is the actual software we’re going to reinstall on the new SSD. And Rufus is going to format the SteamOS file into a readable format for the deck. 7Zip is needed for the next step too, because we’re going to need to extract the SteamOS file that we’ve downloaded.


10. Extract the .img File with 7Zip
This step is absolutely vital and a problem that I ran into when I tried to install SteamOS for the purpose of this article. For some reason, Valve has put the actual file you need which contains the SteamOS into a .bz2 zip. The reason why we’ve downloaded 7Zip is because this is one of the few programs out of the box that can handle .bz2 files out of the box without any extra hassle. All you need to do here is locate the “steamdeck-recovery-4.img.bz2” file, double click it which will then put you into the zip. Then you click extract, and select the extraction location and wait a couple of minutes while 7Zip does it’s thing. This is an absolutely vital step, please make sure you do this!

11. Using Rufus
Rufus is essentially a bootable drive program. It will turn a .img or .iso file into a bootable drive, which creates a way for the Steam Deck to recognise the operating system. As you’ll see from the image we’ve provided, my USB stick is called “New Volume (E:)”, and my SteamOS file is in my downloads. Rufus normally picks up a USB when you boot up the program, but you’ll want to click the “SELECT” button to point Rufus towards the .img file. Once you’ve done this, you shouldn’t need to click anything else other than start. Let Rufus do it’s business and wait until its finished.

12. Steam Deck Bootloader and Reinstall
We’re finally here, the final step of this entire process. What you’ll want to do, is plug your USB stick into the Deck. Now you’ll want to hold down the power button and the volume down button too. After a couple of seconds you’ll hear a small chime, this is where you let go of the power button, keep holding down the volume down button. After a few more seconds you’ll be granted with the Steam Deck Bootloader.

Here you’ll use the D-pad to navigate to our USB drive that’s plugged into the top, and then click A. You may have to wait a few minutes to boot into the SteamOS recovery especially if your USB drive is a bit slow.
After some time you’ll be greeted with the SteamOS desktop with four icons at the top of the screen. Because we’ve done a ground-up reinstall you’ll want to double click the “Re-image Steam Deck” icon using the trackpad and triggers. This will perform a full factory reset, but it will reinstall the ‘Big Picture’ mode of Steam OS where you’ll need to log in and go through the preliminary setup. And with this done, we’re finished! You’ve officially installed a brand new SSD into the Steam Deck and reinstalled the SteamOS software onto the Deck too.
Video
Here is the full video of our Steam Deck disassembly process. It is worth keeping in mind that there’s no commentary on this one, just the installation process on it’s own. I would recommend consumers and follow the steps that we’ve provided above if you’re unsure of what to do.
![FI_[SR190] HYTE X50 Ryzen 5 9600X & MSI RTX 5070 Ti](https://geekawhat.com/wp-content/uploads/2026/01/FI_SR190-HYTE-X50-Ryzen-5-9600X-MSI-RTX-5070-Ti-551x431.jpg)
![FI_[DP064] ASUS Prime AP303 + 9070XT](https://geekawhat.com/wp-content/uploads/2026/03/FI_DP064-ASUS-Prime-AP303-9070XT-551x431.jpg)
![FI_[DM93] Corsair 3200D Launch](https://geekawhat.com/wp-content/uploads/2026/03/FI_DM93-Corsair-3200D-LAUNCH-551x431.jpg)