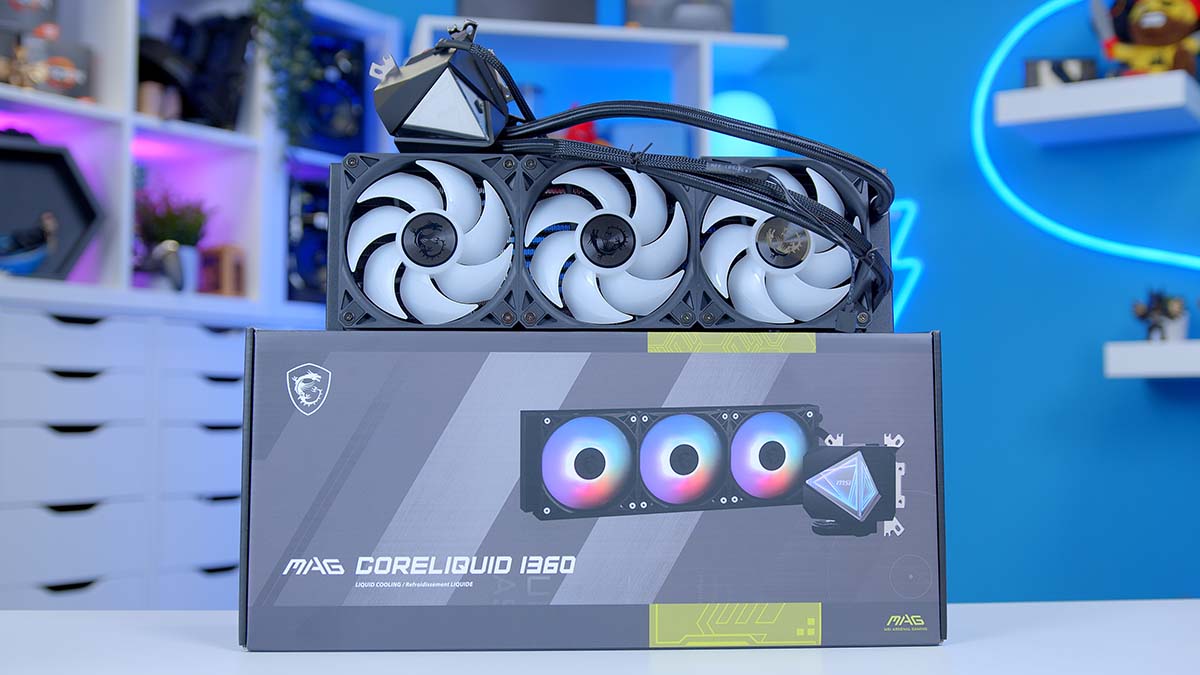
The MSI MAG CoreLiquid I360 is a unique CPU cooler designed to streamline the building process as much as possible. With a universal mounting bracket, pre-installed fans, and a simplified set of cables, this liquid cooler may be the easiest AIO (all-in-one) we’ve built with to date. Furthermore, MSI claims the high-efficiency pump is geared to offer excellent thermals and low noise levels. So, we’ve tested the CoreLiquid I360 in a series of synthetic benchmarks to determine if MSI’s claims are valid.
Building with a liquid CPU cooler can sometimes be a bit of a mixed bag. While some manufacturers have gone to great lengths to keep things straightforward, we have previously reviewed a range of AIOs that make building a PC more of a hassle than an enjoyment. This being said, MSI makes an interesting case for using universal brackets and cabling standards. For this reason, we’ve looked at how the CoreLiquid I360 fares regarding the building process, as this is one of the main selling points of this cooler.
As always, in our CPU cooler reviews, we’ll discuss the specs, design, installation process, thermal performance, and features to see what value this rather exciting liquid CPU cooler offers.
Buy the MSI MAG CoreLiquid I360 on:
Specification
The MSI MAG CoreLiquid I360 is a 360mm liquid cooler with three 120mm I-series fans. Most 360mm liquid coolers have the same dimensions, and the CoreLiquid I360 follows suit. The radiator measures 394mm long, 120mm wide, and 27mm long. Regarding the specs, there’s nothing particularly unique about the radiator. MSI hasn’t noted anything different about the fin stack inside the radiator.

MSI’s “CoreLiquid I” range comes in two sizes, 240mm and 360mm. The 240mm variant shares a similar set of specs to the 360mm version, bar the fact that the radiator is smaller and there’s one less fan. MSI hasn’t confirmed any plans to release a 280mm or 420mm AIO, but based on their current stack of components on the market, we’re not entirely sure we’ll see different sizes hit the shelves anytime soon.
| Key Specs | MSI MAG CoreLiquid I360 |
|---|---|
| Radiator Size | 360mm |
| Radiator Dimensions (L x W x H) | 394mm x 120mm x 27mm |
| Number of Fans | 3 |
| Bearing Type | Loop Dynamic |
| Pump Connector | PWM |
| Max Pump Speed | 3400RPM |
| Socket Compatibility | Intel – LGA 1851, 1700, 1200, 115X, 20XX AMD – AM5, AM4 |
Contrasting to the CoreLiquid E360, the I360 fans use a Loop Dynamic bearing instead of a Fluid Dynamic bearing. These bearings are similar in operation, using a fluid type to lubricate the bearings and shaft. Fluid Dynamic is generally preferred, so many manufacturers have recently used this bearing. However, a Loop Dynamic bearing should have a relatively similar noise profile.
Regarding cabling, MSI has streamlined power and RGB to reduce unnecessary wires. All three fans connect through one cable, which is then plugged into ‘CPU_FAN’. The RGB for the fans has a female connector that plugs into the ARGB cabling from the CPU blockhead. The pump (which uses a 4-pin PWM header) then plugs into ‘PUMP_FAN’.

Regarding socket compatibility, the CoreLiquid I360 supports the latest Intel and AMD processors, including Intel’s rumoured 15th-Gen LGA 1851 socket. It’s good to see next-gen socket support, as new Intel CPUs will likely be released around Q4 of 2024.
On the pricing front, the CoreLiquid I360 looks to be quite affordable. It is priced around £120 in the UK and $149.99 in the US, which I think is a fair ask. Ultimately, whether the price is reasonable comes down to the thermal performance. But overall, I’d say $150 is reasonable for a 360mm AIO. This aligns the CoreLiquid I360 with a cooler like the be quiet! Silent Loop 2 and the CoreLiquid E360.
MSI MAG CoreLiquid I360 Design
The MAG CoreLiquid I360 is somewhat simplistic in design. It is available in white or black. We have the black version, which blends in nicely with other dark components. All of the fans, the radiator, tubing, and wires are all black, providing a consistent look throughout the cooler. It would be nice to see black screws or some covers over the screws, but this isn’t a deal-breaker for us.

The cabling has been streamlined so that the RGB and power headers use a single wire. Firstly, it’s great to see the use of a universal standard, as this makes it easier for builders to plug into a motherboard. Additionally, unifying the fan cables into one is a great feature, as it saves up headers for other fans or additional cooling accessories.
This cooler’s I-series fans light up with RGB. Plugging these into an addressable header on your motherboard allows you to sync up all the lighting effects and colours in your build.

One of the more exciting design elements is the dual-sided infinity mirror on the CPU blockhead. The mirror features a series of polygon shapes that light up with RGB once your PC is powered on. Again, this can be controlled with RGB software, providing a way to customise the overall look.

It’s worth highlighting that the pump cover on the CPU doesn’t move. This can be a valuable feature, as it allows builders to change the orientation of the fly, but the CoreLiquid I360 pump block is supposed to be installed one way.
MSI has also included a cable cover for both sides of the fans. This hides the cables, making your system look much cleaner. This is an excellent attention to detail that we love to see.

From an aesthetic point of view, the CoreLiquid I360 isn’t the most exciting AIO we’ve seen. However, this likely comes down to some potential cost-saving measures, as MSI has provided a range of usability and quality-of-life features that simplify the building experience.
Installation Process
Getting the MSI MAG CoreLiquid I360 installed was straightforward from start to finish. Over the years, many manufacturers have simplified building with liquid CPU coolers, but MSI has gone the extra mile to cater to first-time builders. We assembled this AIO in an AMD PC build, so there are fewer steps than an Intel system.
Builders can choose between two methods for an AMD PC: either remove the AMD socket clips and install some threads or keep the clips on and use the eyelet mounting. In this instance, we decided to use the first method, as it’s much more manageable.

First, remove the mounting hardware box. Inside the box, the hardware is laid out and labelled, and on the back, a QR code leads to instructions.

Remove the AMD socket clips from the motherboard. To do this, loosen the four Phillips screws and lift the clips off. Place these inside the motherboard box, as they may be needed for a future upgrade.
Take the AMD threads and screw them into the posts underneath the AMD clips. Only use thumb strength, as we don’t want to damage the motherboard or the screw holes.

Installing the radiator is very easy as all the fans are pre-installed. Flip the radiator over and push it up to the mounting rails on your case. In this instance, we top-mounted the CPU cooler. With one hand, hold onto the radiator, and use the labelled screws to secure it to the chassis. Don’t over-tighten these, as they could damage the radiator.

Apply a rice-sized grain of thermal paste to the CPU IHS (internal heat spreader), as the cooler doesn’t come with any. Place the CPU blockhead (this is where the pump is located) onto the CPU and locate the thumbscrews from the mounting hardware box.

The CoreLiquid I360 features a universal mounting bracket with AMD and Intel mounting holes, so there’s no reason to uninstall the plate from the blockhead.

Tighten the thumbscrews around the blockhead in a star pattern. Use a screwdriver once the CPU blockhead is slightly secure, continuing to torque the screws in a star pattern to apply even pressure to the CPU.

Finally, plug the 4-pin PWM fan header into ‘CPU_FAN’ and connect the 3-pin RGB header to the male connector wired to the CPU block. Connect the 4-pin PWM pump header to the motherboard’s ‘AIO_PUMP’ pins.
MSI MAG CoreLiquid I360 Performance
All of the CPU coolers we review are used in builds to assess the installation process, and then they are benchmarked inside our testing system to ascertain performance. We do this to gauge how each cooler handles different scenarios, whether gaming or running harder multi-core workloads.
Our benchmarking PC runs a Core i7-14700K with four 140mm fans to maximise airflow. The case is well-ventilated, and the fan/pump speed is set to Turbo in the BIOS. We’ll use software settings where we can, but the MAG CoreLiquid I360 doesn’t have an application to control it. The results below are from Cinebench and CPU-Z, with temperature results collected from HWMonitor, which runs in the background.
Cinebench
In Cinebench, we ran two benchmarks, one at four threads and the other at eight. Four threads give us an idea of how the cooler will perform while gaming and eight threads are indicative of a more challenging multi-core workload.
In the four-thread run, the CoreLiquid I360 held up reasonably well. With an average of 62°C, it is just below its budget counterpart, the E360. The performance didn’t blow us away here, but the thermals are decent amongst the other 360mm options. It maxed out at 70°C, a common theme with most CPU coolers averaging 60-61°C.

At eight threads, the thermals jumped slightly, with the CoreLiquid I360 offering an average of 73°C and a max of 86°C. Again, the performance isn’t ground-breaking. The CoreLiquid I360 performs quite similarly to the E360 and tends to sit in the lower half of the graph compared to other market alternatives.
To play devil’s advocate, the eight-thread run in Cinebench is rather intense and can be pretty volatile, so this might explain the weaker temperatures. Overall, I’d say the averages so far are acceptable.

CPU-Z
We fired up CPU-Z next, which puts a consistent load on the CPU. This is often used to show stability with higher core and thread counts. In this benchmark, we’re seeing pretty similar performance to the results in Cinebench.
On average, the CoreLiquid I360 held the Core i7-14700K at 72°C, while the max temperature closed out at 80°C. The CoreLiquid I360 is much better positioned in this benchmark, sitting between the DeepCool MYSTIQUE 360 and the HYTE THICC Q60.

The CoreLiquid I360 isn’t the best liquid CPU cooler for performance, but that isn’t to say that the thermals were terrible. This AIO performed averagely and kept the CPU away from dangerous temps, but the thermals weren’t the coolest compared to other radiators.
Features We Like
Streamlined Cable Design
We appreciate the feature of simplifying cable management, as it saves an incredible amount of hassle. Cable management is often the bane of most PC builds, so having fewer cables to deal with is a feature we’d love to see more of on other CPU coolers.

Unified Mounting Plate
If we use a cooler twice in separate AMD and Intel builds, one element of hassle we often experience is having to change out the mounting hardware. However, MSI has alleviated some of this stress by using a universal mounting plate.
This means that when securing the blockhead to the motherboard, we don’t have to switch out the brackets based on whether we’re building an AMD or Intel PC. This also minimises the risk of losing mounting hardware, which is a possibility if you’re constantly upgrading.

First-time builders may find distinguishing between AMD and Intel mounting hardware challenging, primarily because they look similar. Streamlining the number of plates used reduces errors when installing an AIO.
Features We Don’t Like
Doesn’t Need Two AMD Mounting Styles
I think including two different mounting styles for AMD is an odd choice. While it offers versatility, it won’t be evident for first-time PC builders when both mounting methods will work.

Conclusion
MSI MAG CoreLiquid I360

Product Name: MAG CoreLiquid I360
Brand: MSI
-
Features
-
Design
-
Performance
-
Value For Money
Summary
The MSI MAG CoreLiquid I360 is an incredibly unique liquid CPU cooler. While it isn’t the best option for thermals, it offers prospective buyers an extremely unique design that streamlines the building process, eliminating hassle. The universal mounting plate alleviates the confusion of picking up specific mounting hardware, which is accurately and clearly labelled in the accessories box. Additionally, the CoreLiquid I360 offers a simple cable design that frees up headers on your motherboard and makes it incredibly easy to get plugged in. This cooler is incredibly innovative, and I’m a massive fan of its design.
The only major caveat to consider is the performance. While you can leverage a design that makes building a PC much simpler, this cooler’s thermal capability isn’t ground-breaking. Across our testing, it doesn’t really blow any other 360mm options out of the water, and there’s nothing astonishing about how it held up in four-thread and eight-thread benchmarks. Despite this, the CoreLiquid I360 is a CPU cooler we highly recommend based on its unique design qualities.
Pros
✅ Relatively affordable
✅ Easy to build with
✅ Streamlined cabling
Cons
❌ Simple aesthetic
❌ Dual-AMD mounting hardware
❌ Average thermals
![FI_[SR190] HYTE X50 Ryzen 5 9600X & MSI RTX 5070 Ti](https://geekawhat.com/wp-content/uploads/2026/01/FI_SR190-HYTE-X50-Ryzen-5-9600X-MSI-RTX-5070-Ti-551x431.jpg)