The AMD Radeon RX 9070 XT is an incredibly powerful graphics card capable of outpacing the NVIDIA GeForce RTX 5070 Ti at 1440p and 4K. Since its arrival, the RX 9070 XT has been incredibly popular, so it makes perfect sense to assemble a gorgeous but highly capable gaming PC with this graphics card.
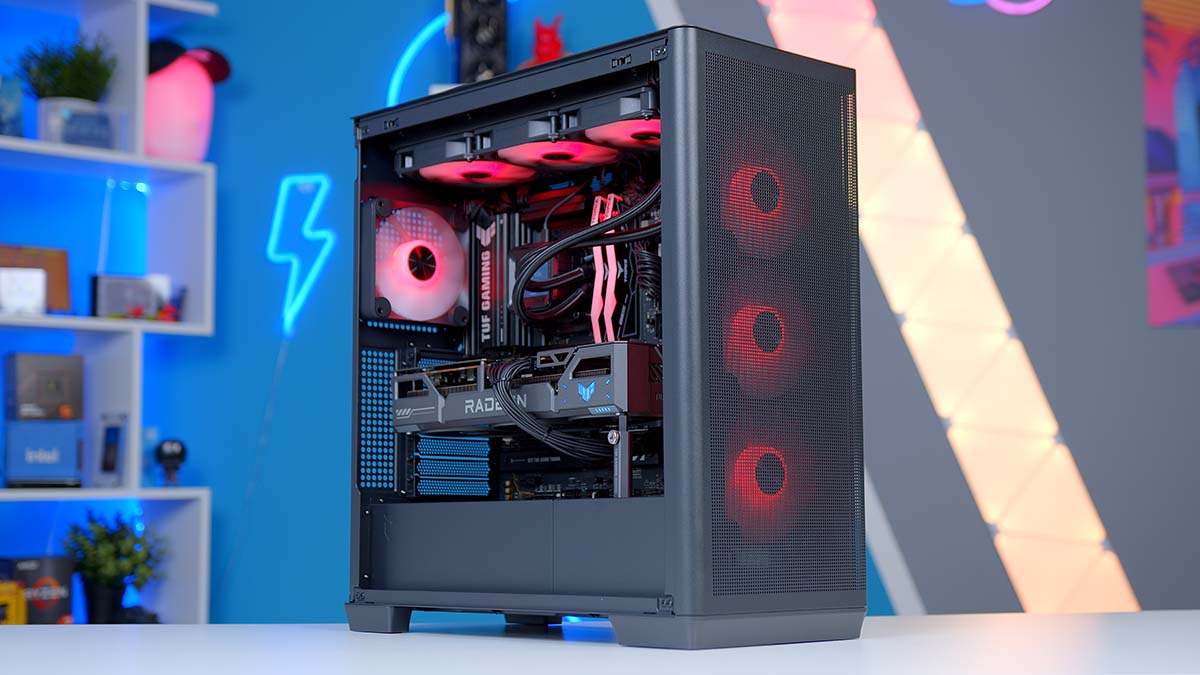
We’ve allocated a budget of $1600, which is more than ample for a gaming PC of this calibre. This system is housed inside the APNX C1-R, a black chassis focused on ventilation to promote good airflow and thermals. It also offers a tempered glass panel to view the components inside.
For the graphics card, this build features an ASUS TUF Gaming RX 9070 XT, alongside the AMD Ryzen 5 9600X and an ASUS Prime LC 360 ARGB LCD to ensure the CPU stays nice and cool.
In this build guide article, we’ll delve into the build process from start to finish, sharing our thoughts on each component with some benchmarks towards the end!
Build Process
Step 1: Socketing the CPU
The first part in this PC build guide is the AMD Ryzen 5 9600X. This is the Ryzen 9000 version of the highly popular Ryzen 5 7600X, which we’ve previously covered in several different build writeups and YouTube videos. Like its previous generation counterpart, the Ryzen 5 9600X has the edge in single-core applications and games due to its exceptional boost clock speed and low power budget. Because it consumes little power, it can sustain its 5.4GHz boost speed in modern games, making it an excellent pickup for 4K or 1440p with the right graphics card.

While the Ryzen 5 9600X offers excellent performance and efficiency, it’s worth noting that it is one of the more affordable options. At the time of writing, it’s available for nearly $200, making it a great pickup for those restricted by a budget.
To install this processor, we recommend removing the TUF Gaming B850-Plus WiFi motherboard from the box and placing the board on top. The box is a sturdy surface to work on, but it’s not so rigid that it will damage the board.

Next, unhook the latch from the CPU socket and lift the socket cover, exposing the pins. Pick up your CPU by the edges and locate the arrow pointing to the top left. This indicates the correct way to orient the CPU. Locate the same arrow on the board and slowly lower the Ryzen 5 9600X into the socket until it drops into place. I recommend giving it a little wiggle to ensure it’s seated correctly.

Lower the socket cover, and push the latch underneath the small hook located next to the socket. While this is happening, the small plastic protector on top will pop off. Keep this in case it’s needed for a future RMA or return.

The motherboard we’ve just installed the CPU into is the ASUS TUF Gaming B850-Plus WiFi. This industrial-themed ASUS motherboard has a strong set of expansion and connectivity options. It offers a PCI-E 5.0 graphics card slot, WiFi 7 and 2.5 Gigabit networking, alongside a range of high-speed USB-A and USB-C ports for those with plenty of peripherals or external devices.

Step 2: Seating the RAM
The next step is to get the RAM seated correctly, for which we’ve chosen the TeamGroup T-Force Delta kit for this build. We’ve used this set of memory in the past, as it’s affordable and offers solid and reliable performance for gaming. It offers a speed of 6400MT/s while latency is clocked in at CL40. Ultimately, we’d love to pick a lower latency kit, but CL40 will be absolutely fine for gaming.

To properly install this RAM, first push down on the tabs at the top of slots two and four on the motherboard. We’re using these slots because they provide the most efficient configuration when you only have two DIMMs.

After this, line up one of the RAM sticks with slot two on the motherboard (it can only go in one way). Then, apply even pressure to both sides of the DIMM and push down firmly until you hear a click. This indicates that the RAM is seated in the slot. Apply the same logic to install the second RAM stick.

Step 3: Mounting the SSD
For storage, we’ve picked out a solid Gen4 drive, the MP44L from TeamGroup. Again, this is another component you’ll likely be familiar with if you’ve followed our content over the past few years. This is a reliable Gen4 SSD with read speeds up to 5000MB/s, while writes sit around 4500MB/s. This Gen4 drive is an excellent choice for gaming, and its 2TB capacity allows you plenty of space for a range of modern titles.

Like the RAM, installing this Gen4 SSD is incredibly straightforward, which is great to see. First off, grab a small Phillips screwdriver and loosen the two screws holding the primary SSD heatsink in place. Once these have been loosened, pull the heatsink off the motherboard.

Then, place the TeamGroup MP44L SSD into the slot. The drive can only go in one way, and all that’s required is a firm push. Once the drive is in place, it will poke out at a 45-degree angle. You need to hold onto the drive so it doesn’t sustain any damage at this angle.

Lastly, push the SSD down into the slot and use the latch to lock it in place. You may want to push the latch down slightly, and it will secure the MP44L inside the slot. Then remove the tape covering the thermal pad on the heatsink, place the heatsink on the drive and tighten the screws you loosened earlier to attach the heatsink to the board.

Step 3.5: Attach the Cooler Mounting Hardware
Before getting the motherboard into the case, we can install some of the mounting hardware on the board, instead of doing it inside a fairly cramped chassis. This will save us some time and effort when installing the cooler later on. First, unscrew the four Phillips head screws around the CPU socket and then pull off the plastic covers which will reveal the posts underneath.

After this, take the AMD mounting bracket from the cooler accessories box and place them over the posts and screw them in place. These are used to mount the CPU block to the processor, which we’ll do later on.

Step 4: Place the Motherboard into the Case
The case we’ve picked out for this build is the APNX C1-R. The C1-R is a refreshed version of the original C1, which offers more space for modern builds, support for reverse connector motherboards, and up to eleven fans. There’s also a huge amount of ventilation around the case, offering strong airflow to maintain great thermals. Overall, the APNX C1-R is a versatile case and a great pickup for this build.

In this step, we’ll be installing our motherboard inside the case. To do this, first locate the box of case accessories. This contains all of the accessories that we need to install the motherboard. Take out nine of the motherboard screws and attach one to your screwdriver. While the case is standing up, use one hand to hold the motherboard up to the standoffs, and use the other to screw it down. I recommend picking the top middle or centre middle hole first to balance out the board. Then, use the rest to secure it fully.
It is worth noting that you can do this while the case is lying flat, which some may prefer. However, I find that standing up and installing the motherboard is a more straightforward method and saves a bit of time.

Step 5: CPU Cooler Install
The liquid CPU cooler going into this gorgeous RX 9070 XT system is the ASUS Prime LC 360 ARGB LCD. We’ve looked at this AIO (all-in-one) in a dedicated review on our website, and generally speaking, we were pretty impressed. Despite being more of a budget cooler, the Prime LC offers decent performance comparable to the Corsair Nautilus 360 RS and ROG STRIX LC III, both pricier coolers. It can easily handle single and multi-core tasks, and offers a unique LCD to show temperatures and system information.

For the installation, remove the radiator, fans and pump from the box. Fortunately, ASUS has done some of the work for us and pre-installed the fans on the radiator, saving us a step, so all we need to do is mount it to the case and CPU.

We recommend untying the cables and threading them through the back of the case first. Then, locate the case mounting screws. With one hand, hold onto the radiator, pushing it up towards the top of the case, and then use your free hand to secure it with the screws. Put one in each corner first while still holding on to the radiator, and then you can let go as the weight is being supported. Fill in the rest of these screws making sure not to overtighten.

Next, we’ll attach the CPU block. Place the blockhead onto the CPU, lining up the pump with the four posts on the bracket we installed earlier. Then use the spring-loaded screws to secure it in place. Tighten the screws in a star pattern to apply equal pressure to each corner, again making sure not to over-tighten. After this, plug the pump into ‘CPU_Fan’ and the CPU cooler fans to ‘CPU_Opt’ or an appropriate splitter, depending on what you’re using.

Step 6: Power Supply Mounting & Cable Management
If you haven’t already, now is a perfect time to start doing some cable management. We advise beginning with the CPU cooler and fans, getting these nice and tidy, along with the front panel cables. Plugging in front panel cables now allows you to manage them alongside any fan wires, finishing up with the PSU power cables, which tend to be the most cumbersome.
The power supply we’re installing into this build is the ASUS TUF Gaming 750W Gold unit. We’ve recommended this power supply across various buyer’s guides and PC builds because it is incredibly reliable and highly affordable. It offers an 80 Plus Gold efficiency rating, a fully modular cabling system allowing you to pick and choose exactly what you need, and is ATX 3.0 certified, so it can handle high-power excursions.

Before getting the power supply into the case, we must pick out the cables needed for this build and get them plugged in. For this system, you’ll need two 8-pin EPS CPU power cables, one 24-pin motherboard power cable, one SATA power cable, and three 8-pin PCI-E power cables. Once you’ve plugged all of these in, you’ll need to remove the faceplate from the back of the case, and screw it into the power supply.

Once the faceplate is installed, slide the power supply into the back of the case and use the thumbscrews to secure it in place. A screwdriver isn’t needed for this.

Lastly, we’ll plug in all of the cables. Motherboard power is the largest and easiest to install, followed by SATA and CPU power. Get all these plugged in and cable managed so they’re clean and tidy.

Step 7: GPU Install & Power On
The final component of this build is, of course, the graphics card. The AMD Radeon RX 9070 XT, specifically the TUF Gaming OC version, drives all of the graphical power in this build. The TUF variant offers a balance of form and function, with a dark grey shroud, some RGB lighting, and a triple-fan shroud that offers great thermals.
Performance-wise, the RX 9070 XT is highly capable at 1440p and 4K, offering great framerates in modern games, even with ray tracing switched on in certain titles. This card is an excellent competitor to the NVIDIA GeForce RTX 5070 Ti and considerably cheaper in comparison.

To correctly install the graphics card, we first need to remove the PCI-E covers at the back of the case. This is a two-slot graphics card, so unscrew PCI-E covers two and three, which will be enough space for this card.

Then, line up the graphics card with the main GPU slot at the top of the motherboard, give it a firm push, and you’ll hear the card click into place, indicating it’s correctly seated. As a sanity check, you’ll know the card is correctly installed because the security clip will be up instead of pushed down. Use the screws you removed from the PCI-E covers to secure the card to the case. Then plug in the three PCI-E cables that we installed into the power supply earlier.

After this, do your final checks to ensure everything is plugged in correctly. Then, put the panels back on, plug in power, a monitor, and your favourite peripherals, and switch on your build!
Performance
Framerates in Hogwarts Legacy and Alan Wake II were pretty solid, with averages of 91FPS and 60FPS, respectively. Despite both games being quite intense, the RX 9070 XT is showing its prowess at 4K.
The strong performance continued in our Esports benchmarks. Fortnite and Apex Legends saw excellent framerates, with 130FPS and 292FPS, respectively.
Gallery


![FI_[SR190] HYTE X50 Ryzen 5 9600X & MSI RTX 5070 Ti](https://geekawhat.com/wp-content/uploads/2026/01/FI_SR190-HYTE-X50-Ryzen-5-9600X-MSI-RTX-5070-Ti-551x431.jpg)
![FI_[DP064] ASUS Prime AP303 + 9070XT](https://geekawhat.com/wp-content/uploads/2026/03/FI_DP064-ASUS-Prime-AP303-9070XT-551x431.jpg)
![FI_[DM93] Corsair 3200D Launch](https://geekawhat.com/wp-content/uploads/2026/03/FI_DM93-Corsair-3200D-LAUNCH-551x431.jpg)