Sticking to a budget of $1200 when building a gaming PC can be challenging. While there are many solid components on the market, finding the best parts that don’t soar past the $1200 price point isn’t the most straightforward task for first-time builders and those who haven’t upgraded in a while.
However, in this PC-building guide, we’ve done all the hard work for you and picked the best components for the ultimate $1200 gaming PC. This system pairs up the AMD Ryzen 5 7600 with an RX 7800 XT graphics card, bringing excellent performance at 1440p.
Per all of our PC build guides, we’ll explore the assembly and installation process and show how the components fit together. We’ve also shared our thoughts on part selection, delving into why they fit this PC build. This guide has been written alongside a dedicated YouTube video we recommend following.
Build Process
Step 1: Socket the CPU
The first part we’ll be installing is the CPU. While this step in the building process may seem daunting initially, it is one of the easiest. The processor we’ve opted for in this particular system is the AMD Ryzen 5 7600. This CPU has seen significant usage across a wide range of budget-oriented systems that we’ve put together due to its exceptional performance in modern games.

The main benefit of this particular processor is that due to its low power budget, it can consistently maintain its boost clock speed of 5.1GHz. This means the number of game instructions is handled incredibly quickly, resulting in excellent performance at 1080, 1440p, and 4K when paired with the right graphics card. Furthermore, at a sub-$200 price point (at the time of writing), the Ryzen 5 7600 offers exceptional value compared to market alternatives.
To install this CPU, first remove the motherboard from its box and lay it on top. This will provide a solid and smooth surface to work on that won’t damage any pins on the underside of the board. Locate the metal retention arm next to the CPU socket and unhook it. This will release the tension from the socket cover, which can be lifted afterwards.

Find the golden arrow on the CPU, typically located at the top right of the processor. There is a matching arrow on the motherboard. Line both of these up and then lower the CPU into the socket. It doesn’t require force and will slot into place with no additional movement required.

Now that the CPU is socketed correctly lower the cover and push the metal retention arm back underneath its hook. The arm holds the socket cover in place with a fair amount of tension, so it does take some force to get it underneath the hook again. While this happens, the plastic protector on the cover will pop off. Keep this for a potential RMA or future repair, as the manufacturer may need it.

The motherboard we’ve just installed the CPU into is the Gigabyte B650 Eagle AX. Again, this part has seen plenty of usage in many of our cheaper PC builds as it offers a great set of features at a competitive price. This board supports overclocking up to 7600MT/s, with a max capacity of 192GB DDR5 memory. Regarding expansion, the B650 Eagle AX has space for a Gen5 SSD, two additional Gen4 slots, and has a PCI-E 4.0 graphics card slot.
| Specification | Gigabyte B650 EAGLE AX |
|---|---|
| Form Factor | ATX |
| Supported Memory | 192GB DDR5 7600MT/s |
| PCI-E x16 Slots | 1 x PCI-E 4.0 |
| PCI-E x4 Slots | 1 x PCI-E 5.0 2 x PCI-E 4.0 |
| Front IO | 1 x USB 3.2 Gen1 1 x USB 3.2 Gen1 Type-C 3 x USB 2.0 |
| Rear IO | 2 x USB 3.2 Gen2 Type-A 1 x USB 3.2 Gen1 Type-C 6 x USB 2.0 |
| Audio | 3 x Audio Jacks |
| Networking | WiFi 6E Gigabit LAN |
The B650 Eagle AX also features two USB 3.2 Gen2 Type-A ports, one USB 3.2 Gen1 Type-C port, and six USB 2.0 ports. Although it would be great to see some more high-speed options, these ports will suffice for most gamers. For networking, gamers can choose WiFi 6E or Gigabit LAN for those who prefer a wired setup.

Step 2: Slot in the RAM
The RAM we’ve picked for this $1200 gaming PC build is the Corsair Vengeance DDR5 RGB 32GB 6400MT/s CL36 kit. DDR5 RAM is much more affordable than it used to be, so building an AMD Ryzen 7000 PC is much more achievable on a budget. This Corsair set of DIMMs stood out to us primarily due to its competitive price point.

However, this Corsair Vengeance RAM also offers solid performance. With a 6400MT/s transfer speed and CL36 latency, this kit is ample for 1440p gaming. It also provides a black heat spreader and RGB strip on top of each stick, which helps it match the darker aesthetic of the build.
To install this RAM correctly on the motherboard, we must first push down the tabs at the top and bottom of RAM slots two and four. We’re using these particular slots because this is the most robust configuration for those with only two DIMMs.

Take one of the RAM sticks and line it up with the second slot on the B650 Eagle AX motherboard. They can only go in one way, so ensure that the RAM is correctly oriented. Then, apply even pressure to both sides of the DIMM and push it down into the slot. The RAM will click into place, indicating that it is seated properly. Do this again for the second stick.

Step 3: Mounting the SSD
Storing all of our games and operating system is the Crucial P3 Plus. Based on their pricing, Gen4 storage is the go-to choice for most PC builders, especially for budget systems. The market has reached a point where Gen4 drives are available at incredibly competitive prices. This means picking up a drive like the Crucial P3 Plus saves us money for other parts like the graphics card.

The Crucial P3 Plus is an excellent fit for this PC build due to its reliability and outstanding performance. While we’d typically choose a 2TB drive for longevity, this 1TB iteration is more than enough to house a good selection of games, the Windows operating system, and any other applications we need to install. Furthermore, the high read and write speeds ensure that boot and game loading times will be fast.

To install this drive, the heatsink SSD must be taken off the motherboard first. To do this, take a small Phillips screwdriver and loosen the screw that secures the heatsink in place. After this, take the heatsink off the motherboard and remove the tape that covers the thermal pads on the heatsink and underneath the drive slot. These provide better heat dissipation for the drive.

Insert the Crucial P3 Plus into the M.2 drive slot. It will poke out at a 45-degree angle until it’s fully tightened down. Using the M.2 screw that comes with the drive, secure the Crucial P3 Plus to the standoff. Then place the heatsink back on top and screw it down.

Step 4: Securing the CPU Cooler
The CPU cooler is the final part that can be installed onto the motherboard outside of the case. In this configuration, the Vetroo V5 stood out as a solid pickup. The main reason for choosing the Vetroo V5 was because it is a highly affordable option. Priced around the $30 mark, this is one of the cheapest air tower coolers on the market, and across our testing, it’s able to compete with other solid air coolers like the DeepCool AG400 and AK400 ranges.

Furthermore, due to the low power draw of the AMD Ryzen 5 7600, the Vetroo V5 is more than ample for keeping our chosen CPU nice and cool. It’s also worth noting that the Vetroo V5 is RGB, adding some extra lighting and spicing up the look of the build.
Remove the plastic AMD clips around the CPU socket for the first step. These are held in place with four screws, and the posts underneath are what the Vetroo V5 mounts to. Loosen the screws, and keep the clips in case they’re needed for an upgrade in the future.

Flip the Vetroo V5 upside down and locate the two pieces of AMD mounting hardware. These brackets are much straighter and point up and down instead of diagonally. With the mounting screws, secure these brackets to the cooler. The spring-loaded screws will point upwards while the cooler is flipped. That’s how you know the brackets are installed correctly.
Grab some thermal paste and squeeze a grain-sized blob onto the CPU’s IHS (internal heat spreader). The Vetroo V5 doesn’t come with any, so we must add our own.

Place the Vetroo V5 air tower cooler onto the CPU lining up the spring-loaded screws with the posts on the motherboard. Tighten these down with a Phillips screwdriver.

Top Tip: We recommend tightening the screws in a star pattern. Start with one of the screws, tighten this, move diagonally to the next screw, then go up or down to tighten the third screw, and move diagonally again for the last one. Repeat this until all of the screws are tight.
Step 5: Place the Motherboard Inside the Case
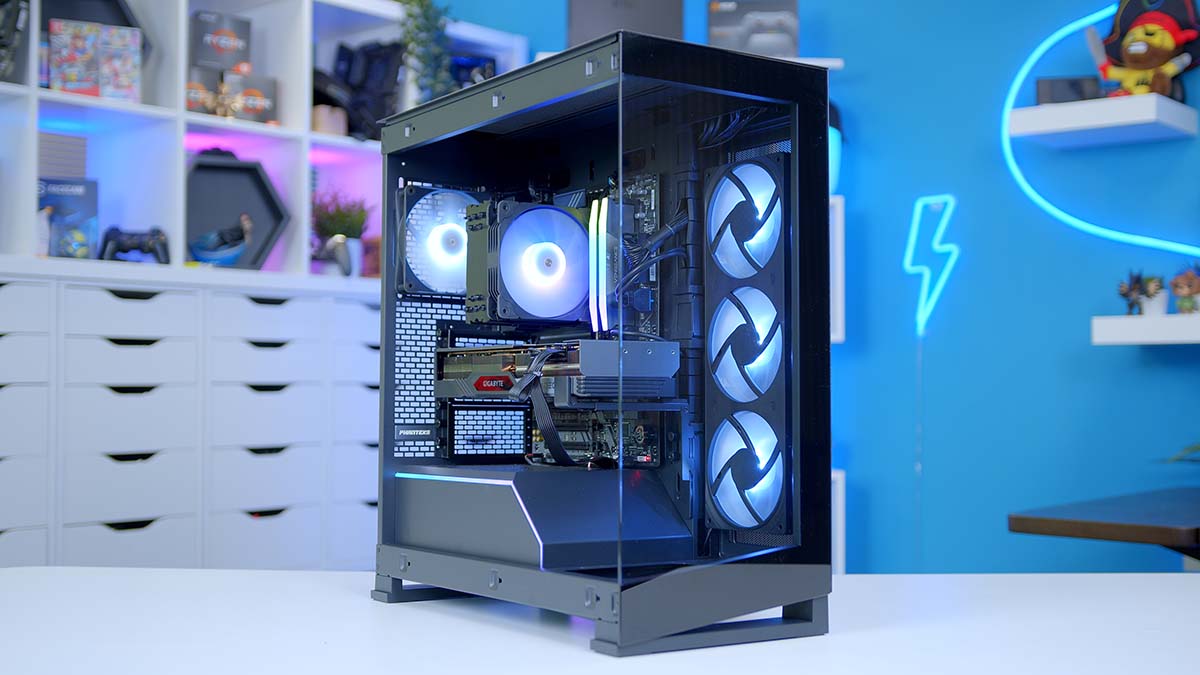
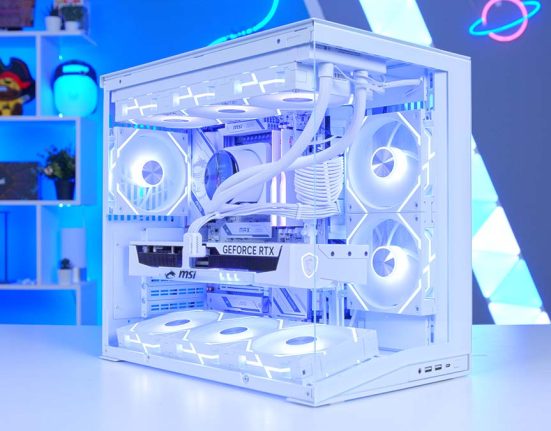
Up to this point, we’ve installed everything outside the case, so it’s time to install the motherboard inside the chassis housing all the parts. The Phanteks NV5 makes a return for this build guide, as it is a case that offers exceptional value. This chassis reviewed very well in our dedicated article due to its solid build quality, gorgeous design, and competitive pricing.

Immediately, the Phanteks NV5 case stands out due to its excellent aesthetic. The dual-tempered glass approach provides a seamless window into the build, and the RGB strip on the PSU shroud lights up the case’s internals. Furthermore, the Phanteks NV5 has tremendous space for various components, including mounting a 360mm liquid cooler on the top and side panel and 440mm of GPU clearance for large graphics cards.
| Specification | Phanteks NV5 |
|---|---|
| Form Factor | Mid-Tower |
| Motherboard Support | Mini-ITX, Micro-ATX, ATX, E-ATX |
| Case Dimensions (L x W x H) | 528mm x 239mm x 477mm |
| Front IO | 1 x USB 3.2 Gen2 Type-C 2 x USB 3.0 Type-A 1 x 3.5mm Combo Jack |
| PCI-E Slots | 7 + 3 (vertical) |
| Colour | Black White |
| Max Clearance | 180mm Cooler Height 440mm GPU Length 230mm PSU Length |
| Drive Support | Up to 4 x 2.5 inch Up to 3 x 3.5 inch |
| Fan Support | Top: 3 x 120mm Side: 3 x 120mm Rear: 1 x 120mm Bottom: 1 x 120mm |
| Radiator Support | Top: Up to 360mm Side: Up to 360mm Rear: Up to 120mm |
| Pre-Installed Fans | 0 |
To prepare this case for the motherboard installation, remove the front and glass side panels and lay the chassis flat. It’s much easier to install a motherboard in a case laid flat, as this minimises the risk of dropping the board.

Place the Gigabyte B650 Eagle AX inside the Phanteks NV5 and align the integrated IO shield on the board with the cutout at the top left of the case. Using the screws found in the case accessories box, secure the board to the standoffs. Don’t over-tighten these screws, as this can risk damaging the motherboard.

Step 6: Installing Fans
After securing the motherboard, we decided to install some fans. Unfortunately, the Phanteks NV5 does not have fans pre-installed, so we had to supply our own set. For this build, we used an F360RGB Core unit of fans on the side and an F120GB core fan at the rear.

To install the side fans, remove the back panel of the case, push the unit of fans up to the panel and screw them in. Ensure the fans are oriented so that the cables are easy to access and plug in.

For the rear fan, apply the same logic. Push the fan up to the mounting holes on the rear panel and screw it down using the included screws found inside the box.

Step 7: Installing the Graphics Card
Next is the graphics card, of which we’ve chosen the AMD Radeon RX 7800 XT. This card is a mainstay of our budget and mid-range PC builds due to its solid 1440p gaming performance and affordable pricing. The RX 7800 XT comes with 16GB of GDDR6 VRAM on a 256-bit memory bus, so there’s plenty of bandwidth. Due to some price drops, the RX 7800 XT can also be picked up for less than $500, which is reasonable considering the performance on offer.

We’ve opted for the Gigabyte Gaming OC card in this $1200 build configuration. This version is an MSRP card and has seen a few price drops, putting it below the $500 mark at the time of writing. It features a triple-fan shroud, keeping thermals down, and its boost clock speed is slightly enhanced, providing minor performance improvements.
| Specification | Gigabyte RX 7800 XT Gaming OC |
|---|---|
| Video Memory | 16GB GDDR6 |
| Memory Bus | 256-Bit |
| Core Clock Speed | 1.29GHz |
| Boost Clock Speed | 2.56GHz |
| Stream Processors | 3840 |
| Ray Accelerators | 60 |
| Compute Units | 60 |
| Power Consumption | 263W |
| GPU Length | 302mm |
First, remove the PCI-E covers at the back of the case. The Gigabyte RX 7800 XT Gaming OC is a 2.5-slot card, so we only need to remove covers two and three. Remove these and place the screws to one side for the moment.

Line up the RX 7800 XT with the graphics card slot on the motherboard and firmly push it into the slot. It’s easy to tell that the graphics card has been secured as you’ll hear a click sound (similar to the RAM installation). Once the GPU is in the slot, use the screws removed from the PCI-E covers to secure it to the case, alleviating sag.

Step 8: Securing the PSU
The final component that needs to be installed is the Corsair RM750e power supply. This 750W power supply supports the ATX 3.0 standard and has an 80 Plus Gold efficiency rating, minimising any extra power that could be lost as heat or noise.

The Corsair RM750e is slightly pricier than what we’d typically choose. However, by selecting a solid unit to power this build, we ensure it will last for plenty of time and offer longevity for future upgrades.
Before securing this inside the case, we must pick out the cables required for this system. The cables needed for this build are a 24-pin motherboard cable, an 8-pin EPS CPU cable, and two 8-pin PCI-E graphics card cables. Plug all these in and give the wires a firm tug to ensure they’re secure.

Slide the power supply into the PSU shroud at the back of the case. Then, use the hexagonal screws to secure it to the chassis. Don’t use any other screws, as they could damage the threads on the power supply, which will make future upgrades challenging.

Now, we can start wiring up the power cables in this build. Only three power cables need to be plugged in, and we always recommend starting with motherboard power. This cable has a long rectangular connector that can only go one way. The header is usually located on the right side of the motherboard.

The Gigabyte B650 Eagle AX only has one CPU power header, so we need to plug in one cable. Thread this through to the top of the case and push the cable to ensure the clips are engaged.

The last cable is for the graphics card. The RX 7800 XT has two headers, so plug these in. Again, these can only go in one way, so there’s no risk of plugging them incorrectly.

Step 9: Front Panel Wires & Power On
Continuing with the wiring theme, we’ll take this opportunity to plug in the rest of the cables for this build. The front panel wires power the build and provide data/power for the ports at the front of the chassis. The Phanteks NV5 has one JFP1 power header, a HD_Audio header, a USB 3.0 header, and a USB Type-C header.
JFP1 is required for the power button on the case. The JFP1 and HD_Audio headers are pretty similar in that they have a blocked-out pin. Get both of these wired up. JFP1 is generally located at the bottom right, while HD_Audio is closer to the left side.

USB 3 and USB-C are usually underneath the motherboard power connector. Because they are both notched, they can only be plugged in one way.

Finally, take this opportunity to re-wire and manage any cables so they’re neat. Because we know all of our component clearances, it’s much easier to work around the parts in the build and clean up the wires. Once this is done, put on the panels, plug in peripherals and a monitor, and switch on the build.
Performance
Framerates reached 94FPS in Starfield and rose past 132FPS in Alan Wake II. The AMD Radeon RX 7800 XT offers strong rasterised gameplay, which explains why we’re seeing smooth framerates in such demanding titles.
The strong performance continued through to the Esports games. Fortnite and Apex Legends saw great metrics, with 384FPS and 275FPS, respectively.
Gallery


![FI_[SR190] HYTE X50 Ryzen 5 9600X & MSI RTX 5070 Ti](https://geekawhat.com/wp-content/uploads/2026/01/FI_SR190-HYTE-X50-Ryzen-5-9600X-MSI-RTX-5070-Ti-551x431.jpg)
![FI_[DP064] ASUS Prime AP303 + 9070XT](https://geekawhat.com/wp-content/uploads/2026/03/FI_DP064-ASUS-Prime-AP303-9070XT-551x431.jpg)