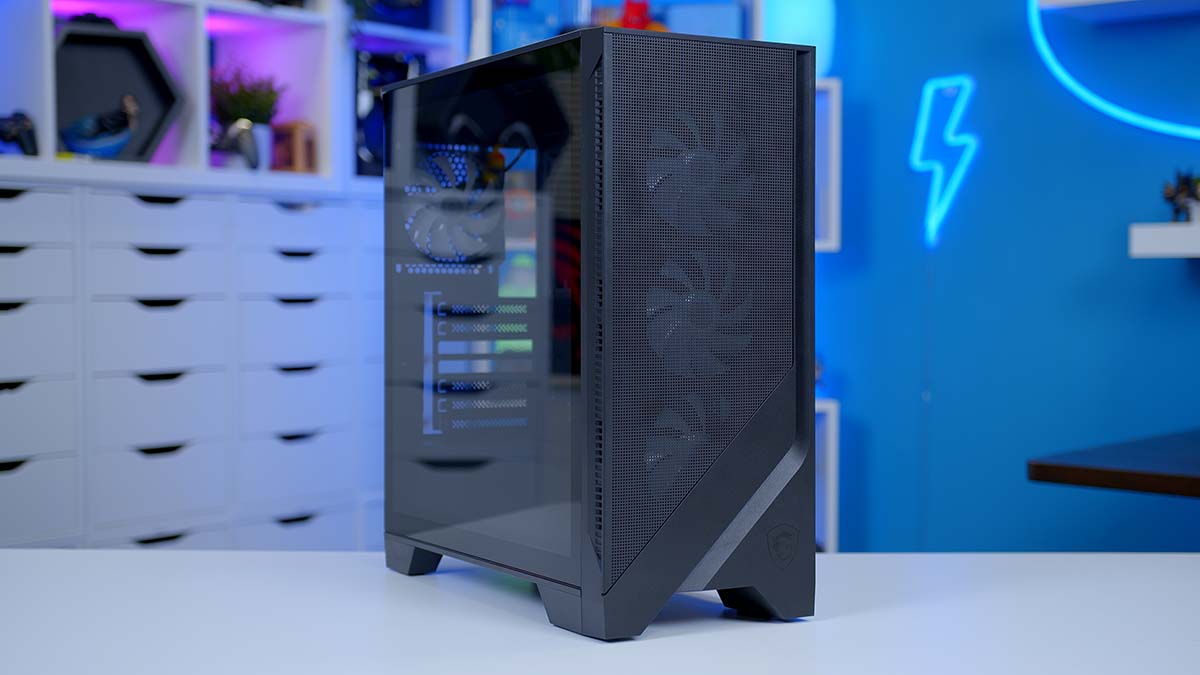
The MSI MAG Forge 320R is an affordable PC case with a high-airflow front panel and a tempered glass side panel to showcase all your components. This mid-tower chassis offers extensive support for various parts and has four pre-installed ARGB fans to help you get started. However, a massive range of affordable cases is already on the market, which means the MAG Forge 320R is up against tough competition. That’s why we’ve put the MAG Forge 320R through a series of tests and analyses to determine whether it’s a worthwhile pickup.
Despite the competition, the MAG Forge 320R is an interesting proposition. The case market has somewhat shifted away from mesh designs, favouring fish-tank-style cases. And while fish-tank cases look good, airflow can often be problematic due to a lack of ventilation. For this reason, the MAG Forge poses decent value, especially due to its affordable price point.
This review thoroughly examines the MSI MAG Forge 320R case, discussing the specs, design, build quality, and features to determine whether this is a solid pickup.
Buy the MSI MAG Forge 320R on:
Specification
Taking a look at the specs of the MAG Forge 320R, this is a compact mid-tower chassis. It can house ATX motherboards and has space for Micro-ATX and Mini-ITX boards. In the build we put together with this chassis, we opted for a full-size ATX motherboard to flesh out and properly use the internal space. While the MAG Forge 320R’s height lines up with most other mid-tower cases, it isn’t as wide, making it much easier to slip under a desk or into a cubby hole.
This chassis comes equipped with seven PCI-E covers on the back, which is typical of similar cases. The front IO is a bit weaker, with only two USB 3.2 Gen1 Type-A ports, alongside separate 3.5mm audio jacks for a microphone and pair of headphones. Ultimately, I’d like to see more USB ports. An extra USB-C option would bump up the value of this case, allowing gamers to easily plug in peripherals without having to fiddle around with the rear IO.

The MAG Forge 320R comes in the standard black and white colour options, affecting the mesh’s colour at the front. Our build featured the black version, which is also what we’ll be reviewing today, but it’s good to see alternative lighter-themed cases for those going for a different setup style.
In terms of clearances, the MSI MAG Forge 320R accommodates CPU air coolers up to 160mm tall. This means you’ll be limited to slightly smaller air tower coolers like the Cooler Master Hyper 212 Halo or the Vetroo V5. Options like the DeepCool Assassin IV are too big to squeeze into this case. There’s room for graphics cards up to 390mm long, which is ample clearance for most modern cards. Installing a radiator at the front may cause issues if you’ve got a larger card, but there’s a surprising amount of internal space that the Forge 320R offers.
| Specification | MSI MAG Forge 320R |
|---|---|
| Form Factor | Mid-Tower |
| Motherboard Support | Mini-ITX, Micro-ATX, ATX |
| Case Dimensions (L x W x H) | 473mm x 210mm x 498mm |
| Front IO | 2 x USB 3.2 Gen1 Type-A 1 x 3.5mm Microphone-In 1 x 3.5mm Audio-Out |
| PCI-E Slots | 7 |
| Colour | Black White |
| Max Clearance | 160mm Cooler Height 390mm GPU Length 200mm PSU Length |
| Drive Support | Up to 3 x 2.5 inch Up to 2 x 3.5 inch |
| Fan Support | Front: 3 x 120mm Top: 3 x 120mm Side: 2 x 120mm Rear: 1 x 120mm PSU Shroud: 2 x 120mm |
| Radiator Support | Front: Up to 240mm Top: Up to 360mm Rear: Up to 120mm |
| Pre-Installed Fans | 4 x 120mm |
Those looking to improve airflow and thermals by adding more fans have plenty of space to play around with. The MAG Forge 320R supports up to eleven 120mm fans, four of which are blocked out by pre-installed models (three at the front and one at the rear). Radiator support is weaker in comparison, with room for a 360mm rad at the top or a 240mm at the front, which, as mentioned earlier, will entirely depend on how big your graphics card is.
On the pricing front, the MSI MAG Forge 320R has an MSRP of $80, or £65 here in the UK. I think the price is incredibly fair. There is a range of solid options on the budget side of the market, and the Lian Li Lancool 207 and Montech King 95 (non-pro edition) spring to mind around this price point. However, $80 is considerably challenging to argue with, considering what’s on offer versus the competition.
MSI MAG Forge 320R Design
Unfortunately, the design of the MAG Forge 320R isn’t particularly impressive. Functionality and pricing are the two main strengths of this chassis, which is reflected in the general weakness of the design. If I had to use one word to describe this case, I’d say basic. MSI hasn’t approached the design or aesthetic of this case with a rogue mindset; its entire design premise is built on the foundation of providing a builder with the space they need to house a build.
This means the overarching look is simplistic. The front panel is mesh, which cuts off at an angle, and the side panel is tempered glass, providing a small window into the build. While MSI has taken a no-frills approach to the design, they have been consistent. Depending on your chosen colour, all the metal in the case is coated in that colour. This goes for the fans, motherboard tray, wiring and mesh, which is excellent. There are too many cases out there that don’t colour the cables or screws, which can be jarring.

Despite the slightly underwhelming aesthetic, there are some solid design features worth highlighting. The glass side panel is tool-less, secured by thumbscrews and pop-in connectors, making it easy to remove or install.

Two-thirds of the front panel is predominantly mesh. This improves general airflow, which in turn assists thermals. Mesh cases aren’t as popular as they used to be since the rise of the fish tank design, so it’s nice to see the continuation of this style.

MSI has also taken a similar approach to the top of the chassis. This is where you’ll find the mounting rails for fans or a liquid CPU cooler. On top is a small mesh dust filter that minimises the risk of blockages and keeps the chassis quiet under load. The dust filter itself is magnetic and is easily removed.

Around the back of the case, you’ll find all the front panel cables, a bay for additional internal drives, and mounting points for any cable ties. This case has space for two 3.5-inch SATA drives or three 2.5-inch storage. There is also an internal hub towards the centre of the case, allowing you to plug in six 3-pin ARGB-controlled devices. This is a solid value-add, as it opens up additional room for those with RGB components, freeing up individual headers on the board and minimising the use of splitters. The hub is also handy for new builders, as all the lighting can be controlled through the case, reducing the use of finicky software.

The front IO is located at the top of the case. It includes a power button to turn on your build and an LED switch to control the case lighting. The front IO is comprised of two 3.5mm jacks (Audio-out and Mic-in) and two USB 3.2 Gen1 Type-A ports.
Building in the MSI MAG Forge 320R
The MSI MAG Forge 320R is a reasonably attractive case when assessing the specs and design, but an actual test of its quality can be done by building inside of it. We configured a solid mid-range PC build featuring the B650 Gaming Plus WiFi, CoreLiquid I360, and RTX 4070 Gaming X Trio to determine how this case holds up.
Internal Space
Internal space is an immediate concern for a case with a smaller footprint. However, the MAG Forge 320R offers a decent amount of room overall. With support for ATX motherboards, you can put together a range of different build configurations. This chassis has ample room inside to move your hands around freely.

There are many cutouts around the motherboard tray, four down into the PSU chamber, two to the right, and two above, so threading through cables is easy. I’m a fan of the additional cutout for GPU wires, which makes everything look clean and tidy. Unfortunately, this chassis doesn’t support BTF, STEALTH, or PROJECT ZERO motherboards, but this isn’t surprising based on its affordable price point.

Installing a graphics card was no issue. The MSI RTX 4070 Gaming X Trio is a triple-fan card that is 338mm long. This means a potential front radiator configuration would likely pose some clearance problems, but there’s ample space beyond the length of the card for three fans without restricting airflow.

You’ll have to get creative with your cabling at the rear of the chassis. The PSU chamber is reasonably large, so if you employ what I like to call ‘the shove and stuff technique’, all your wires will easily squeeze into here, especially if the HDD cage is removed.
Alternatively, for those looking to keep things nice and tidy, this is where you may run into issues. There’s about 20-30mm of clearance between the back of the case and the rear panel, which isn’t a tremendous amount of room. We recommend carefully threading the cables up through the central channel, using cable ties to keep everything taut. There are eleven mounting points for cable ties, or the side fan mounting rails can also be used if you have no intention of installing anything there.

Radiator and Fan Mounting
For a budget case, the MAG Forge 320R offers plenty of space for fans. Fortunately, MSI did a fair amount of the work for us regarding cooling, as this chassis comes with four pre-installed fans. The only requirement is that they need to be wired up to the build, which is pretty straightforward. The three front panel fans are hidden behind the plastic panel, and the cables are threaded through hidden cutouts, which lead straight into the back of the case. The RGB headers can then be plugged into the included hub, freeing up motherboard space.

Besides the rear panel, the rest of the case’s mounting areas remain free for additional fans or coolers. MSI’s website specifies that the PSU shroud and side panel are for fans, while the top doubles as fan or radiator mounting. In our build config, we installed the MSI MAG CoreLiquid I360, which, as you’ve probably guessed, is a 360mm radiator. The fans come pre-installed on this liquid cooler, saving us time and hassle during the build process.

Once the CoreLiquid I360 was installed correctly, it was a case of appropriately plugging in and managing the cables. The CoreLiquid I360 uses one cable for PWM control and one for addressable RGB. This allows builders to sync up the cooler lighting with the case, or it can be plugged into a motherboard and controlled with software like SignalRGB for more customisation.

We left the PSU shroud and side panel free of fans. While these would assist airflow, they didn’t quite fit within the budget we were aiming for. Those with more cash to spend, however, should use the additional cooling support.

Ease of Building
In terms of the building process, we were pretty happy with the quality of this case. For a budget chassis, it’s robust, sturdy, and easy to build. The pre-installed fans are a game-changer at this price point, as they save builders time and money. It’s not unusual for cases to not offer fans, so it’s great to see that despite being a cheaper option, MSI is alleviating build costs.
During the GPU installation, James notes that he’s not a fan of the single-use PCI-E covers. While we understand that this was likely to save on costs, it just feels and looks cheap. If you make a mistake and remove the wrong one, you cannot reinstall it. Furthermore, you have to be incredibly careful when removing them, as they can damage the case due to bending.
Finally, the included RGB hub and the sheer number of cable tie mounting points are impressive. More cases should include RGB hubs, as they free up motherboard headers and limit the use of splitters. The cable tie mounting points are also handy for keeping things tidy. Without these, it’s much more challenging to remove cable slack and keep the wires out of the way of the rear panel.
Features We Like
Pre-Installed ARGB Fans
It’s great to see a case that targets the budget market come with pre-installed fans. These can be plugged into the included ARGB hub and controlled via the case lighting button or through software like SignalRGB.

Ample Cable Tie Mounting Points
One of the final steps of any PC build is cable management, and it is pretty heartbreaking when you’re going to tidy up all the wires and find out there’s nowhere to secure everything. However, the MAG Forge 320R has plenty of mounting points to keep everything clean and taut.

Features We Don’t Like
Snap-Out PCI-E Covers
While snap-out PCI-E covers aren’t detrimental to a case’s functionality, they can affect its aesthetic. This isn’t a deal-breaker for us, but including some regular reusable PCI-E covers would be a solid addition to the MAG Forge 320R.

Lacklustre Front IO
In this case, the front IO is pretty minimalistic compared to other budget options on the market. We understand that this is likely to save on costs, but an extra USB-C or USB-A port would be much appreciated and allow gamers to plug in peripherals and accessories easily.

Conclusion
MSI MAG Forge 320R

Product Name: MAG Forge 320R
Brand: MSI
-
Features
-
Design
-
Versatility
-
Value For Money
Summary
The MSI MAG Forge 320R is a unique budget chassis that offers a very strong value proposition at a highly competitive price point. This is one of the cheapest ATX cases on the market, offering budget builders a robust chassis with four pre-installed fans, ample space to secure cables, and an airflow-focused design that assists temperatures. While this case doesn’t necessarily offer a particularly interesting aesthetic, I’d argue that the main focus is more functionality over looks. However, despite this, I don’t think the MAG Forge 320R is a bad-looking case, especially when all of the lighting is synced up using the case button.
While I like the MAG Forge 320R a lot, it has some weaknesses worth highlighting. The main two are the snap-out PCI-E covers and the lacklustre front IO. These aren’t detrimental to the case’s functionality or design, but they do affect its value, especially for those looking to build a clean PC with plenty of ports. These are relatively small cons in the grand scheme of things, and overall, I’d argue that the MAG Forge 320R is a worthwhile pickup for those genuinely sticking to a budget below the $100 mark.
Pros
✅ Ample cable tie mounting points
✅ Pre-installed fans
✅ GPU clearance
Cons
❌ Snap-out PCI-E covers
❌ Weak front IO
❌ Radiator support


