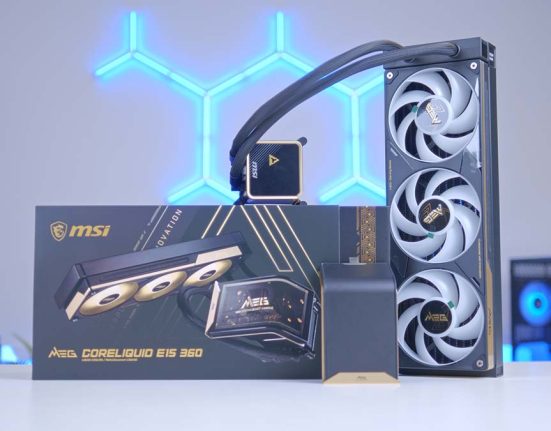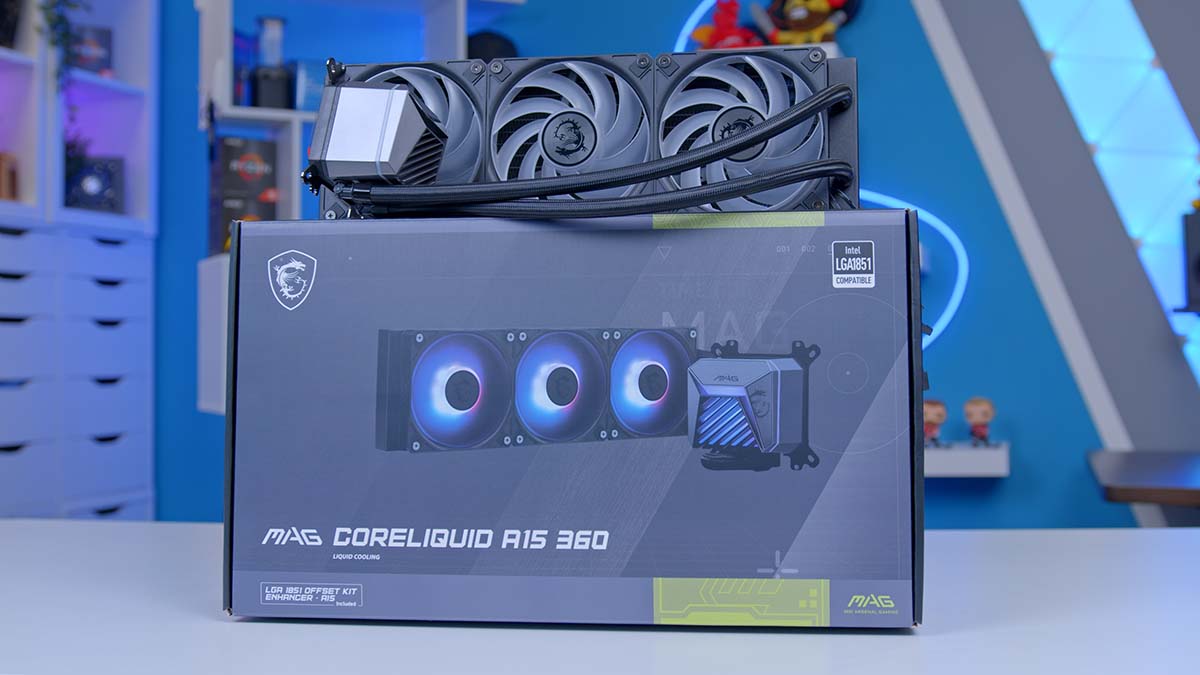
The MSI MAG CoreLiquid A15 is a 360mm liquid AIO (all-in-one) CPU cooler that joins the existing lineup of CoreLiquid options. Targeting the budget and mid-range markets, it is a cheaper option that uses a universal bracket system designed to simplify installation for builders. Additionally, the aesthetic and hidden cabling design provide builders with a solid style and look that isn’t hindered by awkward cable management. But with any liquid cooler, our first question is what kind of thermals it offers. So, we’ve put the MSI MAG CoreLiquid A15 360 through the wringer with some CPU cooler benchmarks to see how it fares against other AIOs on the market.
MSI’s CoreLiquid series offers a reasonably competitive set of AIO liquid coolers. The CoreLiquid E360, for example, has been a favourite on the GeekaWhat channel for quite some time due to its pricing. The I360 offers a slightly more standout design but is priced higher. MSI offers a range of other 360mm liquid cooler options, so we’re interested to see how the A15 compares to the various AIOs already available on the market.
In this review, we’ll explore the MSI MAG CoreLiquid A5 360, looking at its specs, design, installation process, and thermals. We’ll see where this cooler sits regarding temperatures to determine if it’s a worthwhile pickup amongst the vast range of similar liquid coolers.
Specification
The MSI MAG CoreLiquid A15 is a 360mm that utilises MSI’s CycloBlade 9 fans. These fans use a rifle-style bearing and deliver strong airflow and high static pressure while being designed to maintain low noise levels even during intense workloads. This 360mm radiator is a fairly standard size, sitting at 394mm long, 119mm wide and 27mm thick. MSI has noted that the water channels on the radiator are wider than on previous models, there are also more fins per inch, significantly enhancing heat dissipation across the board.

The CoreLiquid A15 Series comes in two sizes: 240mm and 360mm. Both variants are similar, except the 240mm version has one less fan and a smaller radiator. MSI doesn’t typically offer 280mm and 420mm versions, so it’s not likely we’ll see these hit the shelves anytime soon.
The fans on the CoreLiquid A15 360 are pretty different from those on the I360. The I360 fans are Loop Dynamic, whereas the CycloBlade9 fans use Rifle Bearings. Rifle Bearings are generally louder than Loop Dynamic, so the CoreLiquid A15 360 may be slightly noisier. However, we expect these new fans to offer a better noise profile.
| Key Specs | MSI MAG CoreLiquid A15 360 |
|---|---|
| Radiator Size | 360mm |
| Radiator Dimensions (L x W x H) | 394mm x 119mm x 27mm |
| Number of Fans | 3 |
| Bearing Type | Rifle Bearing |
| Pump Connector | PWM |
| Max Pump Speed | 3400RPM |
| Socket Compatibility | Intel – LGA 1851, 1700, 1200, 115X, 20XX AMD – AM5, AM4 |
MSI has kept things simple in terms of cabling. Instead of proprietary connectors, all the wiring can be done through universally known headers (PWM and 3-pin ARGB). This means the wiring is compatible with a wide range of different components, which significantly streamlines building. Alternatively, those building a PC with more of an MSI focus can use the proprietary JAF1 header, which combines PWM and RGB, freeing up overall header space.
Regarding pricing, here in the UK, the CoreLiquid A15 360 sits at £100 or so, depending on the retailer. In the US, pricing is slightly higher at $130-$150. This isn’t a terrible price, but it isn’t easy to justify the cost when you have coolers like the MSI CoreLiquid E360 and the HyperFlow 360 ARGB from Montech. However, I don’t think the £100 price tag is entirely uncompetitive, but this entirely depends on the thermal performance, which we’ll look at later.
MSI MAG CoreLiquid A15 360 Design
The MAG CoreLiquid A15 360 is a relatively simple-looking cooler. This AIO comes in black and white, but for the sake of this review, we’ll be looking at the black version. As you can see from the images we’ve provided, the CoreLiquid A15 adorns a black radiator along with the tubing and the lower portion of the CPU blockhead. The look is reasonably consistent apart from the screws and the top plate of the pump, which are silver and grey, respectively. It would be nice to see some vanity covers for the screws, but this isn’t a deal-breaker for us.

As for the pump block, MSI has opted for what they call a ‘military-inspired’ approach to the design. I don’t see what’s militaristic about it. It primarily looks like there are a few vents with some RGB shining through. There’s nothing particularly special about it overall, and it will appeal to some and not others. I think the brushed aluminium on the sides is a nice touch, but overall, I think an infinity mirror like the one we saw on the CoreLiquid I360 would have a much broader interest than this odd vented look.
Unlike the CoreLiquid I360, this cooler’s cabling is entirely hidden. It uses daisy-chain connectors that attach to the next fan through the side. Each fan is pre-installed, too, which means the daisy-chain connectors are virtually invisible as soon as you take the cooler out of the box.

One of the other unique design elements is the included offset kit. The mounting bracket for the cooler provides two positions for the LGA 1851 socket type. This ensures that your processor will be aligned optimally on top of the IHS (internal heatspreader), providing better thermal dissipation. This also negates the need for an alignment plate, making the CoreLiquid A15 360 fairly unique.

In terms of lighting, all of the fans on this cooler use addressable LEDs, along with the lightning bolt pattern on top of the CPU pump. You can customise the lighting using MSI Center or, if you prefer, greater customisation, SignalRGB.

Installation Process
One of the big focuses of the CoreLiquid A15 360 is its usability and quality-of-life features. This cooler is designed to make the building process much easier by reducing the number of screws used while also limiting bracket changes and keeping cabling simple. We installed the CoreLiquid A15 in an AMD system, which is, fortunately, a slightly quicker process than Intel, as you don’t have to install a backplate.
To get started, take the cooler out of the box and its various accessories. As we mentioned earlier, all of the fans are already pre-installed, so you don’t need to screw any in. This can be immediately mounted to your case of choice as soon as you’re ready. Next, remove the four screws around the CPU socket, which secure the AMD brackets in place. This cooler doesn’t use the older eyelet mounting, standoffs screw directly into the posts underneath which is what we need access to.

Once the screws are loose, remove the plastic brackets and place these inside the motherboard box. These are worth keeping if needed for a future upgrade or an RMA. Then, screw the AMD screws into the posts underneath. The stubbier side needs to go into the post. Just use thumb strength to tighten these. Pliers are not required.

Place the motherboard inside the case and continue with the extra steps needed for your build, whether this is cable management or installing fans into the chassis. Once you get to a point where the cooler can be mounted, grab the twelve screws found with the mounting hardware. Hold the radiator up to the case (we installed the cooler at the top) with one hand, and using your screwdriver, start to secure a minimum of four screws, one for each corner.

Note: In our RTX 5080 MSI VANGUARD build, we removed the original fans from this cooler and replaced them with iCUE LINK QX120 fans. This step is optional and not typically required as the fans come pre-installed on the radiator.
Once this is done, you can let go of the radiator, the screws will hold the weight. Use this time to install the rest of the screws making sure that the AIO is attached firmly to the chassis.

Add a blob of thermal paste to the CPU. We generally recommend a rice-grain-sized or small pea-sized amount. Once the AIO has been fully tightened, this will be enough to cover the CPU fully.

Finally, place the CPU pump blockhead on top of the IHS and use the spring-loaded thumbscrews to secure it. Use thumb strength first and then a screwdriver to tighten the screws the rest of the way. You’ll know when the screw is done because you won’t be able to torque it anymore without applying a lot of force to it.

As the last step, we recommend taking the time to manage the cables. As the fans and cooler wires are streamlined, they can be easily threaded through the back of your case and into ‘CPU_Fan’ and ‘AIO_Pump’. Again, the RGB can daisy chain, as both cables split off with a male and female connector, so this can be synced up easily with your choice of software or through the case lighting.
MSI MAG CoreLiquid A15 360 Performance
All of the CPU coolers we review are used in builds to assess the installation process, and then they are benchmarked inside our testing system to ascertain performance. We do this to gauge how each cooler handles different scenarios, whether gaming or running harder multi-core workloads.
Our benchmarking PC runs a Core i7-14700K with four 140mm fans to maximise airflow. The case is well-ventilated, and the fan/pump speed is set to Turbo in the BIOS. We’ll use software settings where we can, but the MAG CoreLiquid A15 360 doesn’t have an application to control it. The results below are from Cinebench and CPU-Z, with temperature results collected from HWMonitor, which runs in the background.
Cinebench 4-Thread
In our first benchmark, we fired up Cinebench and ran a custom 4-thread test. This test is somewhat similar to what you’d expect to see in a gaming benchmark, as the vast majority of games will only use 2-4 threads at maximum. As you can see from our run, the MSI MAG CoreLiquid A15 360 averaged around 60°C, which is a pretty strong showing overall. This puts this cooler in 6th place versus the other 360mm units we’ve tested.

Cinebench 8-Thread
Bumping up the thread count to eight in Cinebench, the CoreLiquid A15 360 held average temperatures at 69°C while the max sat at 75°C. Overall, the results here were pretty impressive. Most coolers tend to cave at eight thread benchmarks due to the heat and power draw, but the CoreLiquid A15 held firmly at 69°C. This shows that the A15 360 is reasonably strong in multithreaded settings and is comparatively better than its I360 and E360 counterparts.

CPU-Z 8-Thread
Our last benchmark is CPU-Z, which is primarily used to assess stability at eight threads. Similarly to Cinebench, the CoreLiquid A15 360 offered average temperatures of 70°C, with the max at 72°C. These results are similar to those recorded in our Cinebench eight-thread run, demonstrating that the CoreLiquid A15 360 can consistently maintain decent temperatures during multi-core workloads.

Features We Like
Offset Mounting Kit
The offset mounting kit is a unique offering from the CoreLiquid A15. As mentioned in the design section, this kit can align the CPU blockhead to the processor’s IHS, providing better thermal dissipation and lower temperatures. It is worth highlighting that this kit is only available for the LGA 1851 socket, but as the vast majority of Ryzen 9000 processors cool pretty well, I imagine this won’t be a deal-breaker for everyone.

Universal Mounting Hardware
Similarly to the CoreLiquid I360, the A15 360 uses the same universal mounting style and is equipped to support both AMD and Intel CPUs. This alleviates build hassle and provides an easy way to upgrade if you decide to switch platforms.

Features We Don’t Like
CPU Blockhead Design
I think the biggest weakness of this cooler is its blockhead design. MSI has called the styling ‘military’, but I don’t see where they’re coming from. I’d much rather have something plainer like what we’ve seen on the CoreLiquid E360, which also provides additional adjustability or an infinity mirror like the CoreLiquid I360. These design choices would be considerably better than what MSI has chosen for the A15.

Standoffs Come Loose When Removing CPU Block
During testing, we found that the Intel and AMD standoffs that house the CPU blockhead aren’t designed well. When uninstalling the cooler from our testing system, the screws loosened the standoffs underneath. This ultimately isn’t the end of the world, but it’s a silly design flaw to have the standoffs come with it.

Conclusion
MSI MAG CoreLiquid A15 360
Product Name: MAG CoreLiquid A15 360
Brand: MSI
-
Features
-
Design
-
Performance
-
Value For Money
Summary
Overall, the MSI MAG CoreLiquid A15 360 is a fairly decent liquid CPU cooler. During the earlier parts of this review, I thought that the CoreLiquid A15 360 would be an AIO designed more for show than performance. With the CoreLiquid I360 performing below expectations despite its pricing, it wasn’t out of the realm of possibility for the CoreLiquid A15 to be weak on the performance front. But I was impressed to find out that this AIO can handle the Core i7-14700K well. MSI has clearly improved upon its previous iterations regarding thermals, and the unique design qualities, such as the universal mounting plate and hidden cabling, only add to the value.
However, some caveats need to be addressed. The first is that the standoffs can be very easily loosened during mounting. If, for some reason, you need to reposition the cooler after tightening it down, you may find that the standoffs come with it, potentially loosening the backplate if you’re building an Intel PC. Additionally, I think pricing could be better. While the design qualities somewhat justify the price, I’d expect a better aesthetic at this price. Furthermore, when you have coolers like the Montech HyperFlow ARGB 360, which absolutely blows the CoreLiquid A15 360 out of the water both on the performance and pricing front, it’s even more difficult to argue that the cost of this AIO is acceptable.
Pros
✅ Solid performance
✅ Hidden cabling
✅ Universal mounting
Cons
❌ Fairly boring aesthetic
❌ Standoffs easily loosened
❌ Offset kit only available for LGA 1851