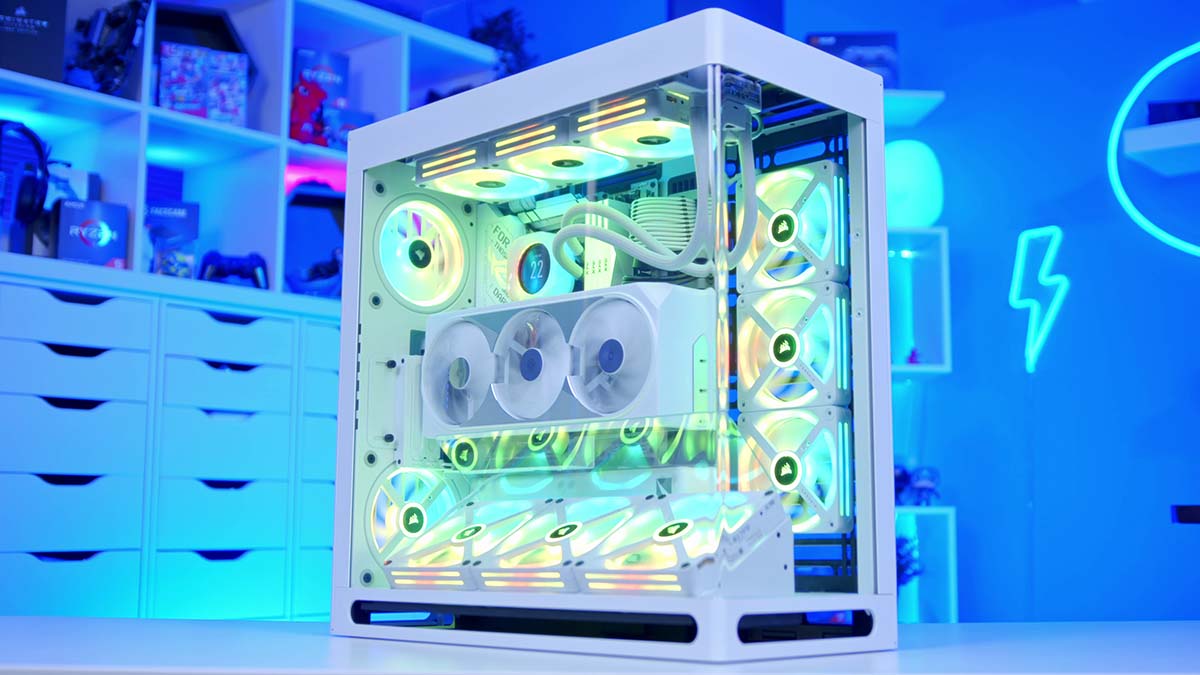
Building the ultimate white gaming PC requires plenty of time and skill. With so many white components on the market, picking out the best parts for a high-performance build takes a keen eye.
That’s where we come in! We’ve picked out the best white components money can buy, such as the Gigabyte RTX 4080 SUPER AERO OC and Corsair iCUE LINK H150i LCD liquid cooler, housed inside the HAVN HS420 VGPU, a gorgeous white case with a unique design.
Per our gaming PC build guides, this article explains the assembly and installation process from start to finish.
We’ve also included the reasoning behind our part choices, benchmarks, and an accompanying video of the build process.
Build Process
Step 1: Socketing the CPU
As always, we’ll start the build by socketing the CPU inside the motherboard. The processor picked out for this system is the Ryzen 7 7800X3D. Since its release in April 2023, the Ryzen 7 7800X3D has been one of the most popular CPUs you can buy. After Intel’s relatively lacklustre 14th-Gen and the more recent Core Ultra range, the Ryzen 7 7800X3D is the go-to for those looking to build a high-performance gaming PC. Alternatively, those who are looking to spend a little bit more cash can pick up the Ryzen 7 9800X3D, which offers performance and efficiency improvements.

The Ryzen 7 7800X3D is so popular because of its 3D V-Cache. This cache allows the CPU to store and execute instructions much quicker instead of pulling from RAM, which means processes that cycle through many instructions, like games, run faster. This CPU is an absolute performance powerhouse with a 5GHz boost clock speed.
To install this CPU, remove the motherboard from its box and lay it on top. We do this because the box is a stable but soft surface to work on, minimising the risk of damaging the back of the PCB. Unhook the metal arm from its socket and lift the metal cover, exposing the pins underneath.

Locate the golden arrow on the Ryzen 7 7800X3D, typically at the top left for AMD CPUs. This indicates how the CPU has to be oriented to slot into the motherboard correctly. Find the same arrow on the motherboard and ensure they’re aligned. Then, lower the Ryzen 7 7800X3D into the socket until it sits snugly in place. No force is required. The processor will drop into place.

Place the metal socket cover on the CPU and push the metal arm back under its hook. The retention arm requires a bit of force to go back under the hook, but this is normal. While this happens, the plastic protector will pop off. Keep this inside the motherboard box if needed for an RMA or repair.

We installed the CPU in the ASUS ROG Strix X870-A Gaming WiFi, an entirely white motherboard with a light-themed PCB and heatsinks. White motherboards are rare, so it’s great that the X870 chipset has a couple of options that fit the style of this system. This higher-end option features dual USB4 Type-C ports, two Gen5 SSD slots, and a range of high-speed IO comprised of six USB 3.2 Gen2 ports and four USB 3.2 Gen1 ports.
| Specification | ASUS ROG Strix X870-A Gaming WiFi |
|---|---|
| Form Factor | ATX |
| Supported Memory | 256GB DDR5 8000MT/s |
| PCI-E x16 Slots | 1 x PCI-E 5.0 1 x PCI-E 4.0 |
| PCI-E x4 Slots | 2 x PCI-E 5.0 3 x PCI-E 4.0 |
| Front IO | 2 x USB 2.0 2 x USB 3.2 Gen1 Type-A 1 x USB 3.2 Gen2 Type-C |
| Rear IO | 2 x USB4 Type-C 5 x USB 3.2 Gen2 Type-A 1 x USB 3.2 Gen2 Type-C 4 x USB 3.2 Gen1 Type-A |
| Audio | 2 x 3.5mm Audio Jacks 1 x Optical S/PDIF |
| Networking | 2.5 Gigabit LAN WiFi 7 |
The ROG Strix X870-A Gaming WiFi supports RAM overclocking speeds up to 8000MT/s, providing a boost in performance at the cost of stability. For networking, you can choose 2.5 Gigabit LAN or WiFi 7 for those with a supporting router. Audio is slightly lacklustre in terms of connectivity options, but the selection of rear IO more than makes up for this.

Step 2: Slot in the RAM
The next component in this build is the XPG Lancer RGB DDR5 RAM kit. This white set of DIMMs clocks in at 6000MT/s with a latency of CL30. It supports AMD EXPO memory profiles, which offer a boost to speed and lower latency, improving performance across your system. This RAM is excellent for gaming and a solid contender within more demanding multi-core workloads.

Design-wise, we’ve opted for a white kit. Both memory sticks feature a white heatspreader, with a small RGB strip lining each DIMM’s top. Any lighting effects and colours can be synced up with the other components in this system.
Getting RAM installed is a pretty straightforward process. First, we must push down the tabs on RAM slots two and four. We’re using these specific slots because they offer the most robust efficiency when you only have two DIMMs.

Next, pick up one of the RAM sticks and line it up with the second slot. RAM can only go in one way, so make sure the notch in the centre is accurately aligned. Then, firmly push down on both sides of the RAM until you hear a click. This indicates the stick is sitting in the slot correctly. Do this again for the second RAM DIMM.

Step 3: Mounting the SSD
We’ve chosen the Team Group T-Force GE Pro 2TB Gen5 SSD for storage. The X870 chipset offers widespread Gen5 SSD support, so it makes sense to install a high-performance drive in this system to maximise usage of the slots on the board. This drive offers up to 14000MB/s on the reads and up to 11800MB/s on the writes, which is ample for this PC build.

Regarding capacity, we’ve decided to pick up the 2TB version. The main reason for this is game sizes. 2TB allows us to install multiple big games, additional applications, and our operating system. While friendlier for those on a budget, smaller drives will limit the number of programs we can install, which isn’t ideal for a high-end system.
To install this drive, remove the heatsink from the ASUS motherboard. Fortunately, all the new X870 motherboards feature DIY-friendly mechanisms that don’t require tools, so installing components is easy. Push the button down on the heatsink, take the tape off the thermal pad, and place the heatsink to one side.

Place the M.2 SSD into the slot, which will poke out at a 45-degree angle. Then, push down on the drive until it clicks into place. This slot is entirely toolless; no screws are required. Then, place the heatsink back on top, and it will click into the slot.

Step 3.5: Installing the CPU Cooler Mounting Hardware
Before putting the motherboard inside the case, we must attach the CPU cooler mounting hardware while the board is easily accessible. Firstly, find the correct mounting hardware from the CPU cooler box. As this is an AMD system, we’ll need the AMD hardware, which includes four standoffs and a bracket that attaches to the cooler’s pump head.

Remove the four plastic clips around the AMD CPU socket to secure the standoffs. These are held in with two screws each, which can be easily removed with a Phillips head screwdriver. Then place the standoffs into the posts underneath and screw them in using your fingers. Pliers are not needed.

Step 4: Place the Motherboard in the Case
As mentioned during the introduction of this build guide, the case housing all of the components in this system is the HAVN HS420 VGPU. Although HAVN is a newcomer to the scene, the brand has a range of veterans designing and developing cases that bring something exciting and unique to the market. And the HS420 VGPU definitely fits this criteria.

The HAVN HS420 VGPU is a dual-chamber fish-tank case with a curved tempered glass panel that spans the front and side. The tempered glass is particularly impressive, as there’s no seam in the middle, so the view inside the case is entirely unhindered. The bottom fans are angled and feature a plastic shroud over the top, designed to provide better airflow.
| Key Specs | HAVN HS420 VGPU |
|---|---|
| Form Factor | Mid-Tower |
| Motherboard Support | Mini-ITX, Micro-ATX, ATX, E-ATX |
| Case Dimensions (L x W x H) | 541mm x 259mm x 547mm |
| Front IO | 1 x USB 3.2 Gen2 Type-C 2 x USB 3.2 Gen1 Type-A 1 x 3.5mm Combo Jack |
| PCI-E Slots | 4 |
| Colour | Black White |
| Max Clearance | 185mm Cooler Height 470mm GPU Length 220mm PSU Length |
| Drive Support | Up to 10 x 2.5 inch Up to 5 x 3.5 inch |
| Fan Support | Top: 3 x 140mm Side: 3 x 140mm Bottom: 3 x 140mm Rear: 2 x 140mm |
| Radiator Support | Top: Up to 420mm Side: Up to 420mm |
| Pre-Installed Fans | 0 |
It supports a range of components, including graphics cards up to 470mm long, E-ATX motherboards, and liquid coolers up to 420mm on the top and side panels. This case is evidently designed with enthusiasts in mind, and it clearly shows with its unique aesthetic and solid build quality.
To install the motherboard, remove the glass panel from the side. This panel is particularly heavy, so be careful. The case is pre-configured to support ATX motherboards, so we don’t need to move any standoffs around. Place the board onto the standoffs, lining up the integrated IO shield with the cutout at the top-left of the chassis.

Using the screws found in the accessories box, secure the motherboard to the back panel of the case. You may need to lay the case flat to install the motherboard, as it’s pretty large.

Step 5: Power Supply & Cabling
The next component we need to install is the power supply. For this build, we’ve opted for the Cooler Master GX III 850W unit. This PSU offers 850W of power and is rated at an 80 Plus Gold efficiency, minimising any excess power lost as heat. While this power supply doesn’t match our chosen colour scheme, it won’t matter because you’re not likely to see your PSU very often, so it won’t take away from the build aesthetic.

Regarding cabling, the Cooler Master GX III 850W is fully modular, allowing us to pick the cables we need. This unit is ATX 3.0 and comes with a 12VHPWR cable for NVIDIA graphics cards, allowing us to keep all the wiring organised and clean.
Before placing the power supply inside the case, we must pick out the cables we’re using for this build. This particular system uses two 8-pin EPS CPU cables, one 24-pin motherboard power cable, the 12VHPWR cable for the graphics card, and PCI-E 6-pin for the Corsair iCUE LINK hub, which provides power for the hub and fans. Additionally, we’ve picked out white cable extensions to maintain the clean white theme. The cable extensions are optional but worthwhile if you want to build a wholly white system.

Get the cables (and cable extensions) plugged into the power supply. Slide the unit into the back of the case, and use the hexagonal screws to secure it in place. Make sure to use the correct screws, as we don’t want to damage the threads.

Starting with motherboard power. This is the biggest connector out of the bunch, and its header is typically on the board’s right side. Give the connector a firm push to secure it on the board, ensuring the clip is engaged.

Next is CPU power. The ROG STRIX X870-A Gaming WiFi has two headers at the top left of the PCB, each with eight pins. Again, push the cables to ensure they’re correctly sitting inside the header.

We recommend also taking this step to wire up the iCUE LINK hub. The hub has multiple connection points for fans, radiators, and data, so it’s a good idea to plug in PCI-E power while there’s room.
Step 5.5: Front Panel Wiring
After wiring up some of the build, we’ll plug in front panel connectors. USB-C and USB3 sit on the right side of the board; both are slightly below motherboard power. The headers are keyed and notched, so ensure the orientation is correct before pushing on them firmly. USB 3.0 has a small notch on one side, making it easier to figure out which is the correct side compared to USB-C

HD_Audio and Front panel power are next. Fortunately, the HAVN HS420 VGPU uses a universal header instead of individual pins, so plugging these in will save time compared to older methods. The HD_Audio header is at the bottom left of the board, while JFP1 front panel power generally sits on the right side. JFP1 is the more important of the two, as this allows you to turn on your build through the button on the case.

Step 6: Mounting the CPU Cooler
Mounting the CPU cooler to the top of the case is pretty straightforward. For this build, we’ve chosen the Corsair iCUE LINK H150i LCD. This is one of Corsair’s most premium AIOs (all-in-one) liquid coolers. It’s a 360mm unit with a reasonably standard radiator size of around 27mm. It comes with three QX120 iCUE LINK fans, all of which are RGB, and uses the iCUE LINK daisy-chain system to streamline cable management and installation.

The screen is one of the standout areas of this cooler, as it utilises an LCD. This allows enthusiasts to play GIFs and images or display temperature readouts and system stats, all through the Corsair iCUE software. It’s a unique way of adding flair to the build, and the display looks excellent.
To install this liquid cooler, remove the panel covering the top of the case, exposing the mounting rails underneath. The fans come pre-installed on the cooler, so we don’t need to screw them on ourselves. Line up the radiator with the top of the chassis and secure it to the top panel using the included screws. Hold onto the radiator while the first four screws are added, and then you can let them take the weight.

Next, attach the AMD mounting hardware to the CPU blockhead. It simply slides into the little notches around. Push the blockhead onto the CPU and use the thumbscrews to secure it. We advise tightening the screws in a star pattern to apply even pressure.

For the cabling, attach one of the iCUE LINK wires to the hub on the radiator and plug the other end into one of the fans. Then, use one of the longer iCUE LINK cables, plug that into the second port on the radiator, and attach it to the iCUE LINK hub.

The following cable plugs into the CPU blockhead, which houses the LCD screen. We recommend threading this towards the back of the case and plugging it into a splitter. This will allow us to daisy-chain all of the fan devices through one port.
Step 7: Adding Extra Fans
To make this build look fantastic and, more importantly, to maximise airflow, we need to fill out the chassis with fans. We’ve used Corsair’s QX models for all this system’s fans. They look gorgeous, whether positioned normally or reversed, and we can wire them up through the iCUE LINK ecosystem, streamlining cable management.

In this configuration, we’ve opted to install two 120mm fans on the rear, three 140mm fans on the bottom, and three 120mm fans on the side. To gain access to the rear panel, remove the security screws and pull it off. The fans can then be screwed into the removable brackets and daisy-chained to the splitter we plugged in earlier.

For the bottom 140mm fans, take out the angled removable bracket. Connect up the three fans using the Corsair snap connectors. These provide stability and daisy-chain the signal from one fan to another. Then, screw them into the bracket and add it back to the case. We recommend attaching these fans to the rear fans with your iCUE LINK cables. Corsair iCUE LINK hubs support up to twelve devices through one port, so there shouldn’t be any issues daisy-chaining all these fans through one iCUE hub port.

Finally, the side-mounted fans connect to a removable bracket that houses 2.5—and 3.5-inch SATA drives. First, remove the bracket from the case, then slide the drives out. Friction mounts hold in them, so there’s no reason to remove any screws.

Once the drives are out, connect up the final three QX120 fans, they snap together. After this, screw them into the removable bracket, and add the bracket back into the case. Connect the bottom fan on the side panel to the QX140 on the right with your remaining iCUE LINK cables.

Step 8: Installing the Graphics Card
The last part to be installed in this build is the graphics card. We’ve left the best until last, as it’s arguably one of the most critical parts of the build. We’ve picked out an RTX 4080 SUPER instead of an RTX 4070 Ti SUPER or an RTX 4090 because of performance and cost. The RTX 4080 SUPER is a top-end card, ideal for 4K gaming, and is often hot on the heels of the RTX 4090 in a range of games.
Additionally, because the RTX 4080 SUPER is still in stock, this GPU can be picked up at a reasonable price. If we’d chosen an RTX 4090, we’d be paying close to $2000, which is much more than MSRP.

Due to its gorgeous white design, we’ve picked the Gigabyte AERO version of the RTX 4080 SUPER. While there are a couple of white RTX 4080 SUPER options on the market, the Gigabyte AERO OC stood out to us as the best selection.
We first need to remove the riser bracket to get this card correctly installed. This can be done by removing the three screws at the back and the two thumb screws that lock it in place. Once these are out, take the bracket out and remove the first three PCI-E covers. These aren’t accessible while the bracket is installed in the case, which is why we’ve removed it.

Plug the PCI-E riser cable into the graphics card slot, and using the screws we removed moments ago, secure the riser bracket back inside the case.

Lastly, push the graphics card into the PCI-E riser slot. Apply firm pressure, but be cautious not to damage the riser. Once this is done, use the screws removed from the PCI-E covers to secure the GPU, and then plug in the 12VHPWR cable.

Performance
Framerates easily reached 75FPS in Hogwarts Legacy at 4K and held firm in Alan Wake II with Ray Tracing enabled. We’re really pushing the RTX 4080 SUPER in these benchmarks to reach the best visual fidelity, which incurs a slight cost in performance.
The excellent performance continued through to the Esports games. Fortnite and Apex Legends saw insane framerates, quickly surging to exceptionally high framerates with 390FPS and 207FPS, respectively.
Gallery




 4K, High Settings
 4K, High Settings, RTX On
![FI_[DM82] TT MineCUBE Build](https://geekawhat.com/wp-content/uploads/2025/12/FI_DM82-TT-MineCUBE-Build-551x431.jpg)
![FI_[DP056] Antec flux M + 9060XT](https://geekawhat.com/wp-content/uploads/2025/12/FI_DP056-Antec-flux-M-9060XT-551x431.jpg)
