The Tower 600 case from Thermaltake is a mid-tower iteration of the renowned ‘The Tower’ chassis series. This 600 version retains the octagonal design of The Tower 300 but widens the case, opening up more space for fans, motherboards, and graphics cards. In doing so, this case is better equipped to facilitate a substantial range of build configurations, making it a more versatile option than its predecessors. We’ve tested the Tower 600 case in a rigorous set of benchmarks to see how it compares to the previous Tower versions.
The Tower range of cases has seen a redevelopment year upon year, and The Tower 600 looks to be the most significant change yet, both physically and in terms of design qualities. However, by making this chassis larger, The Tower 600 sits in the Mid-Tower market, placing it against the Montech King 95 Pro, Lian Li O11 Vision, and Fractal Design North. All of these cases offer unique features or designs that make them stand out.
As with all of our PC case reviews, we’ll examine the specs, design, building quality, and features to determine the value proposition.
Specification
The Thermaltake Tower 600 is a mid-tower case with unusual dimensions. Compared to a traditional ATX tower, most cases tend to have a length and height of around 500mm, while the width generally isn’t as long. However, the Tower 600 is much wider than it is long. This is interesting, and we’re curious to see how the width of the case affects component clearance, as this chassis is considerably larger than its smaller Tower counterparts.
Regarding motherboard support, the Tower 600 now supports ATX boards, which opens up build configuration options. The Tower 300, while larger than the previous 200 and 100 models, could only support Micro-ATX boards at the maximum. Component clearances are generally solid across the board, with space for coolers up to 210mm tall and power supplies up to 220mm long.

Graphics card space varies depending on whether the PSU power cover is installed. With it, there’s only 280mm of clearance for GPUs. Without it, space jumps up to 400mm, which is ample room for modern NVIDIA and AMD cards. The GPU will dip into the bottom of the case, next to the power supply, but the increased space is much appreciated.
Fan support is pretty solid despite the mounting being relatively dispersed. The Tower 600 has space for a maximum of thirteen 120mm fans. While there is space for 140mm fans across most panels, the top and left sides only have space for 120mm fans. Radiator mounting has also improved compared to the Tower 300, as the Tower 600 can now support a 360mm and 420mm radiator on the left and right sides, respectively.
| Specification | Thermaltake The Tower 600 |
|---|---|
| Form Factor | Mid-Tower |
| Motherboard Support | Mini-ITX, Micro-ATX, ATX |
| Case Dimensions (L x W x H) | 286mm x 420mm x 550mm |
| Front IO | 4 x USB 3.0 Type-A 1 x USB 3.2 Gen2 Type-C 1 x 3.5mm Headphone Jack 1 x 3.5mm Microphone Jack |
| PCI-E Slots | 7 |
| Colour | Black White Hydrangea Blue Snow White Matcha Green |
| Max Clearance | 210mm Cooler Height 280mm GPU Length (with power cover) 400mm GPU Length (without power cover) 220mm PSU Length |
| Drive Support | Up to 3 x 2.5 inch Up to 1 x 3.5 inch |
| Fan Support | Top: 3 x 120mm Right Side: 3 x 140mm Left: 3 x 120mm Rear: 2 x 140mm Power Cover: 1 x 140mm Bottom: 1 x 140mm |
| Radiator Support | Right Side: Up to 420mm Left Side: Up to 360mm |
| Pre-Installed Fans | 2 x 140mm |
| MSRP | $169.99 |
The front IO has also drastically improved, with five USB ports: four USB 3.0 Type-A ports and one USB 3.2 Gen2 Type-C port. The IO also includes separate headphone and microphone jacks.
Price-wise, the Tower 600 is around $169.99, which applies to all colour variants. I think $170 is a fair ask. A tremendous amount of tooling has gone into the panelling, and the increased space compared to the Tower 300 makes it a compelling choice for a mid-range build. However, at $170, it has tough competition to beat out.
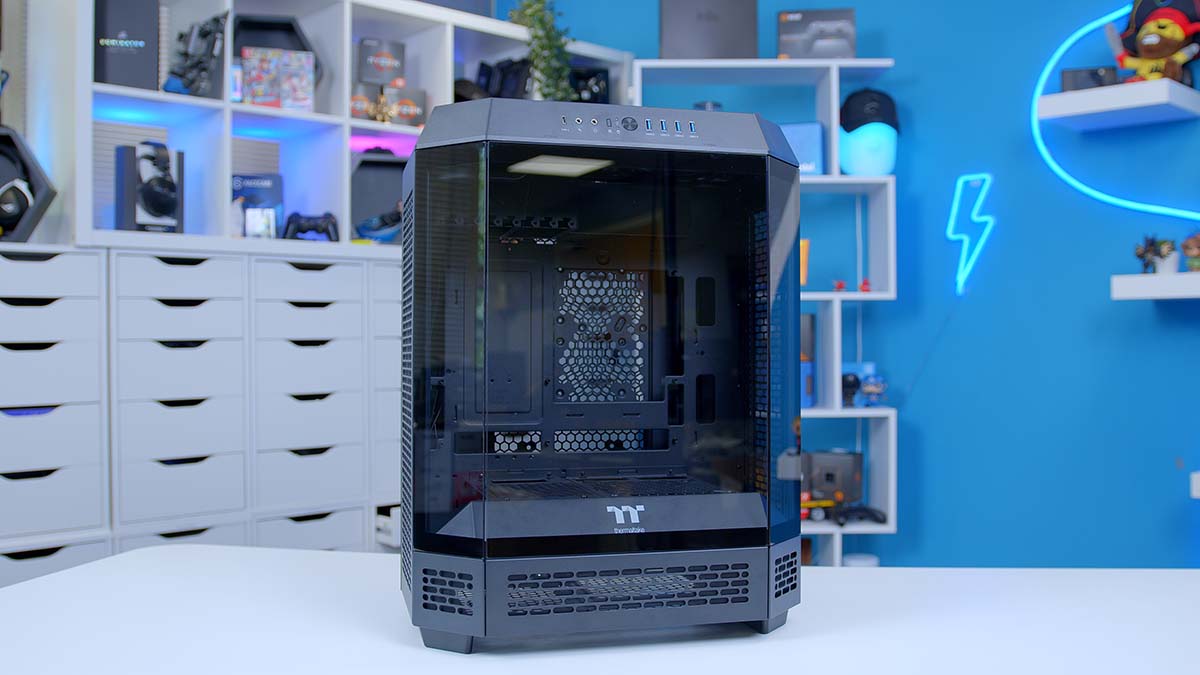
Thermaltake The Tower 600 Design
The Tower 600 has an attractive aesthetic. With the introduction of the Tower 300, Thermaltake shifted the design from a metal cuboid to an octagonal box with eight distinct panels. This has continued through to the Tower 600, and it makes this case a bit of a spectacle to look at. While separate, the three panels at the front are seamless glass, providing a complete window into your build without any hindrances.

The centre panel uses a push-pin mechanism that releases when you press the top of the glass. After the centre panel has been removed, the two angled glass panels can be quickly taken out, exposing the internals.

The motherboard tray is recessed quite far into the back of the case, likely to accommodate fan space on the PSU cover. Both areas of the IO are accessible through the top of the case. This seems like an odd design choice, but we’ll touch on this feature later.

The left and right sides of the Tower 600 feature removable mounting rails for fans or coolers. Both are held in by two screws in the middle of the rails, and they can then be pulled out of the chassis.

Moving around to the back, cable management is quite tight. While this area is straightforward to reach (thanks to the tool-less panels), builders must be careful with cable bulge. This will only worsen with a BTF motherboard, as all of the headers and connectors pass through to the rear of the case, which means there’s more slack to deal with.

The area carved out for the power supply is pretty small. Power supply cabling is rather tight because this bottom part of the case also intersects with large graphics cards.

At the front of the case, underneath the tempered glass, is a small rectangular ventilated panel. This can be swapped out to house an LCD for the Tower 600. This is an optional purchase, but it could be worth considering for those looking to spice up the design more.

The front IO is located at the top of the case. It has five USB ports and two 3.5mm audio jacks for headphones and microphones. It is one of the few parts of the case that can’t be removed without tools.

The Tower 600 case is similar to its smaller variant, the Tower 300. The octagonal design is a unique value proposition and adds an exciting look to any build. This chassis’ most impressive design quality is the sheer amount of tooling used for the panelling. This case can be entirely dismantled, leaving the frame and the IO, which is screwed into the top of the case.

Additionally, the Tower 600 is armed to the teeth with dust filters. Every area with ventilation is backed by a dust filter, which can be removed and cleaned if dirty. It’s incredible to see how much work has gone into making this case user-friendly.

Building in The Tower 600
Looking at the design and specs, the Tower 600 features some solid changes compared to the Tower 300 and has some unique qualities and features that will appeal to many prospective buyers.
However, building a PC is a great way to gauge the quality and building experience compared to other cases on the market. We’ve paired the Tower 600 case with an ASUS TUF Gaming X670E-Plus WiFi, a ToughLiquid EX Pro 360 cooler, and a range of Thermaltake EX Pro 120mm fans.
Internal Space
The Tower 600 case is much more spacious than its previous iterations. With room for ATX motherboards and reverse connector designs, builders have ample options for build configurations. However, there are some interesting design choices concerning how some of the components need to be installed. The motherboard, for example, has to be installed sideways.

This means that IO isn’t directly accessible unless the rear panel is removed, which adds considerable hassle when plugging in USB peripherals. Furthermore, installing the board isn’t as easy as a traditional ATX design. While there’s plenty of clearance, we recommend installing a motherboard into this case while it’s laid down, as doing this while the chassis is standing up can be a challenge.
This case supports ATX boards out of the box, so those with an ATX board won’t need to move around any standoffs. While we didn’t use a BTF board in this build, the cutouts around the motherboard tray are large, allowing headers to slip through easily.

Installing the graphics card posed a similar challenge to the motherboard. Because the card goes in sideways, again, IO isn’t easily accessible, and getting the card screwed in looks and feels awkward. We think installing some of the components in this case will be demanding for novice builders.
Despite this, there’s 400mm of clearance for graphics cards once the PSU cover is removed, which must be removed beforehand. It’s a shame there isn’t a GPU support bracket, but the fact that the left side of the case houses fans or a radiator likely explains why there isn’t one.
Radiator and Fan Mounting
Installing fans and radiators inside the Tower 600 was one of the more manageable parts of the building process. Thermaltake has made it so that the case can be entirely dismantled, including the panelling for fans and radiators. In doing so, these panels can be removed, components can be installed on them, and they can be put back into the case. In this configuration, we installed a 360mm Thermaltake EX Pro radiator on the right side panel and three daisy-chainable 120mm EX PRO fans on the left panel.
Note: James decided to mount these while the panels were inside the case, but they can be removed and then reinstalled if this is too challenging.

We decided to leave installing fans on the PSU cover or inside the PSU chamber, primarily due to the lack of space. The Tower 600 has two CT140 pre-installed fans, which exhaust the hot air inside this chassis.

The fan and mounting rails are incredibly easy to access, and installing everything was a breeze because the rails are removable. The increased amount of space is also a welcome change. By providing additional room for fans, cold air hits the graphics card, and the rest of the components are kept cool as the air continues up and out of the top panel.

Ease of Building
The Thermaltake Tower 600 provides a solid building experience. Thanks to the dismantlable and tool-less design, accessing the various components is relatively simple, and there’s plenty of clearance across the board. Getting the fans and CPU cooler secured was also straightforward.
The only qualities we’re not fans of are the PSU chamber, the sideways graphics card, and the motherboard orientation. The power supply chamber doesn’t have enough space to cram all your cables and manage them simultaneously. It’s a small area that would benefit from extra space to make cable management more effortless.
Finally, the motherboard and GPU’s sideways orientation make them harder to install. Getting these components lined up was finicky, and the location of the IO adds an extra hassle factor when plugging in a monitor or any peripherals. But despite this, building with the Tower 600 was an enjoyable experience overall.
Features We Like
Dismantlable Design
Pretty much every panel on the Tower 600 can be removed to access various areas of the case. This enhances the building experience, as the chassis internals are easily reachable, and the panels go back on with minimal hassle due to their tool-less nature.

Unique Aesthetic
The Thermaltake Tower 600 is one of the more unique-looking cases on the market. One thing that we loved about the Tower 300 was its attractive octagonal design, which showcases your build with three panels of tempered glass. This has continued with the Tower 600, but on a much wider case, which offers better build configurations.
We’ve seen an enormous range of fish tank cases recently, and while some of these are interesting, this design approach has become rather dull due to oversaturation in the case space. For this reason, it’s nice that the Tower range hasn’t adopted the fish tank look and instead offers a unique and standout aesthetic.

It’s worth mentioning that the Tower 600 also has a stand accessory, which Thermaltake kindly sent us. This allows you to showcase your build horizontally, which would look great on a desk as a showpiece system.
Features We Don’t Like
IO Accessibility
We’ve touched on this in the build section of this article, but the motherboard and graphics card IO aren’t that accessible in this case. By removing the chassis’ back panel, the IO is accessible through a small cutout at the top of the case.
USB cables need to be threaded through the top, which then funnels out of a cutout at the centre of the plastic top cover. This is a better design than the Tower 300, but it still adds unnecessary hassle when plugging in or removing some USB peripherals.

Power Supply Cable Space
The PSU area of the case is very tight. James noted that he wasn’t a fan of this as it made cable management tricky and more challenging compared to a traditional build. With more space in the PSU chamber and a better selection of cutouts, the cables would be easier to move around while reducing the risk of damaging the wires.

Conclusion
Thermaltake The Tower 600
Product Name: The Tower 600
Brand: Thermaltake
-
Features
-
Design
-
Versatility
-
Value For Money
Summary
The Thermaltake Tower 600 is a unique case that offers some solid design changes compared to the Tower 300 while opening up space for more build configurations. The most significant advantage of this case versus the rest of the Tower range is that its wider frame means more space for coolers, fans, graphics cards, and motherboards. The result is that builders can enjoy a more normal-sized build inside a highly unique-looking case. The Tower 600 is well constructed, easy to build in, and has strong ventilation and dust filtration across the entire chassis.
The only major drawback of this case (besides the fact that accessing IO is a bit more of a pain) is the price. At $169.99, the Tower 600 is encroaching on mid-range case territory, putting it up against other competitive chassis like the Montech King 95 Pro, Lian Li O11 Vision, and Fractal Design North. Despite this, I think the price is a fair ask if you’re a fan of the aesthetic of the Tower 600, but keep in mind that there are some better value cases out there that may suit your preferences more.
Pros
✅ Unique design
✅ Dismantlable panels
✅ Ample cooling space
Cons
❌ IO accessibility
❌ PSU chamber space
❌ Sideways component orientation

![FI_[SR190] HYTE X50 Ryzen 5 9600X & MSI RTX 5070 Ti](https://geekawhat.com/wp-content/uploads/2026/01/FI_SR190-HYTE-X50-Ryzen-5-9600X-MSI-RTX-5070-Ti-551x431.jpg)
![FI_[DM82] TT MineCUBE Build](https://geekawhat.com/wp-content/uploads/2025/12/FI_DM82-TT-MineCUBE-Build-551x431.jpg)