Introduction
Do you ever struggle to plug in your front panel connectors? Do you know where they are on your motherboard? Today we’ll be answering those questions in this ‘How To’ series of articles.
In these articles we seek to answer your most frequently asked questions, and ultimate frustrations that come with building a PC. Today’s focus is front panel connectors, the pesky cables that allow you to turn on your PC!
Suggested Article: PC Building Checklist – How to Build a Gaming PC in 2022
What are Front Panel Connectors
Your front panel connectors are cables that plug into your motherboard to power your front IO (so USB ports, and audio), and your power and reset buttons. The connectors to turn on your PC plug into the JFP1 power located normally at the bottom right of your motherboard (but this can differ based on the manufacturer’s choosing).

The other front panel connectors will plug into HD Audio, and one of the internal USB connectors. Dependent on whether your case has USB 3.2 Type-C or lower, the type of connector you’ll need to plug one of these cables into will differ. There are also some extra cables that aren’t necessary, but can be worth plugging in. Power LED and HDD LED are there to show you that your hard drive and PC are turned on. These don’t affect the functioning of the computer, but if you want to know that your hard drive is active, then the LED visibly provides this.
[adrotate banner=”7″]Front Panel Connectors Guide
Now for the most important part – the guide. Below we’ve put together a guide of where to plug in your front panel connectors with a before and after shot of how these cables should be seated. Keep in mind, where these connectors plug in will change based on the model of motherboard you’ve got, but it tends to remain relatively similar between motherboards.
USB 3 Connector


The first connector (which is one of the easier ones) is your USB 3 connector. This cable can only go in one way, as there is a notch that the cable needs to fit into. You can apply a little bit of force to get this in, but make sure that you don’t apply too much as the pins inside the connector could bend. Once you’ve got this cable plugged in, your USB 3 ports on your case should be powered and working.
USB C Connector


The USB C connector is normally located towards the right hand side of the board often next to your RAM DIMMs, or below your 24 pin motherboard power connector. This cable is reversible, so it can fit into the slot either way. As the cable is quite blocky, it should be able to fit into the connector with relative ease. You don’t need too much force to get the cable to go into the connector, but you should give it a wiggle to make sure it is plugged in correctly.
HD Audio


The HD audio connector is normally denoted by the ‘JAUD1’ notation on your motherboard, and this cable can only plug in one way. If you look at your HD audio connector, you’ll see that one of the pins is blocked out and there is no hole. And this lines up with the connector where there is also no pin. If you line both of these up you can apply some pressure to the connector to get the pins to slide in. There is no audible click, but the connector will feel sturdy if you attempt to move it around.
JFP1 Power


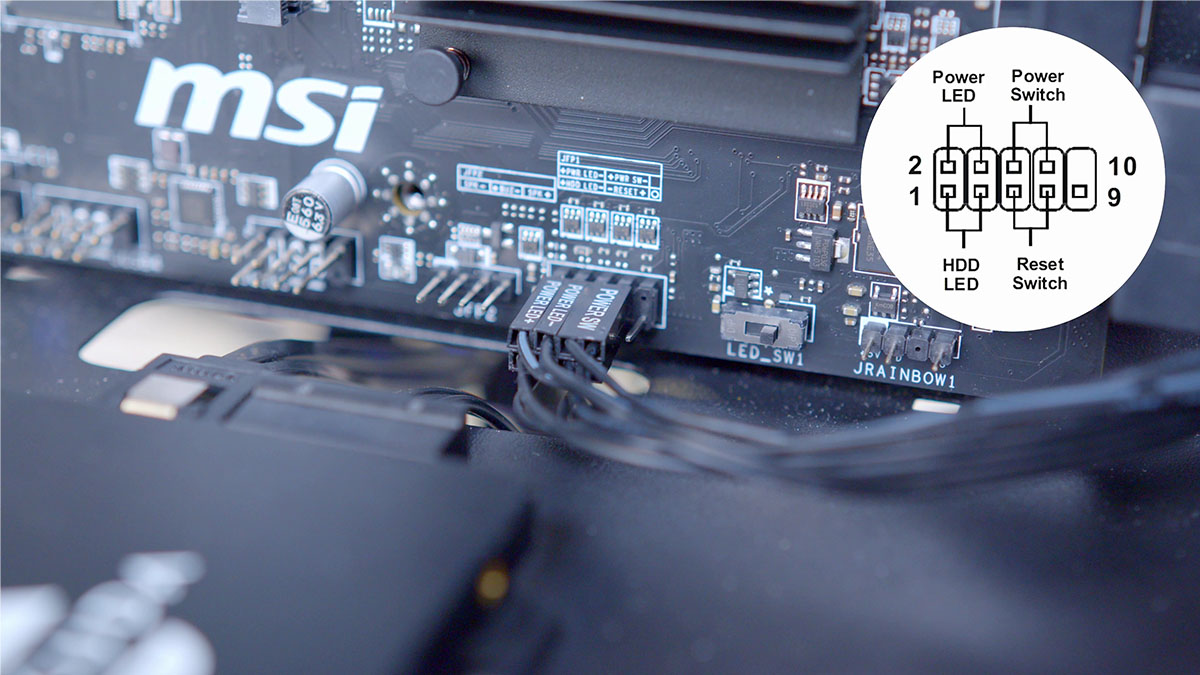
The front panel connectors are the most finnicky of the lot, but they can be easy to plug in with patience. The diagram we’ve provided shows where you should plug in your power connectors. This will differ between motherboards and we would recommend you check your manual or the manufacturer website.
The easiest way to figure out if the connector is the correct way around is dependent on whether the writing is legible. This isn’t always the case, so if your PC doesn’t boot, flip the power connector round the other way and try again.


![FI_[DM87] HAVN BF & RTX 5090 Build](https://geekawhat.com/wp-content/uploads/2026/01/FI_DM87-HAVN-BF-RTX-5090-Build-551x431.jpg)
