The AMD Ryzen 7 9700X has been out for a couple of weeks now, and with some troubleshooting and a Windows update, the performance looks to be much better than it was initially received. For this reason, building an excellent PC designed to hit high framerates in modern titles at 1440p and 4K makes perfect sense.
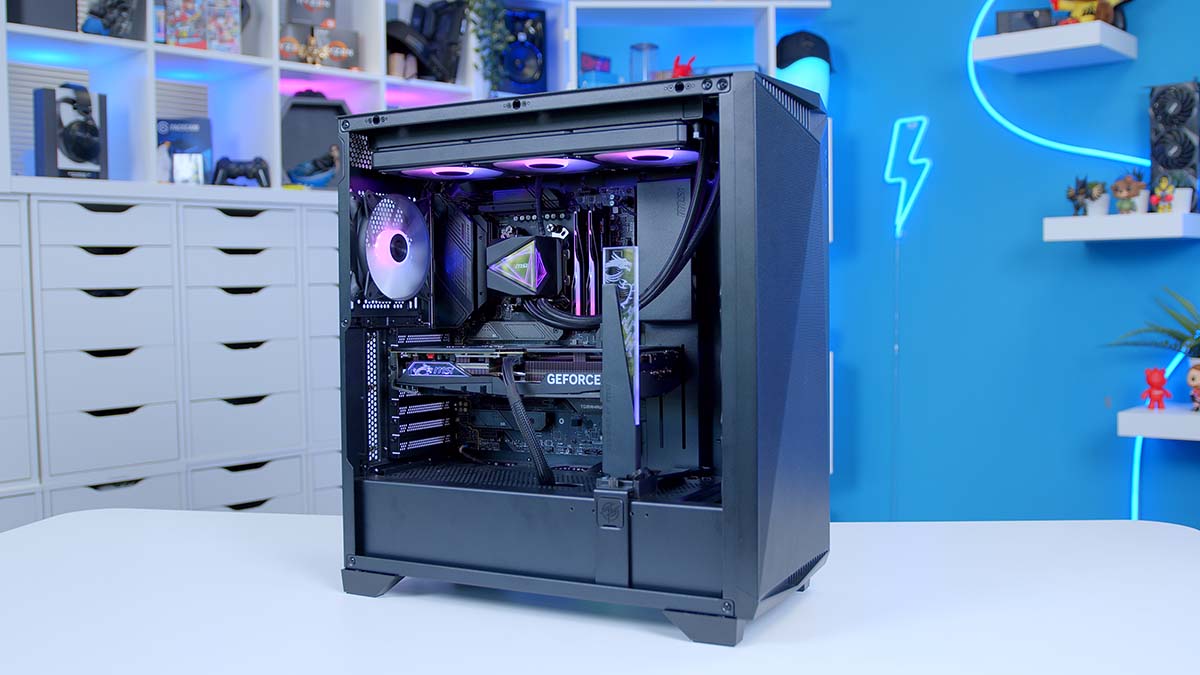
This build pairs the AMD Ryzen 7 9700X with an RTX 4070 Ti SUPER and an MSI MAG CoreLiquid I360 liquid cooler, all housed inside the MSI Gungnir 300R Airflow chassis.
Like all of our PC build guides, we’ll cover the entire process, showing how all the parts fit together from start to finish. We’ve also provided our thoughts on each component, explaining why they’re an excellent fit for this system. We recommend watching the dedicated YouTube video alongside this article, as James discusses the building process in greater detail.
Build Process
Step 1: Socketing the CPU
The build we’ve put together uses a relatively standard set of components compared to some of the reverse connector systems we’ve put together recently. For this reason, we can carry on with the installation process as usual by placing the motherboard on top of the box, ready to socket the CPU.
Note: The BIOS must be updated for Ryzen 9000 CPUs before installing anything into the motherboard. This can be done through BIOS flashback or while a Ryzen 7000 CPU is on the board. Make sure this is done before, as your PC will not boot if it isn’t.

As highlighted in the introduction, the CPU we opted for in this configuration is the AMD Ryzen 7 9700X. After some criticism during the initial launch, the Ryzen 9000 range looks to be in better shape after a Windows update rollout, improving how instructions are handled when passed to the CPU.
The specs have remained the same across generations compared to the 7700X. AMD’s Ryzen 7 9700X received a 100MHz uplift to 5.5GHz instead of 5.4GHz. This CPU still has eight cores and sixteen threads, so gaming and light productivity work is highly viable. Overall, the Ryzen 7 9700X is a solid CPU for modern gaming, and once the prices drop, its value will only increase.

First, unhook the metal retention arm from the CPU socket to install this CPU. Then, raise the metal socket cover, exposing the pins underneath. Find the golden arrow on the CPU. As the socket hasn’t changed, the arrow is in the same place as it would generally be, typically found at the top left. There is a matching arrow on the motherboard. Line both of these up. This indicates the correct orientation for the processor to sit in the socket.

Slowly lower the CPU into the socket. If the arrows are lined up correctly, the processor will drop into place, requiring no additional movement. Lower the socket cover and push the metal retention arm back under the hook. The arm requires a bit of force, but this is normal. While this is happening, the plastic protector will pop off. Keep this for a potential RMA or future repair.

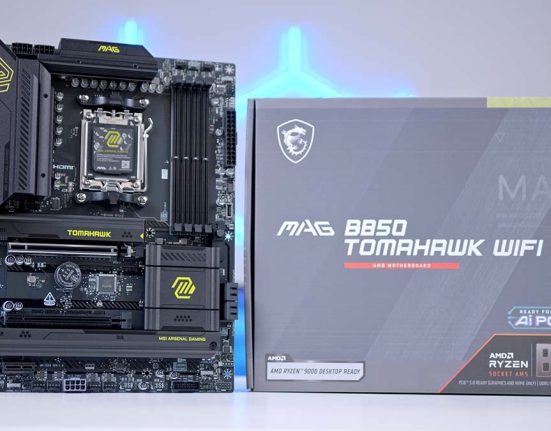
The motherboard used in this build is the MSI MAG B650 TOMAHAWK WiFi. This is a darker-themed motherboard contrasting with the Mortar series of MSI boards. Featuring a black set of heatsinks, it blends in well with the style we’ve opted for. The MAG B650 TOMAHAWK WiFi is primarily targeted as a mid-range board, offering a Gen4 graphics card slot and three Gen4 SSD slots, ample for future upgrades.
| Specification | MSI MAG B650 TOMAHAWK WiFi |
|---|---|
| Form Factor | ATX |
| Supported Memory | 256GB DDR5 7600MT/s |
| PCI-E x16 Slots | 1 x PCI-E 4.0 |
| PCI-E x4 Slots | 3 x PCI-E 4.0 |
| Front IO | 1 x USB 3.2 Gen2 Type-C 1 x USB 3.2 Gen1 Type-A 2 x USB 2.0 |
| Rear IO | 1 x USB 3.2 Gen2x2 Type-C 3 x USB 3.2 Gen2 Type-A 4 x USB 3.2 Gen1 Type-A 2 x USB 2.0 |
| Audio | 5 x Audio Jacks 1 x Optical S/PDIF |
| Networking | 2.5 Gigabit LAN WiFi 6E |
The B650 TOMAHAWK WiFi also supports a maximum of 256GB of RAM at up to 7600MT/s speeds. Rear IO and networking are also incredibly strong. There are ten ports: three USB 3.2 Gen2 ports, four USB 3.2 Gen1 ports, a single USB 3.2 Gen2x2 port, and two USB 2.0 ports. This board also features 2.5 Gigabit LAN and WiFi 6E, five audio jacks and optical S/PDIF for those with dedicated speaker setups.
Step 2: Slotting in the RAM
The next part we’ll install is the G.Skill Trident Z5 NEO EXPO kit. EXPO RAM is specifically designed for AMD systems and features a unique memory profile that enhances the speed of the RAM and decreases the latency. With this profile enabled, this G.Skill kit can run at 6000MT/s speeds at a latency of CL30, which is sufficient for a top-end build.

On the design front, these G.Skill DIMMs match the black colour scheme we opted for in this build. Each RAM stick features a small strip of LEDs, providing some colour and lighting. These can be synced to other components using an application like SignalRGB.
Installing RAM is a relatively straightforward process. First, push down the tabs at the top and bottom of slots two and four on the motherboard. We’re using these slots as they offer the best efficiency when a build uses two DIMMs.

Line up one of the RAM sticks with the second slot. They can only go in one way. Place the DIMM into the slot, apply firm pressure on either side and push the RAM down until you hear a click. This indicates that the memory is correctly seated, and the push tabs secure it. Do this again for the second stick.

Step 3: Securing the SSD
We’re installing the SK Hynix P41 2TB Gen4 SSD for storage. SK Hynix is one of the significant flash storage manufacturers and is well known for providing SSDs for OEM devices. However, they also have a range of desktop NVMe SSDs that offer incredible speeds at competitive prices. The P41 is a 2TB drive that can reach speeds up to 7000MB/s on the reads and 6500MB/s on the writes.

We’ve opted for a 2TB drive primarily because of storage space. While a 1TB drive is a solid option for those saving money, 2TB is more than enough to install a range of big games and applications like Discord or alternative launchers.

To get this drive safely installed on the motherboard, first unscrew the SSD heatsink. Two screws need to be loosened. After this, the heatsink will come off. Make sure to remove the plastic tape on the thermal pads, as this will affect the thermal capabilities of the drive.

Push the SK Hynix P41 into the SSD slot. It will poke out at a 45-degree angle. This is normal. Push the drive down, and then use the MSI EZ M.2 clip to secure it. It spins around to hold the drive in the slot. Finally, place the heatsink back on top of the M.2 slot, and screw it down.

Step 3.5: Install CPU Cooler Mounting Hardware
Before placing the motherboard into the case, we need to install the mounting hardware for the CPU cooler. We’ll provide more details about the CoreLiquid I360 later, but this AIO (all-in-one) has two methods to secure a cooler on the AM5 socket. We opted for the first method, which involved removing the clips and installing some threads. And this is precisely what we’re going to do now.
To remove the AMD clips, take a Phillips screwdriver and loosen the four screws around the CPU socket. Lift the clips off the board and place them inside the motherboard box along with the screws. Some coolers require these to be installed, so they’re worth holding onto for future upgrades.

Take the AMD threads. These are hexagonal and don’t feature a strip in the middle. Screw these into the posts around the CPU socket, making sure to tighten them down with your thumbs.

Step 4: Place the Motherboard Inside the Case
The case housing all of the components in this build is the MSI MPG Gungnir 300R Airflow. We’ve reviewed and used this case a couple of times in previous builds. We were impressed by the Gungnir, as it brought some unique features to the table that made it stand out compared to the competition. The integrated GPU support bracket provides additional lighting and alleviates sag with large cards.

Additionally, the rotational PCI-E slots provide a quick way to switch between a horizontal or vertical graphics card installation, saving significant hassle. This chassis offers plenty of support for modern components such as E-ATX motherboards and graphics cards up to 360mm. There’s also space for a maximum of nine 120mm fans and 360mm liquid coolers on the top and front panels.
| Key Specs | MSI MPG Gungnir 300R Airflow |
|---|---|
| Form Factor | Mid-Tower |
| Motherboard Support | Mini-ITX, Micro-ATX, ATX, E-ATX |
| Case Dimensions (L x W x H) | 505mm x 235mm x 510mm |
| Front IO | 2 x USB 3.2 Gen1 Type-A 1 x USB 3.2 Gen2x2 Type-C 1 x 3.5mm Combo Jack |
| PCI-E Slots | 7 |
| Colour | White Black |
| Max Clearance | 175mm Cooler Height 360mm GPU Length 220mm PSU Length |
| Drive Support | Up to 6 x 2.5 inch Up to 2 x 3.5 inch |
| Fan Support | Top: 3 x 120mm Front: 3 x 120mm Rear: 1 x 120mm PSU Shroud: 2 x 120mm |
| Radiator Support | Top: Up to 360mm Side: Up to 360mm Rear: Up to 140mm |
| Pre-installed Fans | 4 x 120mm |
We first recommend laying the chassis flat to get the case installed correctly. This makes things more manageable, and you won’t have to hold onto the board while it gets screwed in. Line up the board with the standoffs inside the case and the rear IO shield cutout towards the top left.

Using the screws found in the accessories box, secure the motherboard to the case. Again, this is much easier when the case is flat and minimises the risk of losing any screws. Tighten the screws down, but don’t over-torque them, as this could damage the motherboard.

Step 5: Mounting the Liquid CPU Cooler
As I mentioned a few steps ago, this system’s CPU cooler is the MSI MAG CoreLiquid I360. This AIO was showcased at Computex 2024, and it piqued our interest. This liquid cooler features a universal mounting bracket, one of its many unique qualities. Essentially, the bracket attached to the CPU blockhead works for AMD and Intel builds, so there’s no reason to uninstall it, which normally adds to the overall hassle of building a PC.

The CoreLiquid I360 also features a dual-sided infinity mirror, showcasing a mass of RGB lighting that can be programmed and configured using various software. This cooler’s main USP (unique selling point) is that it is effortless to build with, ultimately reducing the number of steps you’ll need to follow in this guide.
MSI has allowed us to skip a step, as the three 120mm fans already come pre-installed on the radiator. We’ve seen a couple of manufacturers do this recently (namely Corsair and Montech), and I’m all for it.

Remove the case’s top panel and flip the radiator over so the tubing is on your right-hand side. Thread the cables through to the back of the case. MSI has streamlined the wiring on the CPU pump block and radiator, so there are minimal headers to plug in.
With one hand pushing the radiator up to the mounting rails, use the included screws to secure the radiator to the top of the chassis. Don’t over-tighten the screws, as we don’t want to damage the radiator.

Apply a rice-sized grain of thermal paste to the CPU and place the blockhead on top, lining up the mounting bracket with the threads on the motherboard. Using the thumbscrews, start to secure the blockhead to the board, tightening the thumbscrews in a star pattern. Use a screwdriver to tighten the thumbscrews the rest of the way.

Plug the fans into the ‘CPU_FAN’ header, and plug the CPU pump block into the ‘PUMP_FAN’ header. Both ARGB connectors fit together, allowing you to plug all of the RGB into just one set of pins.

Step 6: Mount the Graphics Card
The graphics card is one of the last parts to go into this gaming PC build. Fitting in with the overarching MSI theme, we’ve opted for an MSI RTX 4070 Ti SUPER Gaming X Slim. The RTX 4070 Ti SUPER is an incredibly popular NVIDIA GPU, offering solid framerates across games at 1440p and 4K. NVIDIA technologies such as DLSS and Frame Generation can push these frames further, increasing smoothness and stability.

This variant is the MSI Gaming X Slim version of the RTX 4070 Ti SUPER. It utilises a familiar Gaming X Trio-style design with a triple-fan shroud to keep thermals at bay. The main feature of this card is that it only takes up two slots, contrasting to the range of 3 and 3.5-slot cards on the market. The slimmer design means it isn’t as heavy and is more straightforward to install.
| Specification | MSI RTX 4070 Ti SUPER Gaming X Slim |
|---|---|
| Video Memory | 16GB GDDR6X |
| Memory Bus | 256-bit |
| Base Clock Speed | 2.34GHz |
| Boost Clock Speed | 2.68GHz |
| CUDA Cores | 8448 |
| RT Cores | 66 |
| Tensor Cores | 264 |
| Power Draw | 285W |
| Length | 307mm |
Remove the PCI-E covers at the back of the case. In this build, we removed covers two and three. The Gungnir 300R Airflow utilises reusable covers, which is great to see.

Once these covers are out, line up the RTX 4070 Ti SUPER Gaming X Slim with the GPU slot on the motherboard and push the card firmly down into the slot. Once the graphics card is seated correctly, the slot will click.

Use the screws removed from the PCI-E covers to secure the RTX 4070 Ti SUPER to the case. Finally, loosen the screws on the GPU support holder to slide it underneath the card, and adjust the height so that it alleviates sag on the card.

Step 7: Securing the Power Supply & Wiring
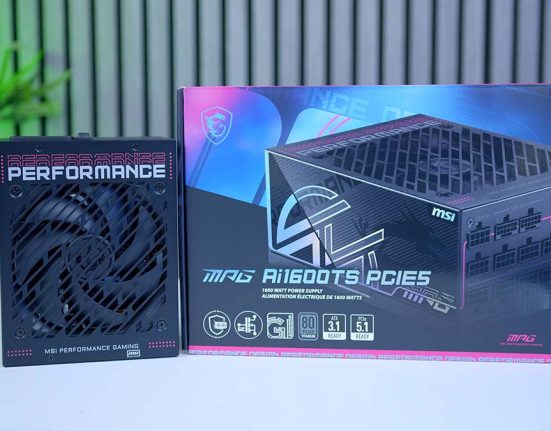
The last part to be installed is the power supply. This configuration utilises the MSI MAG A850GL PCIE5 unit. MSI’s MAG A850GL provides 850W power and features an 80 Plus Gold and Cybenetics Gold efficiency rating. This ensures that the power drawn from the wall doesn’t convert any extra energy to heat or noise.

Builders can leverage the fully modular cabling design, equipped with a 12VHPWR cable for NVIDIA GPUs. This means only one cable goes from the power supply to the RTX 4070 Ti SUPER, which looks much nicer. Overall, the A850GL PCIE5 is a well-rounded unit.
Before screwing down the power supply into the case, we’ll pick out the cables needed for this build first. The cables required are a 24-pin motherboard cable, two 8-pin EPS CPU cables, one 12VHPWR cable for the RTX 4070 Ti SUPER graphics card, and SATA power for the hub in the case. Plug all these in and tug at them to ensure they’re secure.

Slide the power supply into the back of the case, and use the four hexagonal screws to secure it in place. Make sure to use the correct screws, as other types could damage the threads, making a future upgrade somewhat challenging.

Thread the motherboard cable through the cutouts at the back and into the main chamber. Give the power cable a firm push into the header, and double-check that the cable clip is engaged.

The CPU power cables only go in one way, giving them a strong push to secure them in the header. Although we’re not overclocking this build, it’s good practice to plug CPU power into both headers, as it spreads the power delivery much more evenly, resulting in better temperatures.

For the graphics card power, slide the cable through one of the cutouts towards the bottom of the chassis. 12VHPWR cables sometimes require a bit of force to be seated correctly, so give the power cable a slight pull afterwards to ensure the clips are seated correctly.

SATA power cables are friction-fit and click slightly when they’re connected. They are notched, so they only plug in one way.
Step 8: Front Panel Wires & Switch On
Before powering on the build, the last step is to manage cables and plug in any front panel wires. The front panel cables, while primarily optional, are worth plugging in so that you can use all of the buttons and ports on the case.
This system uses JFP1, HD Audio, USB 3, and the USB C header. Fortunately, JFP1 is a single connector instead of individual pins, so plugging in this header is quite simple.

HD Audio is needed for the 3.5mm combo jack on the front of the case. This header has a blocked-out pin, so it plugs in one way. This is optional but worth it if you want an easily accessible 3.5mm jack.

USB 3 and USB C are right next to each other. These provide power and data for the USB ports on the front IO of the case. USB 3 has a slight notch in the centre, indicating the correct orientation of the cable.

USB C is keyed, so it can only be used in one specific way. Do not force this cable into the header, as it can easily be damaged.

Double-check the wires have been managed appropriately. We recommend using this time to unplug anything and tidy them up with some cable ties. After this, put the panels back on the case, plug in some peripherals and a monitor, and power the build.
Performance
![]()
4K, High Settings
Avg: 164FPS
Preset: High
V-Sync: Off
Anti Aliasing: TSAA
Texture Filtering: 8x
Ambient Occlusion: High
Volumetric Lighting: High
Dynamic Shadows: Enabled
Model Detail: High
![]()
1080p, Comp. Settings
Avg: 282FPS
Preset: Low
V-Sync: Off
Render Distance: Far
TSR: Off
Global Illumination: Off
Ray Tracing: Off
Effects: Low
Post Processing: Low
![]()
4K, High Settings
Avg: 69FPS
Preset: Custom
Resolution Scaling: FSR
Texture Quality: High
Anisotropy: x8
Contact Shadows: On
Ambient Occlude: High
Frame Generation: On
![]() 1440p, High Settings
1440p, High Settings
Avg: 106FPS
Preset: Custom
Resolution Upscaling: FSR
Texture Res: High
Volumetric Light: High
Shadow Res: High
SSAO: On
Motion Blur: Off
Framerates reached 69FPS in Hogwarts Legacy and surged past 100FPS in Alan Wake II. The MSI RTX 4070 Ti SUPER Gaming X Slim is a solid performer in rasterised gameplay, so we’re seeing smooth, tear-free gameplay.
The strong performance continued through to the Esports games. Fortnite and Apex Legends saw insane framerates, surpassing the 144Hz sweet spot with 164FPS and 282FPS, respectively.
Gallery


![FI_[SR190] HYTE X50 Ryzen 5 9600X & MSI RTX 5070 Ti](https://geekawhat.com/wp-content/uploads/2026/01/FI_SR190-HYTE-X50-Ryzen-5-9600X-MSI-RTX-5070-Ti-551x431.jpg)
![FI_[DP064] ASUS Prime AP303 + 9070XT](https://geekawhat.com/wp-content/uploads/2026/03/FI_DP064-ASUS-Prime-AP303-9070XT-551x431.jpg)
![FI_[DM93] Corsair 3200D Launch](https://geekawhat.com/wp-content/uploads/2026/03/FI_DM93-Corsair-3200D-LAUNCH-551x431.jpg)