The AMD Radeon RX 7900 XT is a powerful graphics card designed to handle the demands of 4K and 1440p, offering high framerates. However, with several price drops, the RX 7900 XT has become an incredibly competitive offering in the current market, making it a particularly unique 4K-capable GPU that is more affordable than the competition. For this reason, it can be challenging to pinpoint the best components to pair up with the RX 7900 XT while staying within budget.
This is precisely what this guide covers. In this article, we’ve gone through the PC building process step-by-step, covering how to assemble and install all of the components while discussing our reasoning for each part choice.
With affordability in mind, we’ve prioritised choosing components that will keep costs down and provide this system with great features and a solid aesthetic. This article was written alongside a dedicated video where James thoroughly explains the building process.
Build Process
Step 1: CPU Install
The first step of any PC build is the CPU installation. While this is one of the scarier parts of the process, it doesn’t require any additional tools and is less daunting than you think. We’ll walk through the process step-by-step. The CPU going into this build is the Ryzen 7 7700, an eight-core, 16-thread processor ideal for a mid-range system. As a slight step up from the Ryzen 5 7600, the Ryzen 7 7700 boasts a 5.3GHz clock speed and has a relatively low TDP of 65W, so thermals won’t be an issue.

This CPU is designed to handle 1440p and 4K gaming and can hit reasonably high framerates thanks to the high boost clock speed. The strongest element of the Ryzen 7 7700 is its highly affordable price; coming in around the $280 mark at the time of writing, this CPU is an ideal pickup for this build. While we could have opted for the Ryzen 5 7600 to save a bit more money, the Ryzen 7 7700 opens up some options for those using multi-threaded applications.
To get this CPU installed correctly, first, take the Gigabyte B650 Gaming X AX motherboard out of its box and place it on top. We do this because the box provides a soft but stable work surface that won’t damage the board. After this, unhook the metal arm from its latch and lift the metal CPU socket cover, exposing the pins underneath.

Next, locate the golden arrow, which, for AMD CPUs, is typically at the top left; there will also be a similar arrow located on the motherboard. Line these arrows up and carefully lower the Ryzen 7 7700 into the CPU socket, which should sit snugly in place. Getting the CPU into the socket requires no force, so don’t push the CPU or apply any pressure to it once it’s properly lined up.

Drop the CPU socket cover and push the metal retention arm until it sits underneath its hook. It may seem like you’re forcing the arm into place, but because we’re securing the CPU, it does take a fair amount of pressure; this is normal. While the arm is being pushed down, the plastic protector will pop off, and we recommend keeping this inside the motherboard box for any repairs or future RMAs.
The motherboard used for this system is the Gigabyte B650 Gaming X AX. We’ve reviewed this motherboard, and it’s an excellent option for mid-range builds like this one. This motherboard stands out for two particular reasons. The first is the price point. Again, sticking with the mindset of keeping everything affordable, the B650 Gaming X AX is a sub-$200 motherboard, which continues to keep our costs down.

Secondly, the B650 Gaming X AX comes with a decent set of features, which includes support for RAM overclocking up to 8000MT/s, 2.5 Gigabit LAN and WiFi 6E for networking, a Gen5 M.2 SSD slot, and a decent set of rear IO, which includes five USB 3.2 ports, and three USB 2.0 ports. Overall, the B650 Gaming X AX is a solid option for those who are a bit more price-conscious.
| Specification | Gigabyte B650 Gaming X AX |
|---|---|
| Form Factor | ATX |
| Supported Memory | 192GB DDR5 8000MT/s |
| PCI-E x16 Slots | 1 x PCI-E 4.0 |
| PCI-E x4 Slots | 1 x PCI-E 5.0 2 x PCI-E 4.0 |
| Front IO | 1 x USB 3.2 Gen2x2 Type-C 1 x USB 3.2 Gen1 2 x USB 2.0 |
| Rear IO | 1 x USB 3.2 Gen2 Type-C 1 x USB 3.2 Gen2 Type-A 3 x USB 3.2 Gen1 Type-A 2 x USB 2.0 |
| Audio | 3 x Audio Jacks |
| Networking | 2.5 Gigabit LAN WiFi 6E |

Step 2: Slot in the RAM
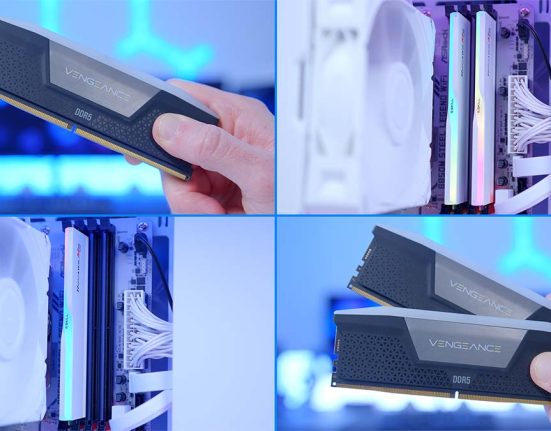
Next, it’s time to install the Corsair Vengeance DDR5 EXPO RAM, which offers speeds of 6000MT/s with a latency of CL30. EXPO kits are ideal for AMD systems as they minimise latency timings with a unique memory profile specific to AMD. This kit provides excellent performance, which can be pushed further with some overclocking, and the top of each DIMM provides some much-needed flair in the form of RGB lighting, which can be controlled with Corsair iCUE software.

While you might assume that this set of DIMMs was pricey, at $130 or so on Newegg at the time of writing, this DDR5 RAM kit is pretty affordable—additionally, few other kits at this price point offer such solid speeds and latency timings.
To get this kit slotted into our motherboard, first, push down the clips on either side of the DIMM slots two and four, revealing the entire slot length. Then, line up each stick of memory; they only go in one way, so this should be relatively easy.

Finally, the RAM is pushed into the slot by applying even force on both sides of the DIMM. We do this to ensure that the RAM sticks go straight, as the slot could be damaged if at an angle.

Step 3: Mount the Gen4 SSD
The storage we’ve picked for this PC build is the TeamGroup MP44L 1TB Gen4 SSD. We’ve used this TeamGroup drive in a few of our recent builds, and it is an excellent option for those looking to save money. While we could have picked out a Gen5 drive, it makes more sense to save our cash here and choose a cheaper SSD, as most PCI-E 5.0 storage devices sit at more than $150 for just 1TB.

Despite the TeamGroup MP44L being a cheaper drive, it offers excellent performance, with read and write speeds that can read up to 5000MB/s and 4500MB/s, respectively. We’ve stuck to a 1TB capacity primarily because of the price, but saving some money here allows us to spend a bit more for other components or save it for future upgrades.
The SSD heatsink must first be removed before installing our drive. Grab a small Phillips screwdriver, loosen the heatsink from the motherboard, and put it to one side. This exposes the SSD slot.

Before inserting the drive in the M.2 slot, remove the tape covering the thermal pad underneath the heatsink and the drive. Place the TeamGroup MP44L 1TB into the slot; it will poke out at a 45-degree angle. Then, secure the drive down with the included M.2 screw. Finally, place the heatsink back on top of the SSD, and screw it into place.

Step 4: Place the Motherboard in the Case
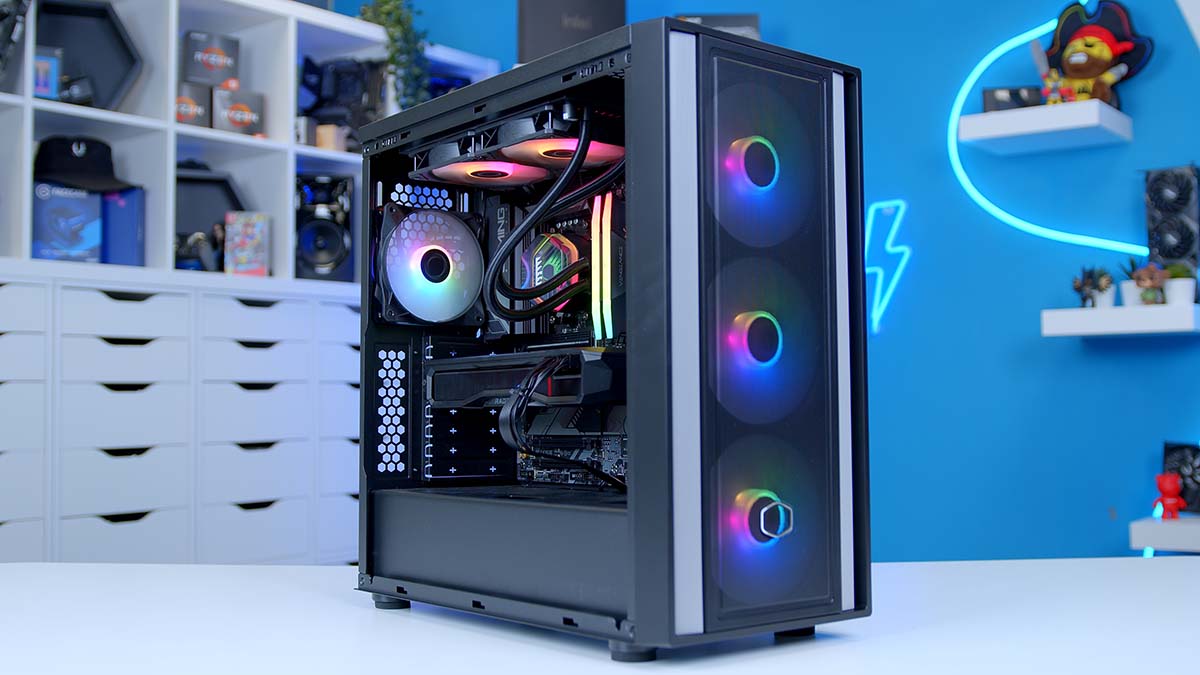
Because this is an AMD build, there’s no requirement to fit a backplate to the motherboard. For this reason, we can now get the board inside the case and finish the rest of the build. The case that we’ve opted for MasterBox 600 from Cooler Master. This case is a budget-oriented chassis designed to bring solid airflow while minimising costs.

The MasterBox 600 supports reverse connector motherboards and graphics cards up to 410mm long without a front-mounted radiator, and it can house liquid coolers up to 420mm at the front and 360mm AIOs at the top. It also has four pre-installed RGB SickleFlow fans and space for three additional 120mm fans on the top panel. This case isn’t mindblowing regarding features, but it doesn’t need to be based on its exceptional price point.
| Key Specs | Cooler Master MasterBox 600 |
|---|---|
| Form Factor | Mid-Tower |
| Motherboard Support | Mini-ITX, Micro-ATX, ATX, E-ATX |
| Case Dimensions (L x W x H) | 474mm x 210mm x 481mm |
| Front IO | 2 x USB 3.2 Gen1 Type-A 1 x USB 3.2 Gen2x2 Type-C 1 x 3.5mm Combo Jack |
| PCI-E Slots | 7 |
| Colour | White or Black |
| Max Clearance | 170mm CPU Cooler Height 410mm GPU Length 170mm PSU Length |
| Drive Support | Up to 6 x 2.5 inch Up to 2 x 3.5 inch |
| Fan Support | Front: 3 x 120mm Top: 3 x 120mm Rear: 1 x 120mm |
| Radiator Support | Front: 420mm Top: 360mm Rear: 120mm |
| Pre-Installed Fans | 3 x 140mm, 1 x 120mm |
The MasterBox 600 is configured out of the box to support ATX motherboards, so there’s no reason to move around any standoffs before we get the B650 Gaming X AX installed. We first recommend laying the case flat on your work surface to get this motherboard inside the case. Then, line up the integrated rear IO shield with the cutout at the top left of the chassis.

Grab the motherboard screws from the small box inside the case, and secure the motherboard in place. Make sure to use the correct screws, as other screws could damage the standoffs, resulting in a potentially tricky future upgrade.
Step 5: Mount the CPU Cooler
Before installing the cooler, it’s worth briefly highlighting which AIO we’ve chosen and why. The liquid CPU cooler in this build is the MasterLiquid 240 Atmos from Cooler Master. Across our testing, this is one of the best 240mm liquid coolers capable of handling the Core i7-14700K during four-thread and eight-thread workloads.

Not only is the 240 Atmos capable of keeping a vast range of CPUs cool, but it is also near-silent during operation. This is a Cooler that we’ve been impressed with repeatedly, and it’s well worth picking up if you’re looking to keep temperatures to a minimum.
The first thing we need to do is attach the correct mounting hardware to the CPU blockhead. Because this is an AMD build, we need the curved mounting brackets. Slide these into the CPU blockhead and screw them down using the four small Phillips screws in the mounting hardware. We don’t need to attach the fans to the radiator because the 240 Atmos comes pre-installed with both fans.

To secure the radiator to the case, we recommend placing one of the screws on your screwdriver beforehand. Using one hand, push the radiator up to the top of the case, and with your other free hand, secure the radiator screw in one of the corners. Keep holding onto the radiator until there’s a screw in each corner. We recommend not tightening all of the radiator screws down so that the cooler can be shifted if there’s not enough clearance.

Next, remove the two plastic AMD mounting clips at the top and bottom of the CPU. Four Phillips head screws hold in these clips, and again we recommend keeping these in the motherboard box for a future RMA or potential upgrade.

Screw in the four AMD threads into the posts around the CPU socket, make sure they’re nice and tight. Apply some thermal paste to the CPU IHS (integrated heat spreader). We typically use a rice grain or pea-size blob. Finally, push the CPU block head onto the CPU IHS and secure it with the thumbscrews. We advise going from corner to corner, tightening with finger strength first and then using a screwdriver to torque the screws the rest of the way, making sure not to over-tighten.

Step 6: Graphics Card Install
The shining star of this build, which is where the majority of the budget has gone, is the AMD Radeon RX 7900 XT. After the launch of the RTX 4000 SUPER range, AMD hit back with several price drops across a range of cards, and the RX 7900 XT was one of these GPUs to be hit by a pricing change. Sitting below $700, the RX 7900 XT is one of the most competitively priced graphics cards on the market, especially considering this is a 4K-capable GPU.

We’ve picked out the reference model card for this build as it is one of the cheaper options. This means there are no extra boosts to the clock speed or enhanced cooling, but it’s an affordable option compared to some of the AIB models from other manufacturers. Performance-wise, the RX 7900 XT can handle the demands of 1440p while having great legs at 4K. This card can compete with the RTX 4070 Ti SUPER in rasterised gameplay and has plenty of longevity in modern titles.
To get the RX 7900 XT into the case, we first need to remove the PCI-E covers on the back. Unfortunately, the MasterBox 600 has one-use PCI-E covers, so we recommend placing the GPU in the case first, which will show you how many covers need to be removed.

After this, take the covers out and push the graphics card into the slot firmly until you hear a click. Then secure it using the screws found inside the accessory box. The RX 7900 XT isn’t extremely heavy, so a support bracket isn’t required for this card.

Step 7: Power Supply & Cabling
The last part we need to install is the PSU, which powers all of the components in this build. The unit we’ve opted for is the Thermaltake Smart BM3 750W, which is a power supply primarily geared towards price-conscious buyers. At less than $100 at the time of writing for 750W, the Smart BM3 is highly affordable. This PSU is semi-modular, so you can pick and choose PCI-E and SATA cables. The Smart BM3 also has an 80 Plus Bronze efficiency rating, ensuring minimal power is lost as heat or noise.

Before we get this power supply into the case, we recommend choosing the required cables first. Because the Thermaltake Smart BM3 is semi-modular, the only wires we need to add are PCI-E and SATA. The PCI-E cable needs two 8-pin headers, and we’re using SATA to power the fans in the case. Then, we can get the PSU screwed into the back of the case using the hexagonal screws in the accessory box.

Now, we can start wiring up the build as usual. We recommend starting with the motherboard power cable, which is the easiest of the main four. The header is rectangular and only goes in one way. Make sure to give this cable a bit of a tug after it’s been plugged in to ensure it won’t come out easily.

Next is CPU power. The Gigabyte B650 Gaming X AX motherboard has an 8-pin and 4-pin header, so we’ll plug in both just to be safe. It’s worth noting that the smaller header is primarily for overclocking, but it’s best to plug in both for better power delivery.

The RX 7900 XT has two PCI-E 8-pin headers; make sure both of these are plugged in. These power connectors look similar to the CPU headers but are not the same. Again, give the cables a slight tug to ensure the clips are correctly engaged.

Finally, for SATA power, plug in the hub that comes with the 240 Atmos and fan/RGB hub on the MasterBox 600; this provides power for any fans or RGB cables plugged in here.
Step 8: Front Panel Cables & Power On
We tend to leave front panel cables until last, as it’s easier to plug everything once we know how much clearance there is. The MasterBox 600 has a single USB Type-C port and two USB 3.2 Gen1 Type-A ports, so we’ll need to plug in the USB-C and USB 3.0 header on the motherboard. We’ll also need to plug in JFP1, which allows us to switch on the build, and HD Audio for the 3.5mm combo jack on the IO.

After this, double-check that all cables have been plugged in correctly. Place the panels back on, plug in a monitor and peripherals, and then power on the build!
Performance
![]()
4K, High Settings
Avg: 165FPS
Preset: High
V-Sync: Off
Anti Aliasing: TSAA
Texture Filtering: 8x
Ambient Occlusion: High
Volumetric Lighting: High
Dynamic Shadows: Enabled
Model Detail: High
![]()
1080p, Comp. Settings
Avg: 311FPS
Preset: Low
V-Sync: Off
Render Distance: Far
TSR: Off
Global Illumination: Off
Ray Tracing: Off
Effects: Low
Post Processing: Low
![]()
4K, High Settings
Avg: 150FPS
Preset: High
V-Sync: Off
DLSS: Performance
Textures: High
Particle Quality: High
Tessellation: Near
Shaders: High
![]() 1440p, High Settings
1440p, High Settings
Avg: 140FPS
Preset: Recommended
V-Sync: Off
Anti-Aliasing: TAA High
Effects Quality: High
Texture Quality: High
Shadow Quality: High
Motion Blur: Off
From our testing and benchmarking, the RX 7900 XT and Ryzen 7 7700 perform well at 4K and 1440p high settings across Esports and AAA games. This mid-range system is more than capable of handling the demands of top-end gaming, offering excellent framerates across a range of titles.
Gallery


![FI_[SR190] HYTE X50 Ryzen 5 9600X & MSI RTX 5070 Ti](https://geekawhat.com/wp-content/uploads/2026/01/FI_SR190-HYTE-X50-Ryzen-5-9600X-MSI-RTX-5070-Ti-551x431.jpg)
![FI_[DP064] ASUS Prime AP303 + 9070XT](https://geekawhat.com/wp-content/uploads/2026/03/FI_DP064-ASUS-Prime-AP303-9070XT-551x431.jpg)
![FI_[DM93] Corsair 3200D Launch](https://geekawhat.com/wp-content/uploads/2026/03/FI_DM93-Corsair-3200D-LAUNCH-551x431.jpg)
![FI_[DM89] Phanteks Evolv + AORUS 5090 9850X3D Gallery (8)](https://geekawhat.com/wp-content/uploads/2026/02/FI_DM89-Phanteks-Evolv-AORUS-5090-9850X3D-Gallery-8-551x431.jpg)