$1600 is an excellent budget for a fantastic 1440p gaming PC. At this price point, we can pick out a graphics card like the RTX 4070 SUPER, which offers solid performance at 1440p with additional benefits such as DLSS and ray tracing. But for those sticking to this budget, it can be challenging to determine the best parts to pick up after your graphics card.
That’s where we’ve done all of the work for you. We’ve assembled a sophisticated gaming PC under the $1600 mark.
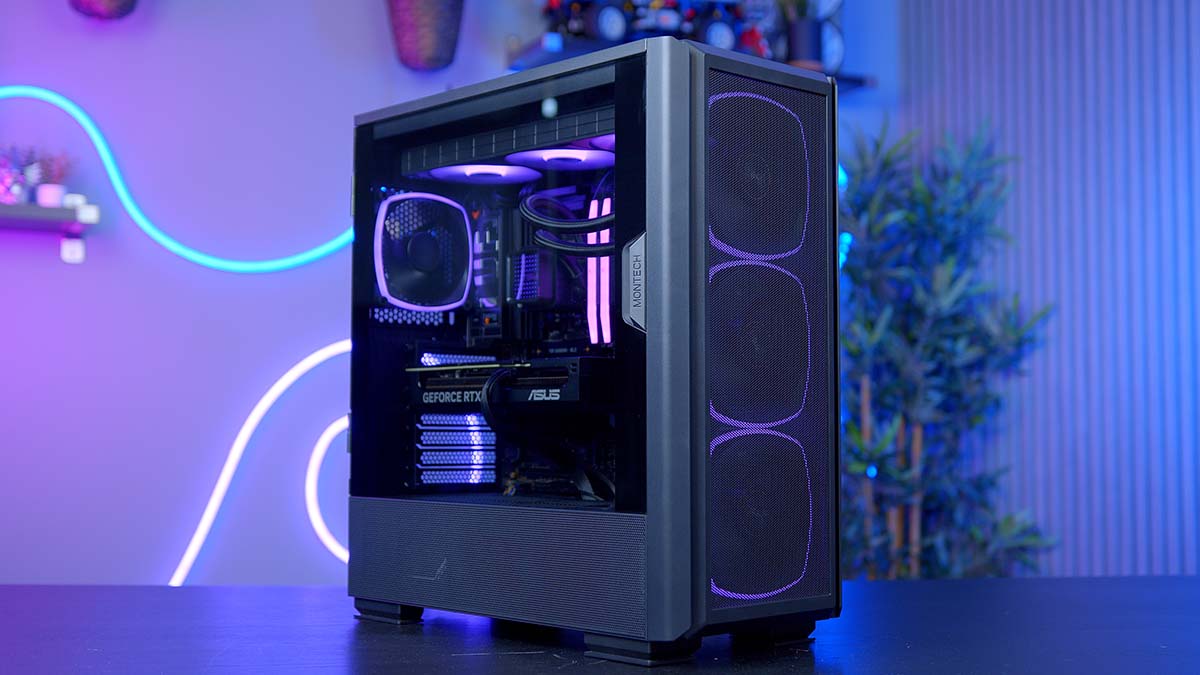
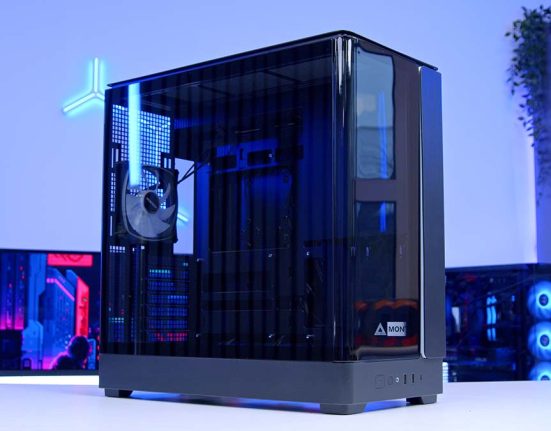
The AMD Ryzen 5 9600X features an ASUS Prime RTX 4070 SUPER graphics card encased in the Montech Sky Two chassis, which features dual tempered glass panels and four vibrant pre-installed RGB fans.
Our dedicated PC build video, which you can find below, includes additional details about the building process and our thoughts on each part.
Build Process
Step 1: Socket the CPU
The first component in this PC build we’ll be installing the CPU. We’ve picked out the AMD Ryzen 5 9600X, released in August 2024. This processor is the sibling to the Ryzen 5 7600X, offering a higher clock speed at 5.4GHz, stronger efficiency and better thermals. Like its previous generation counterpart, the Ryzen 5 9600X can sustain its boost clock speed, giving it an edge in modern games when paired with the right graphics card.

Efficiency is a significant focus for the Ryzen 9000 range. These CPUs operate at lower temperatures than the Ryzen 7000 range, so you can feasibly cool the Ryzen 5 9600X with an air cooler. A beefier option isn’t required.
First, remove the motherboard from its box and place it on top to get this CPU installed. We do this because the box is a solid but soft surface to work on, minimising the risk of any damage to the board. Unhook the metal retention arm next to the CPU socket, lift it, and raise the cover, exposing the AM5 socket underneath.

Grab the CPU by the sides, and line up the golden arrow at the top left with a matching arrow on the motherboard. This indicates the correct orientation for the processor to sit in the socket. Lower the CPU into the socket and give it a slight wiggle to ensure it’s seated properly.
Place the metal socket cover on the processor and push the mental retention arm underneath the hook. This does take some force, but this is normal. The plastic protector will pop off while this is happening. Keep this inside the motherboard if needed for a potential return or RMA.

The motherboard used in this PC build is the ASUS TUF Gaming X870-Plus WiFi. This board has been well-reviewed across our X870 coverage and is an option we typically recommend for mid-range PC builds. It features an all-black industrial aesthetic, synonymous with the TUF branding.
| Specification | ASUS TUF Gaming X870-Plus WiFi |
|---|---|
| Form Factor | ATX |
| Supported Memory | 192GB DDR5 8000MT/s |
| PCI-E x16 Slots | 1 x PCI-E 5.0 2 x PCI-E 4.0 |
| PCI-E x4 Slots | 2 x PCI-E 5.0 3 x PCI-E 4.0 |
| VRM Power Phases | 16+2+1 |
| Front IO | 1 x USB 3.2 Gen2x2 Type-C 1 x USB 3.2 Gen1 Type-A 2 x USB 2.0 |
| Rear IO | 2 x USB4 Type-C 3 x USB 3.2 Gen2 Type-A 3 x USB 3.2 Gen1 Type-A 1 x USB 2.0 |
| Audio | 1 x Optical S/PDIF 5 x Audio Jacks |
| Networking | 2.5 Gigabit LAN WiFi 7 |
On the expansion front, this board features a Gen5 graphics card slot alongside two PCI-E 5.0 NVME SSD slots, supporting the fastest storage on the market. The rear IO on this board is pretty bountiful, with nine ports, two of which are USB4. There’s also 2.5 Gigabit LAN and WiFi7 for networking options, so there are plenty of ways to get connected up to high speed.

Step 2: Slotting in the RAM
The next part we’ll be installing is the RAM. This build features a Corsair Vengeance DDR5 342GB black kit rated at 6000MT/s with a latency of CL36. Performance-wise, this RAM is more than ample for gaming, and its strong speeds pair well with the Ryzen CPU we’ve chosen.

This kit has been colour-matched to fit the build’s predominantly black theme. Corsair RAM also features a strip of LEDs on the top of each DIMM, offering vibrant, customisable lighting. Using software like SignalRGB, this can be synced with other parts in the build.
First, push down the tabs at the top and bottom of slots two and four to insert this RAM into the motherboard. We use these slots because they offer the best efficiency for two DIMMs compared to slots one and three.

Then, line up one of the RAM DIMMs with slot two on the motherboard and apply even pressure to both sides. Push the RAM down into the slot until you hear a click. This indicates that the memory is seated correctly. Do the same again for the second RAM DIMM.

Step 3: Mounting the NVMe SSD
The TeamGroup MP44L SSD houses the games and our operating system. This Gen4 NVMe M.2 SSD can reach speeds of up to 5000MB/s and 4500MB/s on reads and writes, respectively. These speeds are ideal for gaming and will ensure quick load and boot times.

Typically, we would choose a 2TB SSD, especially as the number of games has increased over the years. However, 1TB will be more than enough for most gamers, but it may be worth adding an extra SSD in the future.
Thanks to the tool-less mechanisms on the motherboard, installing this SSD is pretty simple. First, loosen the two screws at the sides of the SSD heatsink, located just under the CPU socket. Once the screws are loose enough, remove the heatsink from the board.

Take off the small piece of tape covering the thermal pad on the SSD heatsink and place it to one side. Grab your SSD and push it into the slot on the motherboard. It will poke out at a 45-degree angle. Then, push the drive down until the latch locks it in place. Put the heatsink back on top of the drive and tighten the screws until the heatsink is secure.

Step 3.5: Attach the CPU Cooler Mounting Hardware
Before installing the motherboard inside the case, we can attach part of the cooling hardware to make installation easier later. To do this, grab a Phillips screwdriver and loosen the four screws around the CPU socket, which hold the plastic brackets in place. Once these are loose, remove them and put them inside the motherboard box in case they’re needed for a future upgrade.

Locate the AMD mounting screws and install them into the standoffs underneath the plastic brackets. Just use thumb and finger strength. Pliers are not needed for this installation.

Step 4: Place the Motherboard Inside the Case
The Montech Sky Two GX houses all of the components in this PC build. We’ve used the Sky Two GX before, as it’s a sturdy and reliable chassis with an airflow focus. It features a tempered glass side panel and a mesh front, ensuring air can freely flow through the front and be exhausted out the back.

| Key Specs | Montech Sky Two GX |
|---|---|
| Form Factor | Mid-Tower |
| Motherboard Support | Mini-ITX, Micro-ATX, ATX, E-ATX |
| Case Dimensions (L x W x H) | 460mm x 215mm x 500mm |
| Front IO | 1 x USB Type-C 2 x USB 3.0 Type-A 1 x 3.5mm Mic-In 1 x 3.5mm Audio-Out |
| PCI-E Slots | 7 |
| Colour | Black White |
| Max Clearance | 168mm Cooler Height 400mm GPU Length 210mm PSU Length |
| Drive Support | Up to 6 x 2.5 inch Up to 2 x 3.5 inch |
| Fan Support | Side: 2 x 120mm Top: 3 x 120mm Front: 3 x 140mm Bottom: 2 x 120mm Rear: 1 x 120mm |
| Radiator Support | Top: Up to 360mm Front: Up to 360mm |
| Pre-Installed Fans | 3 x 140mm |
This chassis comes with three pre-installed 120mm addressable RGB fans on the front panel, providing ample airflow for the build. All lighting can be synced up and powered through the case, and there are two buttons to change the mode and colour. Alternatively, those who like to tinker can plug the RGB into your motherboard for extra customisation. Overall, this is a gorgeous case with ample clearance and room for a range of modern PC components, and its glass design allows you to show off this build as a bit of a statement piece.

To install the motherboard inside the case, first locate the case accessories box at the rear of the chassis. This small box contains the screws needed to secure the motherboard. Lay the case flat, remove the glass side panel, and place the board inside the case, lining up the holes with the standoffs dotted around the case. Use nine of the motherboard screws to hold it in place.
Step 5: Install the Liquid CPU Cooler
Keeping the AMD Ryzen 5 9600X nice and cool is the ASUS Prime LC 360 ARGB. This 360mm AIO (all-in-one) liquid cooler features three 120mm fans already pre-installed on the radiator, which saves us some time during the building process. The CPU blockhead pump utilises a customisable infinity mirror with plenty of vibrant RGB shining through.
A single cable connects the fans and addressable RGB to your build, streamlining cable management during installation. The lens on the infinity mirror is also interchangeable, providing further customisation options.
To get this CPU cooler installed, first remove the top panel of the case. Then, holding onto the radiator with one hand, secure it to the top of the case. We recommend pushing the cooler up to the mounting rails and then using the screws to secure it to the chassis. Make sure not to overtighten the screws, as this could potentially damage the radiator.

Pull the Intel mounting bracket from the CPU blockhead and slide in the AMD bracket. Then, place the CPU blockhead on top of the CPU, lining up the bracket with the threads. Using the thumbscrews, secure the blockhead to the motherboard. Tighten the screws in a star pattern. Start by torquing them with your fingers and thumbs, then use a screwdriver to tighten them the rest of the way.

After this, we took the opportunity to install a rear fan. While the three pre-installed fans that come with the case are great, an additional fan is needed at the back of the chassis to exhaust air properly. This build uses the AX140 PWM fans. Line up the fan with the mounting points at the back of the case, and use the included screws to secure it in place.

Step 6: Power Supply & Cabling
One of the last components we’ll install in this PC build is the power supply, which we’ve chosen to be the ASUS Prime 850W Gold unit. This power supply provides 850W of juice, which is more than enough for the parts in this configuration. The ASUS Prime 850W Gold features a fully modular cabling system, allowing you to choose which cables are needed.

This unit has an 80 Plus Gold efficiency rating, ensuring minimal power is lost as additional heat or noise. ASUS also offers an eight-year warranty as standard with this power supply, which is a solid value add.
Before screwing the power supply into the case, we’ll attach all of the required cables for this build. In this configuration, we need one 24-pin motherboard power cable, two 4+4 pin EPS CPU cables and one 16-pin graphics card cable. Plug these all into the power supply.

Then use the included hexagonal screws to secure the power supply to the case. Slide it into the back of the chassis and tighten the screws until the PSU is snug inside the case.

Next, we’ll plug all of the cables into the build. Starting with motherboard power, this long rectangular connector only plugs into the motherboard one way. Firmly push the cable until it clicks, then tug it to ensure it’s seated properly.

The ASUS TUF Gaming X870-Plus WiFi has two 8-pin EPS headers at the top left of the motherboard. Plug both cables in, applying the same force you did with the motherboard cable. After this, we recommend cable managing GPU power so that it’s accessible once the graphics card is installed.

Step 7: Front Panel Wiring
The front panel cables are the last wires that need to be plugged in. These are required to use the power button on top of the case and for the USB ports. We advise starting with JFP1, otherwise known as front panel power. This cable has a blocked-out pin, indicating which way it needs to be plugged in.

The front panel audio, or ‘HD Audio,’ is at the bottom left of the motherboard. Again, this header has a blocked-out pin. Plug it in to use the 3.5mm microphone and headphone jacks on the case.

The final two front panel wires are USB 3.0 and USB-C. These cables can only be plugged in one way. USB 3.0 has a small notch, and the USB-C header is keyed. Firmly push both of these into their headers.

Step 8: Installing the Graphics Card
The final part we’ll install is the graphics card. For this build, we’ve chosen the RTX 4070 SUPER, which fits with the ASUS Prime theme. This small-form-factor graphics card has three fans designed to keep it cool. It matches our chosen colour scheme and has a black-out shroud, which includes the backplate.

This is an OC model, so the boost speed is clocked slightly higher than MSRP models, providing a slight boost in gaming performance. Because this is a small form factor card, it uses 2.5 slots instead of three, allowing it to squeeze into the Montech Sky Two GX case easily. Overall, it’s a solid card for this build and is ideal for some 1440p gaming in your favourite AAA titles.
| Specification | ASUS Prime RTX 4070 SUPER OC |
|---|---|
| Video Memory | 12GB GDDR6X |
| Memory Bus | 192-bit |
| Base Clock Speed | 1.98GHz |
| Boost Clock Speed | 2.55GHz |
| CUDA Cores | 7168 |
| RT Cores | 56 |
| Tensor Cores | 224 |
| Power Draw | 220W |
| Length | 269mm |
Remove the PCI-E covers at the back of the case to get this card installed. Remove covers two and three (from the top down). Then, push the graphics card into the slot, giving it a firm push until you hear a click.

Using the screws removed from the PCI-E covers, secure the graphics card in place. Then, plug the 16-pin graphics card power cable into the RTX 4070 SUPER.

Performance
Framerates in Hogwarts Legacy and Alan Wake II were pretty solid, with averages of 106FPS and 194FPS, respectively. The RTX 4070 is a great card in rasterised gameplay at 1440p.
The strong performance continued in our Esports benchmarks. Fortnite and Apex Legends saw insane framerates, surpassing the 144Hz sweet spot with 291FPS and 232FPS, respectively.
Gallery




 1440p, High Settings
 1440p, High Settings, RTX On
![FI_[DM87] HAVN BF & RTX 5090 Build](https://geekawhat.com/wp-content/uploads/2026/01/FI_DM87-HAVN-BF-RTX-5090-Build-551x431.jpg)