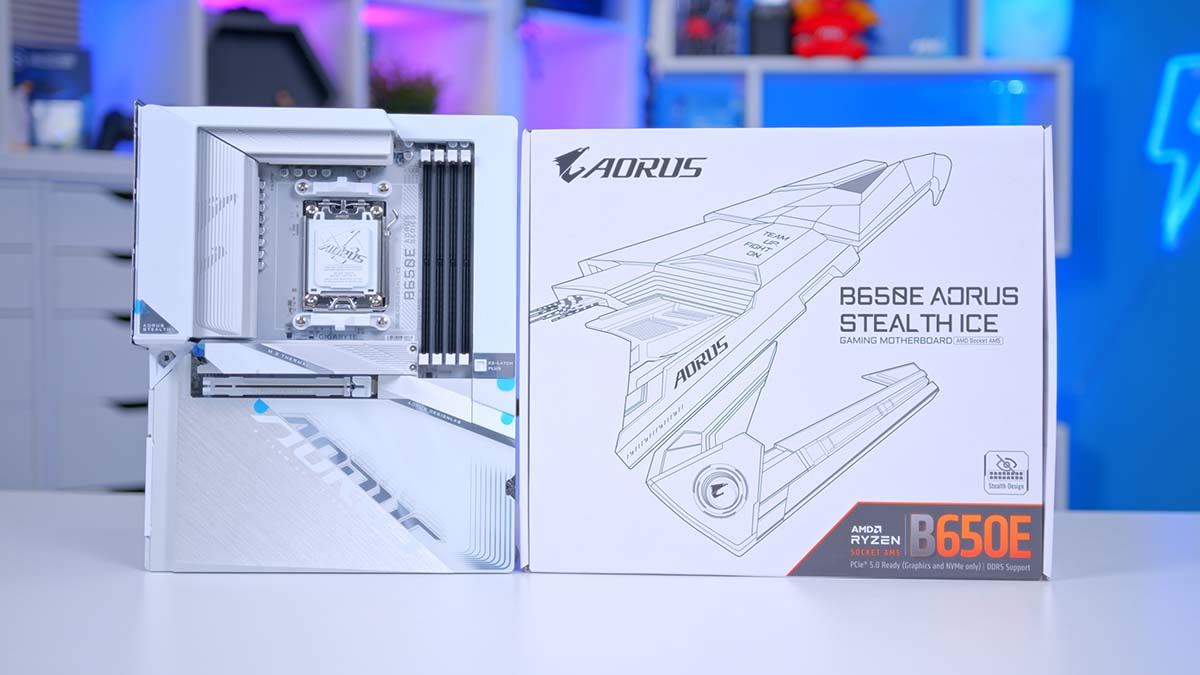
The B650E AORUS STEALTH ICE is a hidden connector solution from Gigabyte designed to keep cables out of sight and out of mind. The STEALTH branding had been around before the inception of standalone desktop motherboards, with Gigabyte providing a PC-building kit that featured no visible power cables. However, with the B650E AORUS STEALTH, the reverse connector design has hit the shelves, competing alongside MSI PROJECT ZERO and ASUS BTF boards. We’ve put the B650E AORUS STEALTH ICE through the wringer in a series of tests to see if it offers any significant differences compared to other no-cables motherboards.
Gigabyte is one of the few manufacturers that offers a way of building a genuinely white system thanks to its ICE motherboards. Gigabyte has gone the extra mile to provide an entirely white PCB, resulting in an exceptionally sophisticated lighter theme. Pair this with the board having no visible power connectors, and prospective buyers can build the cleanest white PC ever!
In this review, we’ll examine the B650E AORUS STEALTH ICE in great detail, covering its specs, box accessories, design, expansion slots, internal connectors, and more.
Buy the Gigabyte B650E AORUS STEALTH ICE on:
Specification
Like other reverse connector motherboards we’ve reviewed or used in PC builds, the B650E AORUS STEALTH ICE has decent specs. Because this board is on the B650E chipset, its feature set is primarily geared towards mid-range or top-end systems that need plenty of ports and expansion options. Additionally, B650E boards have better overclocking support for those who plan on pushing their system harder.
This ATX board accommodates RAM speeds up to 8000MT/s, maxing out capacity at 256GB, equivalent to four 64GB DIMMs. Alongside this, the B650E AORUS STEALTH ICE uses a 12+2+2 VRM power configuration, spreading out voltages over multiple phases to help with temperatures. While this isn’t the strongest config we’ve seen for power, it’ll allow enthusiasts to push their system with a nice overclock.

Regarding expansion, the B650E AORUS STEALTH ICE is slightly more restrictive than other boards around this price point. This primarily comes down to the fact that the board is designed to keep things looking clean while offering decent features. For this reason, some extra slots that may have appeared initially have been stripped back to allow for more heatsink coverage. The result is that there is only one Gen5 x16 slot and three M.2 slots, comprised of two Gen4 slots and one Gen5 slot.
| Specification | Gigabyte B650E AORUS STEALTH ICE |
|---|---|
| Form Factor | ATX |
| Supported Memory | 256GB DDR5 8000MT/s |
| PCI-E x16 Slots | 1 x PCI-E 5.0 |
| PCI-E x4 Slots | 1 x PCI-E 5.0 2 x PCI-E 4.0 |
| VRM Power Phases | 12+2+2 |
| Front IO | 1 x USB 3.2 Gen2x2 Type-C 1 x USB 3.2 Gen1 2 x USB 2.0 |
| Rear IO | 1 x USB 3.2 Gen2 Type-C 2 x USB 3.2 Gen2 Type-A 4 x USB 2.0 5 x USB 3.2 Gen1 Type-A |
| Audio | 3 x Audio Jacks |
| Networking | 2.5 Gigabit LAN WiFi 7 |
The number of front USB headers is somewhat limited. This board has four USB headers on the back of the PCB: two USB 2.0, one USB 3.2 Gen1, and one USB 3.2 Gen2x2 Type-C. It would be great to see more USB 2.0 headers, as modern fans and coolers (especially daisy-chain designs) have started to use this header to extrapolate data about temperatures or utilisation. Fewer headers mean it becomes challenging to plug these in.
Rear USB, however, is very bountiful. You’ll find twelve ports in total to choose from. Five are USB 3.2 Gen1 Type-A ports, followed by four USB 2.0 ports. The remaining three are USB 3.2 Gen2 ports, with one of them being a Type-C. It’s great to see such a robust selection of USB ports, as this opens up peripheral options for gamers and content creators.

Also on the rear IO are three audio jacks and the networking options. The 3.5mm audio serves as basic line-in, mic-in, and headphones-out, accommodating a small speaker setup, headset, and microphone. For networking, this board offers WiFi 7 for those who prefer a high-speed wireless setup or 2.5 Gigabit LAN, which provides excellent stability.
Concerning pricing, the B650E AORUS STEALTH ICE is hovering around the $250-$300 mark at the time of writing. This board isn’t available at many vendors, so pricing will vary.
What is Gigabyte STEALTH?
As we’ve hinted at in the introduction, STEALTH boards are Gigabyte’s branding for their reverse connector boards. Essentially, the central premise of these motherboards is to move all of the visible connectors and headers to the back of the PCB. This means power, USB, fans, and RGB will all be shifted to the back of the board. The result is that motherboards look much cleaner and have a well-rounded design at the front, free of cables.
Gigabyte was technically the first to introduce this to the market with their PROJECT STEALTH PC building kit, which featured this proprietary cable-free design. However, this was only made available through a PC build. Desktop motherboards and graphics cards couldn’t be purchased separately until 2024.

When 2024 rolled around, this would mark the year of cable-free PC building. ASUS and MSI introduced variations of the reverse connector approach with the BTF and PROJECT ZERO series of boards. ASUS pushed this a step further with BTF graphics cards. Gigabyte followed shortly after, announcing their STEALTH boards at Computex in July.
While case manufacturers have yet to announce official support for Gigabyte STEALTH motherboards, we tested this PCB with the Corsair 3500X case, and it worked without issue. This indicates that any new Gigabyte STEALTH boards should work with cases that support reverse connectors.
What’s in the Box?
As a general rule of thumb, most motherboard manufacturers provide a range of accessories and additional items that can save PC builders some money or time during the building process. The Gigabyte B650E AORUS STEALTH ICE has a few extras worth covering.
The first significant accessory is the WiFi 7 adapter. These WiFi adapters differ slightly from WiFi 6 and 6E because the connector has changed. Instead of two hexagonal screws, both parts of the adapter are joined together and clicked into the motherboard; they don’t screw in.

Next up are the SATA data cables. The AORUS STEALTH ICE board has two white data cables in a plastic bag. One of the cables is right-angled, making installing SATA data slightly easier if your case is tight.

Finally, there is a Q-Connector for JFP1 power. While these are slightly more redundant nowadays, they’re helpful if your case doesn’t have a unified header for JFP1 power. This Q-Connector allows you to plug in the JFP1 headers before they go into the motherboard, and the connector is clearly labelled, making the process of plugging it all in quite simple.
Gigabyte B650E AORUS STEALTH ICE Design
All reverse connector motherboards sit inside a specially designed box to account for the headers on the back of the PCB. This means building with these boards can be done straight out of the box, or the board can be installed inside a case straight away. Upon taking the B650E AORUS STEALTH ICE out of the box, you’re immediately greeted with a vibrant white PCB covered in a vast array of lighter-themed heatsinks.

This is an ATX board, so Gigabyte has gone the extra mile to ensure that pretty much all areas of the board are covered in some form of the metal heatsink. Not only does this uplift the aesthetic and make the board look more premium, but it significantly improves heat dissipation. Heatsinks spread over a large surface area allow them to take up the bulk of the heat that a board will transmit, keeping things nice and cool.

Uniquely, the large metal heatsink that covers the bottom portion of the board isn’t held in with screws but instead uses magnets. This is a nice quality-of-life feature and minimises hassle when builders need to access the SSD slots. A small latch towards the bottom right of the board will free the heatsink, allowing you to lift it up and off the board.

Gigabyte has prioritised making the B650E AORUS STEALTH ICE as user-friendly as possible. There are a range of mechanisms that streamline the building process, which is great to see. For example, the EZ PCI-E Latch is a quick-release button that lets you easily remove a graphics card from the PCI-E slot.

Moving to the back, Gigabyte has provided a large metal backplate covering most of the board. This provides rigidity and stability to the PCB and demonstrates the lengths Gigabyte is willing to go to provide a premium experience.
One major hassle we often experience building so many PCs is the sharpness of motherboards. Whether it’s a reverse connector design or not, motherboards are coated in pins and contacts that can cause nicks and cuts. This backplate is something that we need to see more of, as it significantly reduces the risk of injury. It also makes the board look much nicer, too.

From an aesthetic point of view, the B650E AORUS STEALTH ICE is one of the best-looking boards you can buy. It utilises an entirely white theme, which is quite rare, and Gigabyte is one of the few manufacturers with a lineup of white boards. Additionally, the use of heatsinks and a zero-connector design makes this board feel and look incredibly premium.
Connectivity Options
Graphics Card Slot
As a B650E motherboard, the Gigabyte AORUS STEALTH ICE leverages PCI-E 5.0 connectivity across the graphics card slot and SSDs. Fortunately, this board features a full Gen5 x16 slot ready for the next generation of graphics cards. While this bandwidth isn’t needed yet, it offers prospective buyers some upgrade paths in the future.

This GPU slot also uses the Gigabyte UD (ultra-durable) armour, which protects it from damage. This protective covering is white, which is a nice touch.
M.2 Slots
This motherboard has three M.2 slots. The Gen5 primary slot is underneath the large heatsink towards the top of the motherboard. Gigabyte presumably opted to use a large heatsink for this drive because Gen5 SSDs tend to run quite hot.

This heatsink is held in by an EZ-Latch mechanism. This latch is spring-loaded and can be pushed down to free the heatsink from the slot. Additionally, it clicks back down easily once reinstalled.

Underneath the magnetised heatsinks are two further Gen4 SSD slots. Both run at full x4 speeds, so they’re ideal for more fast storage. Installing these SSDs is also tool-less as the drives use the EZ-Latch mechanism.

RAM DIMMs
As covered in this article’s ‘Specification’ section, this board supports a capacity of 256GB rated at 8000MT/s. Generally speaking, unless you’re buying a board geared explicitly towards overclocking, 8000MT/s are the best-supported speeds. However, compared to Intel, AMD motherboards are pretty capable in terms of RAM overclocking.

Rear IO
The B650E AORUS STEALTH ICE has an exceptional set of USB ports. While the rear IO features some USB 2.0 ports, the vast majority are USB 3.2 or higher. The red ports on the right are USB 3.2 Gen2, while the blue ports are USB 3.2 Gen1, rated at 5Gbps speeds. The USB type-C port on the bottom is rated at USB 3.2 Gen2 speeds.

The audio selection is slightly limited compared to some other motherboards. The B650E AORUS STEALTH ICE only features three 3.5mm jacks, so there’s no S/PDIF optical out, additional speaker, or line-out jacks. While this is a bit of a shame, this feature is generally reserved for more expensive top-end boards.
Gamers can choose between 2.5 Gigabit LAN and WiFi 7 for networking options. LAN is always more stable than WiFi, but this requires a cable, which can be a hassle to set up. WiFi 7 is also solid and provides excellent speeds, but you’ll need a WiFi 7-compatible router to take advantage of the increased stability and speeds.

Internal Headers
CPU and Motherboard Power
Looking at the connectors on the back, the B650E AORUS STEALTH ICE features a single 8-pin EPS connector for CPU power. There is only one header because overclocking capabilities are more limited on this board than on other options with more robust VRM power phases.

Motherboard power is relatively standard, with a single 24-pin header. Some manufacturers add an extra header for stability, but Gigabyte has opted for a typical configuration, which is seen across most boards.

Front USB Headers
The USB headers on a motherboard serve several purposes. The main reason is for case IO. The USB ports on the front IO of a case need to be powered, and that’s where these headers come in. Additionally, CPU coolers and fan hubs may use USB to interface with your PC and provide accurate data.
The USB headers on the B650E AORUS STEALTH ICE are spaced across the board’s bottom and left-hand sides. Two USB 2.0 headers are at the bottom centre and support two ports each.

The USB Type-C header is slightly above SATA data on the left side, which uses the USB 3.2 Gen2x2 spec rated at 20Gbps. Again, the cable is notched, so it can only plug in one way.
At the PCB’s left is a single USB 3.0 port, which supports two USB 3.2 Gen1 ports (up to 5Gbps). This header is notched, so it can only be plugged in one way. The JFP1 header (front panel power) is mainly used for your case’s power button, but it also features a couple of extra connections for hard drives and a reset switch. JFP1 is a mandatory header to plug in, but this is quite simple with the Q-connector that Gigabyte has provided.

Pump and Fan Headers
Two of the three headers commonly found on most motherboards are at the top of the B650E AORUS STEALTH ICE. From left to right, they are ‘SYS_FAN1’, ‘CPU_FAN’, and ‘CPU_OPT’. The last two are pretty standard and are where a CPU cooler will be plugged in. However, ‘SYS_FAN1’ is a strange addition to the main set of fan headers. This is typically reserved for the relocated ‘AIO_PUMP’ header.

On the left side of the board, just below the motherboard power, is ‘SYS_FAN_4_PUMP’. We can assume that this is where the pump header has been moved, but it also doubles as a case fan header, which is good to know.
At the bottom of the PCB are two extra ‘SYS_FAN’ headers. One is located next to the reset switch, just to the left of the USB 2.0 connections, and the other is next to the 3-pin ARGB header.
RGB Headers
The amount of RGB headers on this motherboard is a bit lacklustre compared to other reverse connector designs we’ve looked at previously. There are three RGB headers: two addressable and one non-addressable. The first addressable 3-pin header is next to ‘SYS_FAN2’ at the bottom centre of the PCB.

The other two are situated underneath the HDMI port. With more manufacturers switching to addressable RGB, it would be great to see more headers on this board. Having two headers means builders with plenty of RGB will need to use splitters, which can complicate cable management.
SATA Data Ports
The B650E AORUS STEALTH ICE has four SATA data ports. While SATA isn’t used as frequently in modern builds, it’s good to see a selection of ports for those with older hard drives or SSDs.

Building with the B650E AORUS STEALTH ICE
Building with any reverse connector motherboard has a bit of a learning curve. While, in theory, a Gigabyte STEALTH board is no different to a non-STEALTH board, you have to approach the build slightly differently. To start, a decision must be made on whether the initial steps will be done outside the case or while the motherboard is installed inside your chassis.
We opted to socket the CPU, SSD, and RAM for this system while it was protected inside the box. This means builders must be careful as the board is sitting on cardboard. Once this was done, shifting the B650E AORUS STEALTH ICE into the Corsair 3500X case was straightforward. All of the headers slip through the cutouts, and then the board can be screwed down.

Once the board is placed inside the case, the build can continue as usual. The only significant difference is that the wiring is now at the back of the case. This makes the process quick and hassle-free. There’s no need to worry about component clearances, and the result is that the front of a PC build looks incredibly clean.

The only caveat with this board is that the graphics card cables are still visible. It’s not a deal-breaker for us, primarily because the board looks exceptional. However, like with ASUS BTF, we’d like to see Gigabyte provide a cable-less solution for GPUs, resulting in a cleaner look overall.
Features We Like
Incredibly User-Friendly
The B650E AORUS STEALTH ICE is one of the easiest motherboards to work with. It offers a range of DIY-friendly features designed to make building a PC hassle-free and tool-less. The EZ-Latches allow the SSDs and heatsinks to be quickly installed or removed.

The heatsink on the motherboard, which covers the second and third SSD slots, is also tool-less and held with magnets. The small latch at the side frees the heatsink from the board.
The graphics card also has a small button at the end of the PCI-E slot, which pulls down the clip securing the card inside the slot. Again, this is an easy way to install or remove components with minimal hassle.
Solid IO Selection
The selection of IO on the B650 AORUS STEALTH ICE is solid overall. There are twelve ports in total, most of which are high-speed USB 3.2 Gen1 or higher, followed by four USB 2 ports. Networking is also great; prospective buyers can utilise WiFi 7 or 2.5 Gigabit LAN.

Features We Don’t Like
No Cable-Less GPU Solution
ASUS is the only manufacturer that offers a cable-free graphics card solution thus far. While we might see some STEALTH graphics cards later down the line, for now, builders will have to stick to a primarily cable-free design throughout their builds.

Conclusion
Gigabyte B650E AORUS STEALTH ICE

Product Name: B650E AORUS STEALTH ICE
Brand: Gigabyte
-
Features
-
Design
-
Performance
-
Value For Money
Summary
The Gigabyte B650E AORUS STEALTH ICE is one of the best motherboards on the market. This PROJECT STEALTH version takes everything that was great about the standard ICE range and steps it up a notch with even more quality-of-life features, beautiful heatsinks, and a reverse connector design that hides cables. It’s easy to build with, mostly tool-less, and offers great features geared towards mid-range and high-end builds. More manufacturers need to take a page from Gigabyte’s book because this board is incredibly well-built.
The only major drawback is that this board leaves me wanting a PROJECT STEALTH series of graphics cards. While your system will be primarily cable-free, the pesky GPU power cables are still noticeable, resulting in a build that doesn’t fully achieve the zero-cables dream. However, I feel the design, features, and build quality significantly outweigh this caveat, and the B650E AORUS STEALTH ICE is worth picking up if you’re looking to assemble a gorgeous white PC.
Pros
✅ Incredibly user-friendly
✅ Gorgeous white design
✅ Uses a backplate
Cons
❌ No cable-free GPU
❌ Lack of RGB headers
❌ Only 3 M.2 slots
![FI_[DM89] Phanteks Evolv + AORUS 5090 9850X3D Gallery (8)](https://geekawhat.com/wp-content/uploads/2026/02/FI_DM89-Phanteks-Evolv-AORUS-5090-9850X3D-Gallery-8-551x431.jpg)
![FI_[DM88] 16GB DDR5 9060 XT Build Gallery](https://geekawhat.com/wp-content/uploads/2026/02/FI_DM88-16GB-DDR5-9060-XT-Build-Gallery-551x431.jpg)
![FI_[DP059] Corsair Frame 4000 + 9070XT](https://geekawhat.com/wp-content/uploads/2026/01/FI_DP059-Corsair-Frame-4000-9070XT-551x431.jpg)
![FI_[SR190] HYTE X50 Ryzen 5 9600X & MSI RTX 5070 Ti](https://geekawhat.com/wp-content/uploads/2026/01/FI_SR190-HYTE-X50-Ryzen-5-9600X-MSI-RTX-5070-Ti-551x431.jpg)