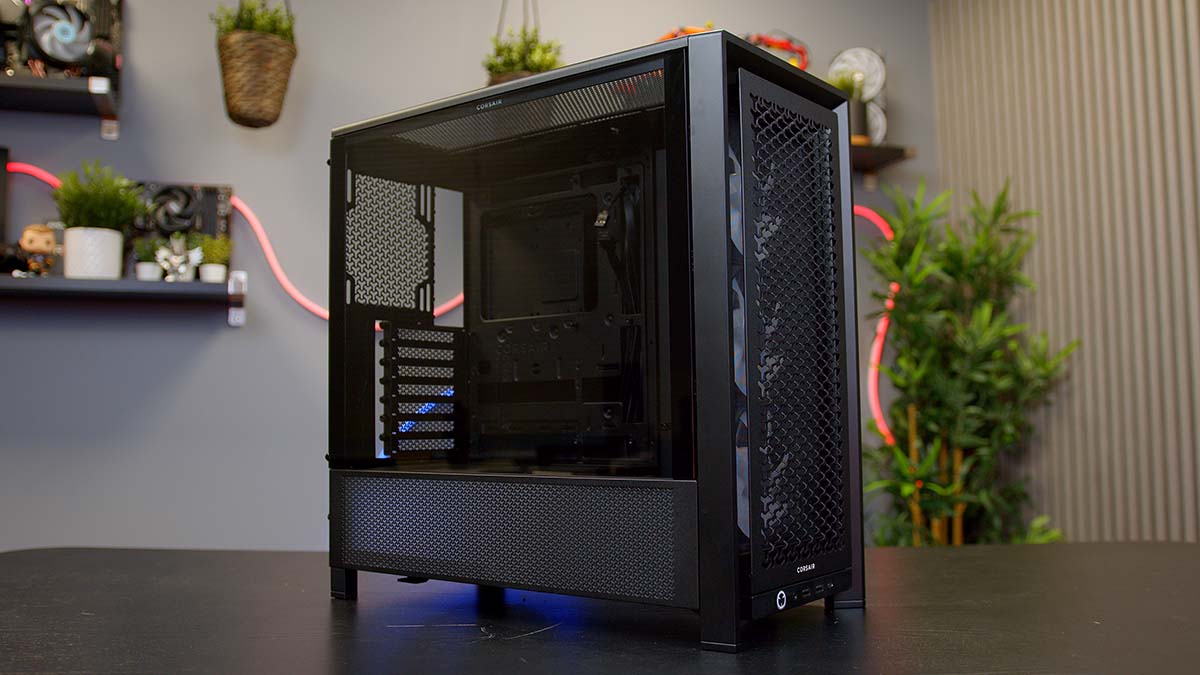
One of Corsair’s most popular cases has made a surprising return to the modern market with a twist. Meet the Corsair FRAME 4000D. This chassis takes all of the original 4000D’s popular elements, such as its strong airflow design, robust frame, and striking but sleek aesthetics, and crams them into a modern case. The FRAME 4000D caters to a vast range of builders, especially those who have picked up an RTX 5000-series graphics card. As always, we’ve put the FRAME 4000D through the wringer, testing its various features and design to see if this revitalised case is worthwhile for a new PC build.
The Corsair 4000D has been a mainstay in the ATX tower space for as long as I can remember. Before the fish tank craze, the 4000D was the go-to option for those looking to build a budget system that offers plenty of airflow and minimal hassle. However, the original 4000D has almost fallen out of fashion compared to the modern chassis released within the past few years. The market has shifted, with graphics cards requiring much more space and builders often picking up large 360mm liquid coolers due to their affordable pricing and simple installation.
For this reason, Corsair has set out to modernise the 4000D by catering to new requirements but still maintaining the elements that made the original 4000D so popular in the first place. However, plenty of testing and analysis is the only way to determine if a chassis is worth picking up. This review assesses the specs, design, building quality, and features of the FRAME 4000D to see if this modern variant is still stuck in the past or a must-have for your next build.
Buy the Corsair FRAME 4000D on:
Specification
The Corsair FRAME 4000D is a traditional mid-tower ATX case with a single tempered glass side panel and a mesh front. Corsair hasn’t decided to revitalise the 4000D range with a fish-tank approach. The FRAME variant remains true to form, which is great to see. At the maximum, this case can house E-ATX motherboards up to 305mm long and 277mm tall, the same as its predecessor. The FRAME 4000D also has cutouts for reverse connector motherboards, so those holding out for a B850 PROJECT ZERO, BTF, or PROJECT STEALTH option won’t need to swap out cases.
You’ll find three ports on the front IO: one USB 3.2 Gen2 Type-C and two USB 3.2 Gen1 Type-A. This is a solid upgrade compared to the original 4000D, which only offered two ports which utilised lower speeds. Clearance-wise, the FRAME 4000D accommodates graphics cards up to 430mm long and CPU coolers up to 170mm tall. This is a significant upgrade, as the original 4000D struggles to support some of the larger GPUs, such as the ROG Strix and AORUS MASTER models.

Drive support hasn’t changed, but this is no surprise to us, considering the FRAME 4000D is relatively similar in size to its predecessor. Fan and radiator support, however, has received a pretty significant upgrade. Across the entire case, this chassis can house a maximum of twelve 120mm fans, double the amount of fan space compared to the original.
For those with liquid coolers, there are three panels with space for large AIOs (all-in-ones): the top, the front, and the side. All three of these panels support 360mm radiators, so there’s ample room for cooling and airflow across the entire case. Again, this is a big leap for Corsair, especially as this opens up options for installing a custom loop.
| Specification | Corsair FRAME 4000D |
|---|---|
| Form Factor | Mid-Tower |
| Motherboard Support | Mini-ITX, Micro-ATX, ATX, E-ATX |
| Case Dimensions (L x W x H) | 486mm x 239mm x 486mm |
| Front IO | 1 x USB 3.2 Gen2 Type-C 2 x USB 3.2 Gen1 Type-A 1 x 3.5mm Combo Jack |
| PCI-E Slots | 7 |
| Colour | Black White |
| Max Clearance | 170mm Cooler Height 430mm GPU Length 220mm PSU Length |
| Drive Support | Up to 2 x 2.5 inch Up to 2 x 3.5 inch |
| Fan Support | Front: 3 x 120mm Top: 3 x 120mm Bottom: 2 x 120mm Side: 3 x 120mm Rear: 1 x 120mm |
| Radiator Support | Front: Up to 360mm Top: Up to 360mm Rear: Up to 140mm Side: Up to 360mm |
| Pre-Installed Fans | FRAME 4000D: 0 FRAME 4000D RS: 3 x 120mm FRAME 4000D RS ARGB: 3 x 120mm ARGB |
Regarding pre-installed fans, this entirely depends on the model of RTX 5000 GPU you pick up. The standard FRAME 4000D, priced at $79.99, is a truly budget chassis, saving builders money. However, the 4000D RS and RS ARGB variants feature three pre-installed fans at the front of the case, with the latter offering addressable RGB fans.
I think pricing is pretty fair across the board. The base model is available for $99.99, while the RS ARGB variant is available for $109.99 at the time of writing. Paying $10 is exactly what I’d expect for the inclusion of some fans, and I’m happy that Corsair has kept the price fair.
Corsair FRAME 4000D Design
Moving onto the design, the first thing we noticed about the FRAME 4000D is the sheer amount of ventilation this case has compared to its predecessor. The original 4000D has a ventilated front and top panel, while the modern version has a split side panel with vents on the bottom third and glass the remainder of the way. This further assists airflow and makes the case stand out more in terms of its aesthetic. The vented side provides a bit more depth compared to just using glass, which is a welcome change.
The front panel also uses a different shape for the vents. Instead of the triangle design seen on older Corsair cases, the 3D Y-pattern, Corsair claims, ensures a better path for cool air. I’m a fan of the design change, as the aesthetic is unique.

Moving around to the side, the glass panel is tool-less and connects to the case through some hinges. Once the panel is angled outwards, it can be easily removed, providing a clear space to access all the internals. The top, front, and opposing side panels can also be quickly removed, giving access to fan rails or cable management. The top is held in by some thumbscrews, which can be loosened reasonably easily.
Corsair prides the FRAME 4000D on being highly modular, so being able to change out panels on a whim is one of its principal features. Corsair also offers some alternative front panels that you can purchase to change up the look. These are optional but worth it if you’d like your 4000D to stand out.

While I’m a fan of the ventilation around this case, it would be nice to see more mesh. Ultimately, more vents mean more dust can get trapped, and having mesh minimises the chance of blockages. The opposing side panel is well-equipped with magnetic mesh, but the top of the case could provide more protection, similar to what the 3500X offers.
Behind the front panel and mesh are three pre-installed ARGB fans. These are already screwed in for you and can easily be swapped out by simply removing the screws. The fans are partially cable-managed and plugged in, but we recommend unplugging them and hiding them behind the cutouts towards the front of the chassis.

The rear chamber of the FRAME 4000D is reasonably tight, but there’s plenty of room to appropriately manage cables without causing any bulge. Three Velcro ties hold the front panel cables in place, and there are several additional anchor points around the chassis to use your own cable ties if the Velcro isn’t sufficient. Corsair has even provided cable management down the right side of the chassis, which is a great place to route CPU cables.

It’s worth highlighting that the power supply chamber isn’t huge. While the FRAME 4000D accommodates PSUs up to 220mm long, there won’t be much clearance beyond this. We recommend pre-installing cables before putting your PSU into this case, as there’s little room to fit a hand in and plug in extra wires.
One thing I wasn’t a fan of about the FRAME 4000D was its inherent lack of rubber grommets. These grommets clean up the look of a case and hide any wires that you’ve plugged in. However, the FRAME 4000D is lacking any such grommets. While I can appreciate that this may be down to cost-saving measures, it makes cable mess much more visible, taking away from the aesthetic of your build. This isn’t a deal-breaker for us, but we appreciate this kind of attention to detail.

The front IO is located at the bottom of the front panel, in contrast to the original 4000D, which had the front IO at the top of the case. Some will appreciate this change, but if you don’t have your PC on top of a desk, it will make it harder for USBs to plug in.

Building in the Corsair FRAME 4000D
The specs and design of the FRAME 4000D case are solid, but the principal way to determine whether a case is worth picking up is by building a PC in it. Our RTX 5070 Ti launch build was housed inside the FRAME 4000D, which used a Corsair Nautilus 360 RS cooler, an MSI MAG B850 TOMAHAWK MAX WiFi, and the MSI RTX 5070 Ti Ventus 3X.
Internal Space
Internal space is one of the significant upgrades to the FRAME 4000D compared to the original. The FRAME 4000D is equipped to accommodate a massive range of modern PC builds. The motherboard tray has space for Mini-ITX motherboards up to E-ATX, catering to those building a top-end PC. Despite not having any grommets, the cutouts around the motherboard are nice and wide, providing plenty of clearance for the front panel and power cables.
Once we screwed down our motherboard, we felt that the MAG B850 TOMAHAWK MAX WIiFi was securely supported thanks to the rigid standoffs underneath. And because this case supports ATX motherboards straight out of the box, there was no reason to relocate any of them.

After installing some of the other components, it was time for the graphics card, which in this build was the MSI RTX 5070 Ti Ventus 3X. This isn’t the largest 5070 Ti graphics card on the market, sitting at 303mm long. However, in the original 4000D, you’d be cutting it fine regarding clearance. It’s worth highlighting that the FRAME 4000D also comes equipped with a GPU support bracket, allowing you to alleviate sag.

Moving to the rear of the case, you’ll need to be reasonably careful regarding cable management. While there’s a decent bit of room, the rear chamber isn’t massive, so we advise avoiding bulges where possible so the rear panel will go on easily. Slipping a power supply into the case is fairly simple, but there’s not a huge amount of space to squeeze your hands into the chamber to plug in your PSU headers, so we recommend plugging in any cables you need beforehand.

Radiator and Fan Mounting
As we’ve alluded to, fan and radiator mounting is one of the big upgrades the FRAME 4000D has received compared to the original. We decided to install the Corsair NAUTILUS RS 360 on the top panel in our build. This is easily done by loosening the thumbscrews and sliding the panel off. If you’ve installed a fan at the rear of the case, you’ll need to angle the radiator into the case, as there’s not enough room to install the cooler straight out of the gate.

The rest of the case can house an ample number of fans. Three are already pre-installed at the front of the case, but there’s also space for an additional 120mm at the rear, along with three at the bottom and three on the side. Alternatively, the side panel can also be used for a 360mm liquid cooler. Again, we recommend installing a 120mm at the rear of the case to ensure ample airflow.

One of the FRAME 4000D’s unique features is its InfiniRail Mounting system. This unique mounting bracket increases the width of the rails to accommodate larger fans. So, instead of being limited to three 120mm fans, you can install two 140mm or 200mm fans by sliding the rails outwards, significantly increasing airflow.

Ease of Building
James noted that he was a big fan of the revitalised version during the build. The modern twists and features give this chassis a new lease on life while accommodating a huge range of component configurations. In terms of the build quality, installing the motherboard into the case was straightforward, with the centre standoff providing an anchor point for the board to sit on while you add the other screws.
Installing the cooler was pretty simple. As I mentioned, you must angle the radiator to get it in. However, this is a small caveat, considering the chassis can house 360mm radiators across three main panels.

One of the more unique elements of this case is that it features a tool-less power supply installation. There are four screws already installed in the case, so all you need to do is slip the power supply into the chassis and tighten the screws. This is a valuable feature that more manufacturers should include to alleviate building hassle further.
Lastly, front panel cables are easy to plug in. All wires are colour-matched to the chassis and are long, providing plenty of slack to get them plugged in. Furthermore, the JFP1 cable is a unified header, making it incredibly simple to plug into the motherboard.

Features We Like
Mostly Tool-Less Design
Corsair has gone to great lengths to make the FRAME 4000D a primarily tool-less case. The panelling uses thumbscrews and simply slides or pops out of place. The power supply chamber is also tool-less allowing you to avoid the hassle of screwing a PSU in. The tool-less approach makes building much easier, especially for first-time builders, so this is a feature we’re a big fan of.

Rotational GPU Panel
One of the other unique elements of this case is that it uses a rotational GPU panel. This panel can essentially be rotated to accommodate those wanting to mount GPUs vertically. We’ve seen this before in other cases, but it’s nice to see that Corsair is including it on the FRAME 4000D, as it provides an alternative way of showcasing your graphics card.

Features We Don’t Like
Front IO At The Bottom of the Case
I’m not a massive fan of the front IO being at the bottom of the case. This won’t be an issue for everyone, but moving the IO to the bottom of the chassis makes it harder to access unless it’s on top of a desk.

Doesn’t Come With a Pre-Installed Rear Fan
While we appreciate that this chassis comes with three pre-installed rear fans at the front, I feel Corsair is missing a trick by not providing an extra fan. The Corsair RS ARGB fans are relatively cheap anyway, so it would make sense to slightly increase the case price by $10-$20 and include the extra fan to save builders from buying their own.

Conclusion
Corsair FRAME 4000D
Product Name: FRAME 4000D
Brand: Corsair
-
Features
-
Design
-
Versatility
-
Value For Money
Summary
The Corsair FRAME 4000D is one of the best cases launched this year. The original 4000D was incredibly popular for several reasons. This revitalised modern version takes everything we know and love about the original but caters to those building a PC with the latest components. There’s ample space for large graphics cards, 360mm radiators and 120mm fans, offering significant airflow and cooling support. The InfiniRail mounting system is excellent for those with larger fans, and the rotational PCI-E slots provide an alternative way to display your graphics card. This case offers some fantastic features, and its familiar design is welcoming.
Regarding the caveats, there’s not a huge amount to cover. The two main ones are that the IO has been moved to the bottom of the case, which makes it a bit more awkward to access if this case isn’t on top of a desk. Additionally, the lack of a fourth pre-installed fan is a bit disappointing. However, these are relatively small cons considering this case’s value, and we recommend picking it up if you’re looking for something around the $100 mark.
Pros
✅ Familiar but revitalised aesthetic
✅ Rotational GPU slots
✅ Modernised design
Cons
❌ Front IO at the bottom of the case
❌ No rear pre-installed fan
❌ Top radiator is awkward to install
![FI_[SR190] HYTE X50 Ryzen 5 9600X & MSI RTX 5070 Ti](https://geekawhat.com/wp-content/uploads/2026/01/FI_SR190-HYTE-X50-Ryzen-5-9600X-MSI-RTX-5070-Ti-551x431.jpg)
![FI_[DP064] ASUS Prime AP303 + 9070XT](https://geekawhat.com/wp-content/uploads/2026/03/FI_DP064-ASUS-Prime-AP303-9070XT-551x431.jpg)
![FI_[DM93] Corsair 3200D Launch](https://geekawhat.com/wp-content/uploads/2026/03/FI_DM93-Corsair-3200D-LAUNCH-551x431.jpg)