The PC component market offers a widespread selection of white components that can be paired up to assemble an awesome gaming PC. With AMD’s RX 9070 XT, we’re able to put together an incredibly strong 1440p and 4K capable system that strikes a delicate balance of performance and design. And with a $1600 budget, this is precisely what we’ve done.
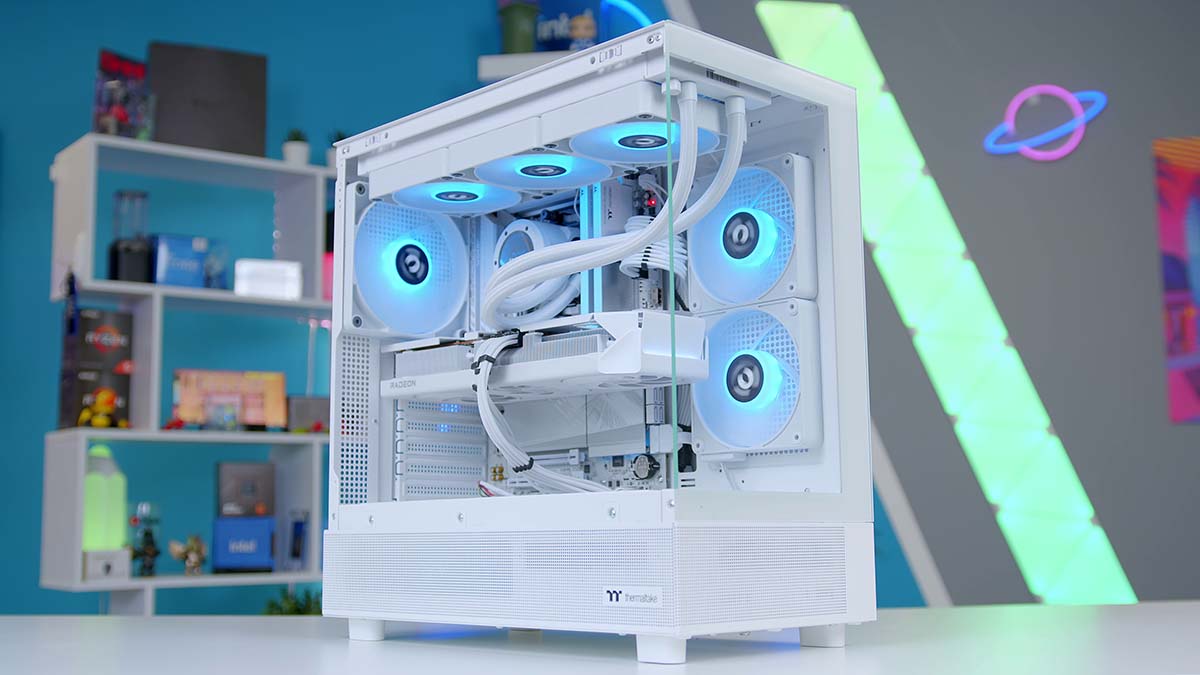
This dazzling white PC build, housed inside the Thermaltake View 270 Snow, offers a familiar dual-tempered glass design showcasing all the components inside.
For this particular build, we’ve chosen a PowerColor Hellhound white RX 9070 XT, along with the AMD Ryzen 5 9600X and a Thermaltake TH360 V2 ARGB Sync, to keep our chosen processor nice and cool.
Below, we’ll explore the entire build process and share our thoughts on each component, which James covers in much greater detail in the dedicated build video.
Build Process
Step 1: Socket the CPU
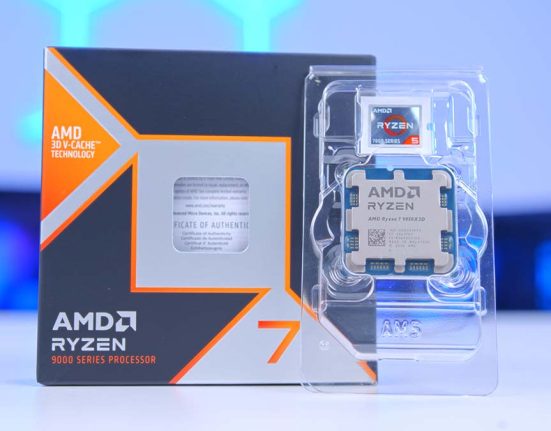
The first component this build guide covers is the AMD Ryzen 5 9600X. This is the Ryzen 9000 version of the highly popular Ryzen 5 7600X, which we’ve previously covered in several different build writeups and YouTube videos. Like its previous generation counterpart, the Ryzen 5 9600X has the edge in single-core applications and games due to its exceptional boost clock speed and low power budget. Due to its minimal power consumption, it can sustain its 5.4GHz boost speed in modern games, making it an excellent pickup for 4K or 1440p with the right graphics card.

Efficiency is one of the significant benefits of the Ryzen 5 9600X, but it’s also worth keeping in mind that this is one of the most affordable gaming CPUs on the market. Available at the time of writing for around $200, the Ryzen 5 9600X is a worthwhile option, especially if you’re on a budget.
To install this CPU, we recommend first removing the motherboard from the box and placing it on top. This acts as a soft but sturdy surface that won’t scratch or damage the underside of the board.

Next, push down the retention arm next to the CPU socket and lift the socket cover to expose the pins underneath. This is where the CPU needs to go. Pick up the Ryzen 5 9600X by the sides and locate the golden arrow, which should be at the top left of the processor. Find the same arrow on the motherboard; this indicates the correct orientation for the CPU to be lined up to slot in correctly. Then, slowly lower the CPU into the socket and give it a jiggle to ensure there’s no movement and it’s lined up correctly.

Lower the CPU socket cover and firmly push down the metal retention arm to lock the CPU in place. The plastic protector will pop off during this process. Keep this inside the motherboard box for any potential RMAs in the future.

Speaking of which, the motherboard into which we’ve just installed this CPU is the Gigabyte B850 AORUS Elite WiFi7 ICE. This board is one of the best additions to the B850 lineup. It offers an entirely white design, including the underlying PCB, RAM DIMM slots, and even the headers for power and other connectors. This is a gorgeous board that fits in nicely with the white theme that we’re going for.
| Specification | Gigabyte B850 AORUS ELITE WiFi7 ICE |
|---|---|
| Form Factor | ATX |
| Supported Memory | 256GB DDR5 8200MT/s |
| PCI-E x16 Slots | 1 x PCI-E 5.0 |
| PCI-E x4 Slots | 1 x PCI-E 5.0 2 x PCI-E 4.0 |
| VRM Power Phases | 14+2+2 |
| Front IO | 1 x USB 3.2 Gen 2×2 Type-C 2 x USB 3.2 Gen1 Type-A 4 x USB 2.0 |
| Rear IO | 1 x USB 3.2 Gen2 Type-C 2 x USB 3.2 Gen2 Type-A 4 x USB 2.0 5 x USB 3.2 Gen1 Type-A |
| Audio | 1 x Optical S/PDIF 2 x Audio Jacks |
| Networking | 2.5 Gigabit LAN WiFi 7 |
The B850 AORUS Elite WiFi7 ICE also offers excellent features, including high-speed rear IO. This board has twelve ports, with only four being USB 2.0. There’s also space for up to three M.2 drives; the top slot is Gen5. It’s an excellent board for this white PC build and a solid pickup for a mid-range or high-end PC.

Step 2: Slotting in the RAM
For the next step of the build process, we’ll be installing the RAM. This particular system features some Thermaltake TOUGHRAM, with a speed of 7200MT/s and a latency of CL36, which is more than ample for gaming. Fitting with the white theme, these 16GB DIMMs are white and offer a stripe of RGB LEDs running along the top, providing some much-needed additional lighting and customisation.

Those looking to customise this RAM kit’s lighting can use an application like SignalRGB. This application lets you easily sync up and change individual lighting patterns and colours to suit your preferences.
First, push down on the two tabs at the top of slots two and four to install the RAM sticks. We’re using these slots because this is the most efficient configuration when you only have two sticks of RAM.

Take one of the DIMMs, line it up with the slot, and firmly push it down until you hear a click. This indicates that the RAM is seated correctly. To sanity-check this, the clip at the top should hold the RAM in place. Follow the same steps to install the second RAM DIMM.

Step 3: Mounting the NVMe SSD
The MSI Spatium M480 Pro 1TB houses our operating system and any games you might install. This solid Gen4 SSD offers read and write speeds up to 7400MB/s and 7000MB/s, respectively. This makes it one of the speediest Gen4 NVMe M.2 SSDs on the market, so it’s an all-around solid selection designed to offer blazing-fast boot and load times.

Typically, we’d choose a 2TB capacity drive to ensure plenty of space for big games, but 1TB will be ample to get most gamers started. With the B850 AORUS Elite WiFi7 ICE we’ve chosen, there’s plenty of room for future storage upgrades.

To install this drive, first push the latch holding the large SSD heatsink in place and put it to one side. Then, push the M.2 SSD into the top slot; it will poke out at a 45-degree angle.

Push the SSD down slightly and use the latch to secure it. Remove the tape covering the thermal pads on the heatsink and place it back on top of the M.2 drive. It should simply pop into place without any screws.
Step 4: Install the Motherboard Inside the Case
For the next step, we’ll install the B850 AORUS Elite WiFi7 ICE inside the case. The chassis housing this build’s parts is the Thermaltake View 270. This case offers a somewhat familiar design to cases like the Phanteks XT View and Montech XR with its dual tempered glass panels (one on the front and side), providing a window into the build inside.

The Thermaltake View 270 offers space for E-ATX motherboards and clearance for graphics cards up to 420mm long, which is plenty of room for the RX 9070 XT graphics card in this system. This case offers one pre-installed 140mm fan at the rear and plenty of ventilation to allow air to flow through freely, offering decent temperatures.
| Key Specs | Thermaltake View 270 TG ARGB |
|---|---|
| Form Factor | Mid-Tower |
| Motherboard Support | Mini-ITX, Micro-ATX, ATX, E-ATX |
| Case Dimensions (L x W x H) | 454mm x 230mm x 456mm |
| Front IO | USB 3.2 Gen2 Type-C 2 x USB 3.0 Type-A 1 x 3.5mm Combo Jack |
| PCI-E Slots | 7 |
| Colour | Black White Blue Green |
| Max Clearance | 180mm Cooler Height 420mm GPU Length 220mm PSU Length |
| Drive Support | Up to 2 x 2.5 inch Up to 2 x 3.5 inch |
| Fan Support | Side: 2 x 120mm Top: 3 x 120mm Bottom: 3 x 120mm Rear: 1 x 120mm |
| Radiator Support | Top: Up to 360mm Rear: Up to 120mm |
| Pre-Installed Fans | 1 x 140mm |

Installing the motherboard in the case is pretty simple. First, line up the motherboard with the standoffs. We advise doing this while the case is lying down to ensure the motherboard doesn’t fall.

Then use the included motherboard screws found in the case accessories box to screw it in place. Make sure to use the correct screws, as different ones could damage and thread the standoffs.
Step 5: Securing the Liquid Cooler to the Case
This next step involves mounting the liquid cooler to the top of the chassis. The AIO (all-in-one) that we’ve chosen is the Thermaltake TH360 V2 ARGB Sync Snow. This is a white cooler, as we’re trying to stick with the white theme. In terms of its design, this is a 360mm option, offering three 120mm fans that ensure that the Ryzen 5 9600X stays nice and cool.

The CPU blockhead offers a rotational cap, allowing you to orient in the right direction easily. The cap features an infinity mirror display with plenty of RGB lighting, offering diverse visual effects for your build. Of course, this can be customised within the Thermaltake software to change various RGB colours and patterns.
We first need to mount the fans to the radiator to install this cooler, as they don’t come pre-installed. We recommend placing the radiator on a flat work surface with the tubes on your right and having the fans’ wires come out towards you. Then use the long radiator screws to secure the fans in place. Don’t overtighten these screws, as this can pierce and damage the radiator.

After this, push the radiator up to the top panel, holding onto it with one hand. Using your free hand, secure the radiator to the top panel using the much smaller radiator screws. We advise getting one in each corner while holding onto the radiator and then adding in the rest after letting go.

For the last step, grab the AMD mounting bracket and secure these to the bracket using two of the thumbscrews and the eyelets. Swap the Intel bracket attached to the pump block of the CPU cooler for the AMD one simply by sliding it out. Apply a rice-sized grain of thermal paste to the CPU, and then line up the eyelets on the notches of the stock AMD mounts on the motherboard and screw them in once both are on. You may need to loosen the thumbscrews so that the eyelets are in the correct position to be screwed in.

Step 5.5: Adding in Additional Fans
As the View 270 only comes with one fan, we need to install a few extra fans to increase airflow and ensure that thermals remain low. We’ve decided to install two CT120 EX ARGB Sync models from Thermaltake. We’ve picked the reverse models to act as intake on the side panel. It’s worth noting that these fans use a magnetic daisy-chain system, which makes installation incredibly straightforward.

To get these fans installed, connect them up first. They magnetise together and shouldn’t pull apart very easily. Attach the magnetic cable to one of the appropriate sides so that it’s easy to access. Then use the included screws to screw it in on the side of the case.

Step 6: Installing the Graphics Card
The star of the show in this particular build is the PowerColor Hellhound Spectral White RX 9070 XT. White cards have become increasingly popular over the years, and with the arrival of the Radeon 9000 series, it’s no surprise that this powerful card has seen plenty of white models from various manufacturers. The Hellhound Spectral white variant is one of the best-looking cards on the market, with a fully white shroud, fans, and backplate.

In terms of performance, the RX 9070 XT is a highly impressive GPU, offering excellent framerates across 1440p and 4K in various titles. We’ve seen this GPU compete with the RTX 5070 Ti, which is an incredible feat considering the price difference between the two. This GPU is a solid fit within this gorgeous white PC build.
| Specification | PowerColor Hellhound Spectral White RX 9070 XT |
|---|---|
| Video Memory | 16GB GDDR6 |
| Memory Bus | 256-bit |
| Base Clock Speed | 1.66GHz |
| Boost Clock Speed | 3.0GHz |
| Stream Processors | 4096 |
| Ray Accelerators | 64 |
| AI Accelerators | 128 |
| Power Draw | 304W |
| Length | 327mm |
Getting this GPU into the case is a straightforward process. First, the PCI-E covers are unscrewed towards the back of the case. You’ll need to loosen the screws on covers one and two, as this is the width of the card.

Then, line up the graphics card with the GPU slot on the motherboard and push it until you hear a click. This indicates that the card is seated correctly and is in direct contact with the slot.

Finally, use the screws you removed from the PCI-E covers to secure the card in place. This model has an included support bracket, but installing this is optional.

Step 7: Securing the Power Supply
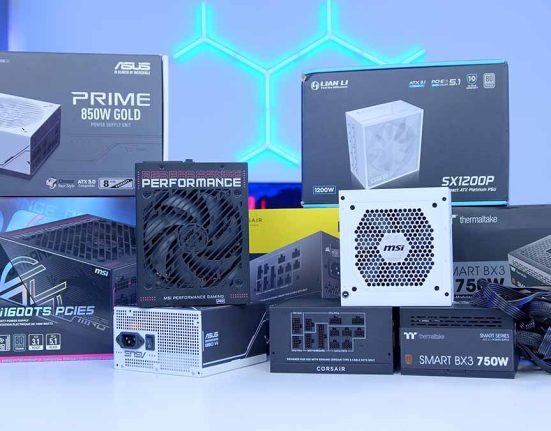
The last component we need to install in this PC build is the power supply, of which we’ve chosen the Thermaltake Smart BM3 750W. This power supply is black, and while we could have picked a white power supply, this isn’t a component you’ll see very often, so it made sense to save some cash and go for the standard black option.

The Smart BM3 is a power supply that we’ve used across several different PC builds. It offers 750W of power with an 80 Plus Gold efficiency rating, minimising any additional power lost as noise or heat. It utilises the ATX 3.0 standard and is semi-modular, allowing you to pick and choose some power connectors and keep things tidy.
First, we’ll select the cables needed for this particular build to install this power supply correctly. For this system, we need two 8-pin EPS CPU connectors, a single 24-pin motherboard power cable, and two 8-pin PCI-E power cables for the graphics card. The motherboard and CPU power are fixed to the power supply, so all we need to do is plug in the GPU cables.

Once this is done, slide the power supply into the back of the case and use the hexagonal screws to secure it in place. Ensure not to over-tighten, as we don’t want to damage the threads.
For the next part, we’ll install the power supply extensions. To maintain the white theme, we’ve picked up some gorgeous white power extensions. These easily plug into the power cables from the PSU, so connect them up and plug them into the PC. You’ll need to plug in the motherboard power, the two CPU headers, and the two graphics card headers.

Step 8: Front Panel Cables & Power On
The last step of any PC build is plugging in front panel cables, managing all of the wires, and powering on your PC. This is a relatively simple process. Make sure USB-C and USB 3 are firmly plugged in, and that front panel power is oriented correctly, as this is used to power your PC build.
Once you’re happy, everything is organised and plugged in, put the panels back on, grab a kettle lead and your favourite peripherals, switch the PSU to 1 on the back, and hit the power button. You’ve successfully built this $1600 gaming PC!
Performance
![]()
1440p, High Settings
Avg: 268FPS
Preset: High
V-Sync: Off
Anti Aliasing: TSAA
Texture Filtering: 8x
Ambient Occlusion: High
Volumetric Lighting: High
Dynamic Shadows: Enabled
Model Detail: High
![]()
1080p, Comp. Settings
Avg: 470FPS
Preset: Low
V-Sync: Off
Render Distance: Far
TSR: Off
Global Illumination: Off
Ray Tracing: Off
Effects: Low
Post Processing: Low
![]() 1440p, High Settings
1440p, High Settings
Avg: 137FPS
Preset: Custom
Resolution Scaling: FSR
Texture Quality: High
Anisotropy: x8
Contact Shadows: On
Ambient Occlude: High
Frame Generation: On
![]() 1440p, High Settings, RTX On
1440p, High Settings, RTX On
Avg: 66FPS
Preset: Custom
Resolution Upscaling: FSR
Texture Res: High
Volumetric Light: High
Shadow Res: High
SSAO: On
Motion Blur: Off
Framerates in Hogwarts Legacy and Alan Wake II were pretty solid, with averages of 137FPS and 66FPS, respectively. The RTX 4070 is a great card in rasterised gameplay at 1440p.
The strong performance continued in our Esports benchmarks. Fortnite and Apex Legends saw insane framerates, surpassing the 144Hz sweet spot with 470FPS and 268FPS, respectively.
Gallery


![FI_[DM89] Phanteks Evolv + AORUS 5090 9850X3D Gallery (8)](https://geekawhat.com/wp-content/uploads/2026/02/FI_DM89-Phanteks-Evolv-AORUS-5090-9850X3D-Gallery-8-551x431.jpg)
![FI_[DM88] 16GB DDR5 9060 XT Build Gallery](https://geekawhat.com/wp-content/uploads/2026/02/FI_DM88-16GB-DDR5-9060-XT-Build-Gallery-551x431.jpg)