The iCUE LINK TITAN range is a series of Corsair liquid CPU coolers designed to bring top performance at a more affordable price point. These AIOs (all-in-one) mark a significant redevelopment for Corsair’s signature series of coolers, boasting a re-engineered pump, improved cold plate, and an interchangeable pump cap design. So, what better way to see how the iCUE LINK TITAN holds up compared to previous designs and other market leaders with a series of benchmarks? We’ve rigorously tested this CPU cooler to see its performance and whether it can keep our Core i7-14700K nice and cool.
While Corsair liquid coolers are considered pretty strong compared to the competition, they are generally pricier than most coolers due to their refined design and the considerable amount of RGB on offer. So, it’ll be interesting to see where this cheaper variant aligns itself versus alternatives like the CoreLiquid E360 or Cooler Master Atmos 360, which come in at much lower price points.
In this article, we’re going full throttle on the testing to see what kind of temperatures iCUE LINK TITAN RX can handle. This review also covers this cooler’s specs, design, installation process, and features to determine its overall value proposition.
Buy the Corsair iCUE LINK TITAN 360 RX on:
Specification
The Corsair iCUE LINK TITAN 360 RX is a 360mm liquid AIO cooler with a relatively standard set of dimensions. Most 360mm radiators are about 400mm long, 120mm wide to accommodate 120mm fans, and 27mm thick, and this cooler adheres to this standard.
This particular cooler model comes in three sizes: 240mm, 280mm, and 360mm. We’ll be reviewing the 240mm variant later, so keep an eye out for that. Corsair hasn’t announced any plans to release a 420mm iCUE LINK TITAN RX, but we might see one hit the shelves in a year or so once the current offerings have saturated the market a bit more.

This cooler comes with three pre-installed 120mm iCUE LINK RX fans. These fans are cheaper variants of the QX fans, so their design is slightly more laid-back. However, they’re built to be quiet thanks to the magnetic dome bearing, offer good airflow, and max out at 2100RPM.
Because this is an iCUE LINK cooler, most of the interfacing is done through the iCUE software, which is achieved via USB. However, the iCUE LINK hub has a small ‘tach connector’ that features a female connector with two pins and a DC 3-pin header on the other end. This is plugged into your motherboard’s ‘CPU_FAN’ or ‘AIO_PUMP’ header. I don’t believe the tach connector is required for the AIO to work, but plugging it in will stop error messages from popping up during boot.
| Key Specs | Corsair iCUE LINK TITAN 360 RX |
|---|---|
| Radiator Size | 360mm |
| Radiator Dimensions (L x W x H) | 396mm x 120mm x 27mm |
| Number of Fans | 3 |
| Max Fan Speed | 2100RPM |
| Bearing Type | Magnetic Dome |
| Pump Connector | iCUE LINK |
| Socket Compatibility | Intel – LGA 1851, LGA 1700 AMD – AM5, AM4 |
This cooler supports the most modern variants of Intel and AMD sockets. Although AM5 and AM4 technically use the same mounting, it’s good to see them supported here. Corsair also supports Intel LGA 1700 and Intel’s 15th-Gen LGA 1851 socket.
Finally, regarding pricing, the 360mm variant of the iCUE LINK TITAN RX range is priced around the $200 mark. In the UK, this cooler has launched at about £179.99, which is an acceptable price. These coolers are more expensive than other AIOs we’ve reviewed, but these prices are comparatively better than some of the earlier models, which have sat close to the $250 mark.
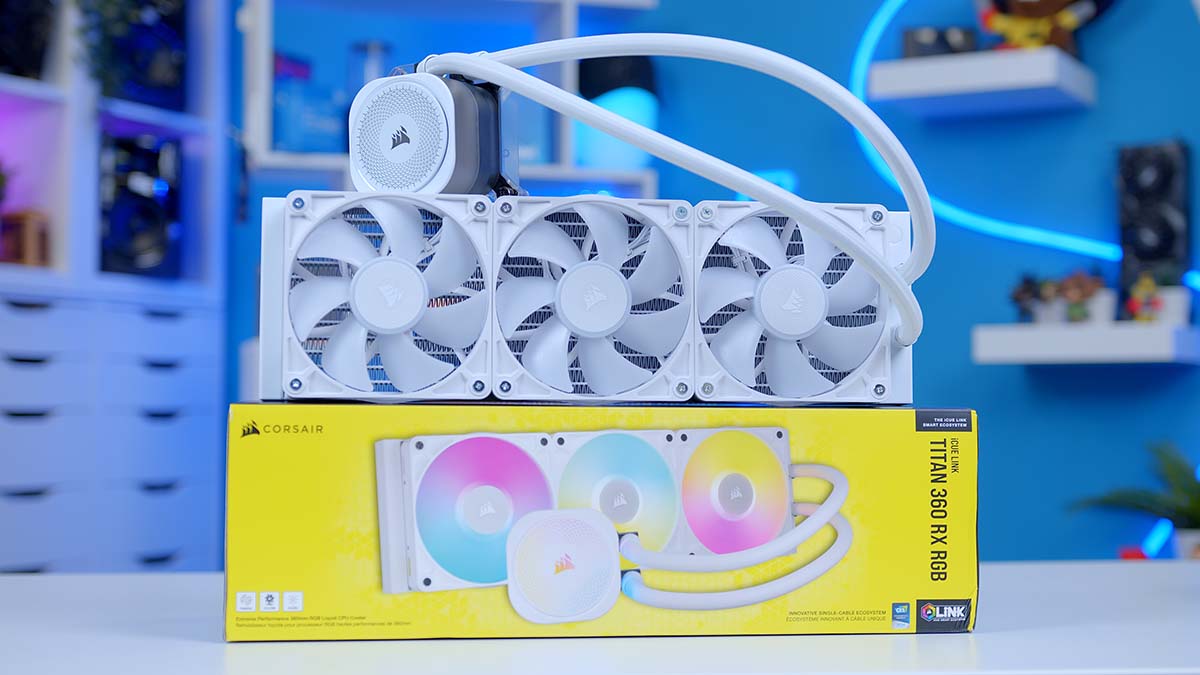
Corsair iCUE LINK TITAN 360 RX Design
From a design standpoint, the iCUE LINK TITAN 360 RX is targeted as a premium liquid CPU cooler. The three RX 120 RGB fans are pre-installed out of the box, saving builders time when installing the cooler.

The white version features a sleek aesthetic across the fans and radiator, with the tubing covered in a white braided protective sleeve. It would be nice to see some white screws securing the fans to the radiator, but Corsair has decided to use some generic silver screws. While it’s not a deal-breaker, it’s an attention to detail that would further enhance the design and value proposition.

The TITAN range of coolers’ CPU block design is one of the more exciting areas worth highlighting. Much like the ‘H100’ series of iCUE LINK AIOs, the CPU pump cap utilises a ‘half and half’ approach, where the top half is surrounded in RGB, while the bottom half matches the colour of the radiator and houses the tubing. The TITAN 360 RX features a unique pattern on the top (the kind of thing you’d see inside a kaleidoscope), with the Corsair logo in the centre.

I like the design. The pump cap change that came with the introduction of iCUE LINK looks much more refined, showcasing Corsair’s strengths in RGB lighting. It’s worth noting that while the pump cap looks great, the magnetic cover is very flimsy and falls off quite easily. We recommend removing it before assembling and installing the cooler and then attaching it later on.
Additionally, the pump cap is hot-swappable. This feature was available with the previous iteration of iCUE LINK liquid coolers, but TITAN AIOs have a few more options. For example, the cap can be fitted with a screen showcasing system stats and information. Corsair has introduced a ridged design, which provides an exciting look to your build.

Alternatively, Corsair also has a VRM fan module with a small fan inside the cap and cutouts on the outside to push air into the VRM heatsinks. This helps keep the VRMs cool but increases the noise floor of your build.

Of course, all lighting can be synced up within the Corsair iCUE software or alternatives such as SignalRGB. The SignalRGB software is handy for builds with conflicting RGB applications, as it only controls lighting and has no bearing on thermals or fan control.

Installation Process
Physically installing the iCUE LINK TITAN RX into the build that we put together was pretty straightforward. Fortunately, Corsair coolers have a relatively streamlined set of mounting hardware, and this is made even more accessible for AMD users because there are fewer components to install. It’s incredibly simple, even for Intel users who are building with the iCUE LINK TITAN 360 RX.
The two plastic AMD clips at the top and bottom of the socket must be removed first for our AMD build. Four screws hold in them, and once these are loosened, the clips can go inside your motherboard box.

After this, we recommend attaching the radiator to the case. We used the Corsair 3500X ARGB chassis and mounted the radiator on the top panel with the tubes on the right-hand side. We’ll worry about cables later. Use the small radiator screws to hold it in place at the top of the case.
Top Tip: While holding onto the radiator, install a screw on each corner first to secure it into place. Then let go of the radiator once the screws can take its weight and put in the rest of the screws.

Once the radiator is in, attach the AMD retention bracket to the bottom of the CPU pump. The bracket slides into a small notch just above the copper cold plate, which is a similar design to previous coolers.

The AMD retention bracket is straighter than the Intel bracket and will point north and south to the threads around the socket instead of diagonally.
The CPU block has pre-applied thermal paste, so we don’t need to add our own. Now it’s a case of attaching the CPU blockhead to the motherboard and screwing it down. We always advise torquing the screws in a star pattern to avoid damaging the cooler or motherboard.

iCUE LINK wiring has a few extra steps compared to a standard liquid AIO. First, attach the proprietary iCUE LINK cable to the CPU blockhead and plug the other end into the iCUE LINK hub.
Connect up the fans and the radiator using one of the shorter iCUE LINK cables to daisy-chain them together. Then use a third cable to connect power at the other end of the radiator to the hub.

The hub is the centralised point of command for iCUE coolers, so all the power and data run through the hub and are then passed to your PC build.
Note: Ignore the second iCUE LINK cable on the right of the hub. During the original build, it was decided that using both hub ports would save some time. We recommend using splitters to avoid all the ports, saving room for future expansion.

The 6-pin, long rectangular header plugged into the hub provides all the power for iCUE LINK devices. It connects to a regular 6-pin PCI-E cable, commonly used for graphics cards.

The Micro-USB cable must be plugged into a USB 2.0 header on the motherboard. This cable controls data and handles features like syncing up RGB or temperature monitoring.

Corsair iCUE LINK TITAN 360 RX Performance
All the CPU coolers we review and use in builds are tested in synthetic benchmarks. We do this to determine how each cooler performs in various scenarios, such as gaming or running tougher multi-core workloads. Our benchmarking PC utilises a Core i7-14700K with four additional fans to maximise airflow, which has moved over to the be quiet! Dark Base 901 case to accommodate 420mm liquid coolers. The results below are from Cinebench and CPU-Z, with temperature data collected from HWMonitor, which runs in the background.
Cinebench
In Cinebench, we run two benchmarks: the first is a four-thread custom run, and the second uses eight threads. We run these multiple times to test throttling under a sustained workload, determining if the iCUE LINK TITAN 360 RX can cope with intensity as the temperatures constantly fluctuate.
In the four-thread run, the iCUE LINK TITAN 360 RX kept temperatures around 61°C on average, maxing out at around 68°C. Compared to the other coolers we’ve tested, the iCUE LINK TITAN RX offered a strong showing here. This performance puts the iCUE LINK TITAN in fifth place, with the ROG STRIX LC III and DeepCool MYSTIQUE 360 beating it by about 1°C on average.

The TITAN range offers considerably better performance compared to the iCUE LINK H150i LCD. We were shocked that the iCUE LINK H150i LCD performed so poorly in the first place, so it’s good to see that iCUE LINK isn’t just for show.
In the eight-thread benchmark, the heat steps up a notch, with average temperatures increasing to 70°C. This benchmark placed the iCUE LINK TITAN 360 RX in third, with the two most robust coolers surpassing it being the be quiet! Pure Loop 2, and the AORUS WATERFORCE X II 360 ICE. Again, we were impressed here. The iCUE LINK TITAN has not only managed to tame the beast that is the Core i7-14700K, but it also managed to beat some of the most robust coolers we’ve tested.
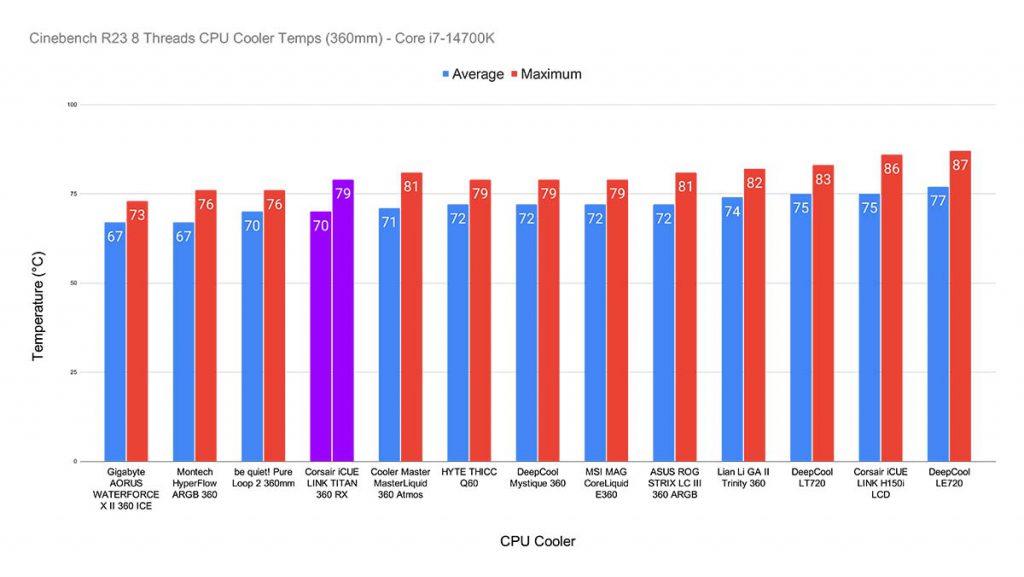
The eight-thread test clarifies how CPU coolers cope with more intense multi-core workloads such as video editing, 3D rendering, etc. The iCUE LINK TITAN 360 RX is a solid pickup for some of the tougher CPUs on the market.
CPU-Z
Our CPU-Z benchmark is slightly similar to our eight-thread Cinebench run. However, the big difference here is that CPU-Z will push a consistent load onto the processor, maintaining this throughout the test. Doing this shows whether the iCUE LINK TITAN 360 RX can handle sustained clock speeds with no fluctuations, which you might see in a very intense video render as an example.
In this run, the Corsair iCUE LINK TITAN 360 RX held the Core i7-14700K at 72°C on average, which is only two degrees higher than our eight-thread Cinebench run. The max temperature hovered around 79°C, which is exactly the same as the previous benchmark.

Overall, the performance was solid. The iCUE LINK TITAN 360 RX is a competitive option if we’re just looking at thermal performance. Across our results, this AIO landed itself in the top five, with its Cinebench results putting it in third place. Definitely a big win for Corsair!
Features We Like
Hot-Swappable Pump Cap
The pump cap of the iCUE LINK TITAN RX range is fully hot-swappable with other compatible cap designs. Corsair offers its own range of optional pump caps, which can be bought alongside the cooler. It offers prospective buyers an alternative aesthetic for those who aren’t fans of the standard cap design.

Easy to Assemble
This is one of the easiest coolers to install (before we get to cabling). While most manufacturers have streamlined their installation process, the iCUE LINK TITAN 360 RX assembly required minimal effort. The pre-installed fans, and the fact that cabling is done right at the end made getting this AIO inside a build very straightforward.

Features We Don’t Like
Convoluted Cabling
The one issue that I feel all iCUE LINK coolers suffer from is their cabling design. While I understand that the design premise of iCUE LINK is to streamline everything, it feels and looks more complicated to set up. AIOs that use non-proprietary wiring will have a maximum of around three cables to plug in, compared to iCUE LINK, which is about six cables just for a liquid cooler.

Conflicts with Non-iCUE LINK RGB
While setting up the iCUE LINK TITAN 360 RX, we encountered issues syncing RGB. The build housing the iCUE LINK TITAN 360 RX utilises Corsair RS 120 fans, which plug directly into the motherboard’s 3-pin AGRB headers. After the build was booted, we couldn’t get the RGB to sync correctly across the different sets of fans.

After reinstalling iCUE or booting the RGB software in a specific order, it just wouldn’t work. Even SignalRGB, which tends to be bulletproof, couldn’t fix the syncing issue. This raises concerns about the end-user experience and the additional hassle a novice builder will likely see when setting up a similar combination of components. It isn’t very reassuring to see this; ultimately, it needs a fix. This isn’t the first time we’ve seen RGB chaos in a build we’ve put together.
Conclusion
Corsair iCUE LINK TITAN 360 RX
Product Name: iCUE LINK TITAN 360 RX
Brand: Corsair
-
Features
-
Design
-
Performance
-
Value For Money
Summary
The Corsair iCUE LINK TITAN 360 RX is an excellent-performing cooler and can handle the demands of tougher CPUs like the Intel Core i7-14700K. Across our testing, this AIO provided solid temperatures in low and high-thread-count benchmarks, demonstrating its ability to cope with gaming and intense workloads. Additionally, the TITAN 360 RX is designed relatively well, and it provides a sleek and sophisticated aesthetic that is a shared quality of most Corsair coolers. We also felt this cooler was easy to assemble and install before the cables and wiring.
The main drawback of the iCUE LINK TITAN 360 RX is its convoluted cabling system. While it does make systems often look cleaner, I feel iCUE LINK is complicated and doesn’t solve the issue of cable management. The design results in more cables to plug in, contrasting to a traditional wiring style, which only requires builders to plug in two or three cables at the maximum. Furthermore, we had issues syncing the RGB when pairing up the cooler in a build with non-iCUE LINK fans. However, if you’re able to get past these issues, the TITAN 360 RX is worth considering based on its ability to keep temperatures low during intense workloads.
Pros
✅ Easy to install
✅ Excellent performance
✅ Hot-swappable pump cap
Cons
❌ Convoluted cabling
❌ Conflicting RGB
❌ Flimsy magnetic blockhead cover
![FI_[SR190] HYTE X50 Ryzen 5 9600X & MSI RTX 5070 Ti](https://geekawhat.com/wp-content/uploads/2026/01/FI_SR190-HYTE-X50-Ryzen-5-9600X-MSI-RTX-5070-Ti-551x431.jpg)
![FI_[DP064] ASUS Prime AP303 + 9070XT](https://geekawhat.com/wp-content/uploads/2026/03/FI_DP064-ASUS-Prime-AP303-9070XT-551x431.jpg)
![FI_[DM93] Corsair 3200D Launch](https://geekawhat.com/wp-content/uploads/2026/03/FI_DM93-Corsair-3200D-LAUNCH-551x431.jpg)