Building the ultimate white RTX 4070 SUPER gaming PC can be challenging. The market offers a range of excellent white components from various manufacturers, so finding the correct parts that provide the best performance and value is often confusing.
That’s why we’ve done all the hard work for you in this gaming PC build guide. We’ve picked out the best parts for an excellent white RTX 4070 SUPER system, featuring components like the Corsair iCUE LINK TITAN RX 360, Gigabyte RTX 4070 SUPER AERO OC, housed inside the Corsair 3500X ARGB case.
With all of our PC building guides, we’ll cover the entire building process from start to finish, along with our thoughts and details on each component.
There are also some benchmarks towards the end and a dedicated build video that covers the entire building process in more depth.
Build Process
Step 1: Socket the CPU
This build uses a motherboard with reverse connectors (which we’ll touch on later), so we must approach it slightly differently than a traditional system. First of all, we recommend leaving the motherboard inside its box to install the CPU, RAM and SSD to avoid damaging any of the headers on the board. The box is designed specifically to cushion the headers on the back, making it a solid surface to work on.
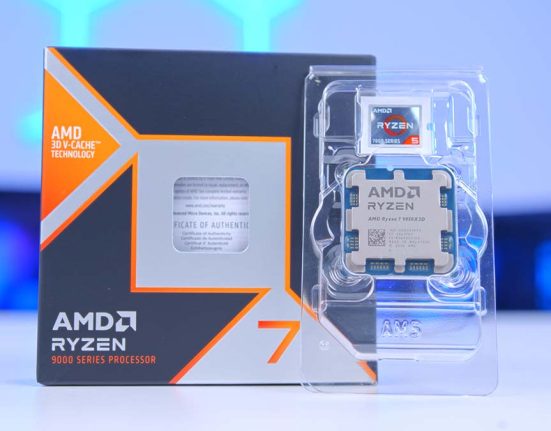
The CPU we’ll install into this motherboard is the AMD Ryzen 7 7700X. For most of our builds, we tend to teeter between the AMD Ryzen 5 7600/7600X or the Ryzen 7 7800X3D because these processors offer excellent value. But we’ve switched it up with the Ryzen 7 7700X for this system. There are a couple of reasons for this; the first is more cores. The Ryzen 7 7700X has eight cores instead of six compared to the Ryzen 5 7600X, so more performance can be gained across multi-core applications.

The second reason is pricing. At the time of writing, the Ryzen 7 7700X is available for around $290, which is relatively competitive compared to the alternatives. Although the Ryzen 7 7800X3D is around $60 more, this CPU is a solid option for those who are a bit more price-conscious.
Push the socket’s metal retention arm down, releasing it from the hook. Then, lift the metal CPU socket cover, exposing all the pins underneath.

Find the golden triangle on the processor. For AMD Ryzen CPUs, this is typically at the top left. This indicates the correct orientation for the processor to go into the motherboard. There is a matching triangle on the motherboard. Line up both so they are facing in the same direction. Then, slowly lower the Ryzen 7 7700X into the socket. It doesn’t require any force; just carefully place it down, and it should sit snugly inside.

Place the metal socket cover on top and push the metal retention arm underneath its hook. This requires some force but won’t damage the CPU. While this is happening, the plastic protector will likely pop off. Keep this inside the motherboard box for a future RMA or repair.
The motherboard we’ve picked out for this build is the Gigabyte B650E AORUS STEALTH ICE. This is one of the first Gigabyte boards to receive the PROJECT STEALTH treatment, which means the headers and connectors on the board have been moved to the back of the PCB. This results in a much cleaner build at the front and eases cable management.

The B650E AORUS STEALTH ICE is a gorgeous white motherboard with a white PCB. This board perfectly complements the lighter theme we’ve chosen for this system and blends in well with a wide range of other white components.
| Specification | Gigabyte B650E AORUS STEALTH ICE |
|---|---|
| Form Factor | ATX |
| Supported Memory | 256GB DDR5 8000MT/s |
| PCI-E x16 Slots | 1 x PCI-E 5.0 |
| PCI-E x4 Slots | 1 x PCI-E 5.0 2 x PCI-E 4.0 |
| Front IO | 1 x USB 3.2 Gen2x2 Type-C 1 x USB 3.2 Gen1 2 x USB 2.0 |
| Rear IO | 1 x USB 3.2 Gen2 Type-C 2 x USB 3.2 Gen2 Type-A 4 x USB 2.0 5 x USB 3.2 Gen1 Type-A |
| Audio | 3 x Audio Jacks |
| Networking | 2.5 Gigabit LAN WiFi 7 |
Features-wise, the B650E AORUS STEALTH ICE offers Gen5 support for graphics cards and SSDs and two additional Gen4 slots for storage expansion. It also has an excellent selection of rear IO, with twelve ports in total. These ports comprise four USB 2.0 ports, five USB 3.2 Gen1 Type-A ports, and three USB 3.2 Gen2 ports, one of which is a Type-C version. The rear IO also features WIFi 7 and 2.5 Gigabit LAN, both high-speed networking options.

Step 2: Slotting in the RAM
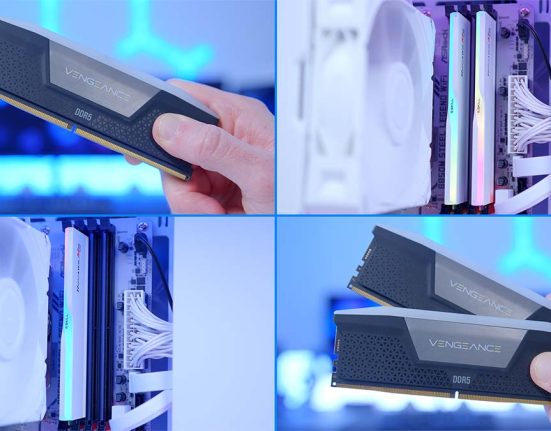
Next up is RAM, and in this configuration, we’ve picked out this Corsair Vengeance DDR5 32GB kit. This is one of Corsair’s older kits, but it still holds up well today in terms of performance. This RAM clocks in at 5600MT/s and has a latency of CL32. The sweet spot for most gaming builds is around 6000MT/s, which will offer the best efficiency, but 5600MT/s will be perfectly fine for this build.

This RAM kit works well with the colour scheme we’ve chosen. The white heat spreader matches the overall theme of the build, and the LEDs on top of each stick add some much-needed RGB lighting and customisation for this system.
First, push down the tabs on slots two and four on the B650E AORUS STEALTH ICE motherboard. We’re using these specific slots because they provide the best efficiency with two sticks of RAM.

Line up one of the two RAM sticks with the slot. They can only go in one way, so we recommend pre-emptively checking the orientation first. Then, place the RAM into the slot and evenly apply pressure to both sides of the DIMM, pushing down until you hear a click. This indicates that the RAM is correctly seated and the push tabs are locking it in place. Repeat this for the second DIMM.

Step 3: Securing the SSD
For storage, the drive going into this build is the TeamGroup MP44L. This is a Gen4 SSD with a 2TB capacity. We’ve reviewed and used this drive in several previous builds, and it’s a great pickup for a mid-range system. It won’t blow you away regarding speeds, primarily because this is not the best-performing Gen4 SSD on the market. However, its competitive price is what makes it a worthwhile pickup.

We’ve picked out a 2TB drive because this capacity strikes a solid balance regarding price per GB. 2TB drives can be expensive, but to store most of your games, an operating system and any additional applications, 2TB is what we generally recommend. Anything more or less, and you’re looking at either spending too much or will require an upgrade in the future.
We first need to remove the heatsink on the motherboard to install this drive. Fortunately, Gigabyte has made this incredibly easy by providing quick-release latches that allow the heatsinks to be removed and installed with zero hassle.

We’re installing the MP44L into the primary drive slot, which uses Gen5 bandwidth. While we can use the lower slots, it makes sense to use the top slot because we’re not installing any other drives in this build. However, for those planning to expand, we’d recommend using one of the two Gen4-capable M.2 slots underneath the large heatsink.
Push the latch to release the SSD heatsink, exposing the drive slot. Remove the tape from the thermal pads, and place the heatsink aside.

Push the SSD into the slot; it will poke out at a 45-degree angle; this is normal. Then, use the latch mechanism to secure the drive. The latch rotates around to push the drive down. Finally, place the SSD heatsink back on top of the drive, and it will simply click back onto the latch.

Step 3.5: Removing the CPU Cooler Clips
Before placing the motherboard inside the case, we must remove the plastic clips around the CPU socket. These are used for specific CPU coolers that have eyelets. These eyelets typically anchor onto the notched part of the plastic clips, and they can then be screwed down.

Fortunately, we don’t need to use these for our build. With a Phillips screwdriver, loosen all four of the screws, take the plastic clips off the motherboard and put them inside the box in case they’re needed for a future upgrade.
Step 4: Place the Motherboard Inside the Case
The case housing this PC build is the Corsair 3500X ARGB. This chassis is a mixture between the 2500X and 6500X ranges, providing ample space for modern components while offering a competitive price. We’ve reviewed the Corsair 3500X ARGB and felt that this case is a decent offering. It’s well built, looks clean and sophisticated and features a primarily tool-less design, making building a simple process.

Regarding component support, the Corsair 3500X ARGB accommodates GPUs up to 410mm long and CPU air coolers up to 170mm tall. There’s space for ten 120mm fans across the entire case and two 360mm radiators across the top and side panels. It can also house reverse connector motherboards and comes with three pre-installed addressable RGB fans.
| Key Specs | Corsair 3500X |
|---|---|
| Form Factor | Mid-Tower |
| Motherboard Support | Mini-ITX, Micro-ATX, ATX, E-ATX |
| Case Dimensions (L x W x H) | 460mm x 240mm x 506mm |
| Front IO | 1 x USB 3.2 Gen2 Type-C 2 x USB 3.2 Gen1 Type-A 1 x 3.5mm Combo Jack |
| PCI-E Slots | 7 |
| Colour | White Black |
| Max Clearance | 170mm Cooler Height 410mm GPU Length 180mm PSU Length |
| Drive Support | Up to 2 x 2.5 inch Up to 2 x 3.5 inch |
| Fan Support | Top: 3 x 120mm Side: 3 x 120mm Rear: 1 x 120mm PSU Shroud: 2 x 120mm Bottom: 1 x 120mm |
| Radiator Support | Top: Up to 360mm Side: Up to 360mm Rear: Up to 120mm |
| Pre-installed Fans | 3500X: N/A 3500X ARGB: 3 x 120mm ARGB 3500X iCUE LINK RGB: 3 x 120mm iCUE LINK RGB |
We recommend laying the chassis flat first to get this board into the case. This minimises the risk of dropping the board or damaging any headers as it’s going through the cutouts at the back of the case. Line up the board with the cutouts, ensuring you place the B650E AORUS STEALTH ICE down carefully.

Then, using the included screws found in the accessories box, screw the motherboard down. The accessories box has a divider for the screws, so it’s easy to pick out the correct ones needed for each component.
Top Tip: To screw the board down, the heatsinks around the PCB need to be removed, exposing all of the screwholes and the standoffs underneath.

Step 5: Mount the CPU Cooler
The AMD Ryzen 7 7700X is kept cool in this build by the Corsair iCUE LINK TITAN RX 360. This 360mm AIO (all-in-one) is a significant redevelopment of Corsair’s previous coolers, providing better performance across the board while maintaining the signature Corsair quality and design.

Across our testing, we’ve found that the iCUE LINK TITAN RX 360 is one of the best 360mm options on the market, competing with alternatives like the ASUS ROG STRIX LC III 360 ARGB, Cooler Master Atmos 360, and DeepCool MYSTIQUE 360. This is a marked change in the performance of Corsair coolers, and we were very impressed by the results during our benchmarking runs.

To install this cooler, the case’s top panel must be removed. The Corsair 3500X ARGB is mostly tool-less so the panel pops off and can be put to the side. The iCUE LINK TITAN RX 360 has all of the fans pre-installed, so we don’t need to screw them in. Hold the radiator up to the top panel, and use the screws found in the cooler box to secure it in place.
Top Tip: We recommend starting with the corner screws first while holding onto the radiator. Once these are filled in, let go and secure the rest of the screws.

Take the CPU blockhead and attach the AMD mounting hardware. These brackets point north and south, contrasting with the Intel hardware, which points diagonally instead.

Place the CPU blockhead onto the CPU. The iCUE LINK TITAN RX 360 has pre-applied thermal paste, so we don’t need to add our own. With a Phillips screwdriver, start to tighten the screws down in a star pattern, going from one corner to the next. Tighten the cooler down until there’s minimal movement.

Step 5.5: iCUE LINK Cabling
Wiring up Corsair iCUE LINK coolers can be convoluted for first-time builders, so we’ve broken it down here. First, place the iCUE LINK hub somewhere at the back of the case. We decided to put it on the hard drive bays because it is magnetic.

Next, pick out the cables needed for this build. You’ll need three iCUE LINK cables, the Micro-USB to USB 2.0 cable, a PCI-E adapter, and the Tach cable (which connects to your CPU_FAN header).
Once you’ve picked out all the cables, we’ll start wiring everything up. Beginning with the iCUE LINK cables, connect the fans and radiator using one of them, and use a second cable to attach the radiator to the iCUE LINK hub. This will daisy-chain the fans and radiator together. Then, the final iCUE LINK cable goes to the CPU blockhead and the second port on the hub.

Attach the PCI-E adapter to the hub. We’ll wire up the other end later during the power supply install. Use the Tach connector, plug one end into the hub and the other into the CPU_FAN header on the motherboard. The Micro-USB also plugs into the hub, and an available USB 2.0 header on your board.
Once the PCI-E adapter is plugged in later, the wiring for the iCUE LINK cooler will be set up correctly. Once the build is switched on, the fans and radiator will power up with the RGB lighting.

Step 6: Installing Extra Fans
The Corsair 3500X ARGB has three RS120 addressable fans installed on the side panel. To exhaust air and pull some more in, we added two additional RS120 fans, one on the rear panel and one on the bottom. This assists airflow and helps pull in and push out cold and hot air.

Getting these installed was incredibly straightforward. RS120 fans are installed like any other fan. Using the screws that come in the fan box, secure both fans to the case, and plug the cables into a hub or directly into the headers on the board.

Step 7: Securing the Graphics Card
The next component we’ll be installing is the graphics card. To fit in with this system’s white theme, we’ve picked out the Gigabyte AERO OC RTX 4070 SUPER. This card has a triple-fan shroud, providing solid cooling performance and minimal noise levels. It offers a small RGB strip on the top, which is a nice touch, and the white colouring persists across the entire card, helping it blend in with the other white components in this build.

Performance-wise, the RTX 4070 SUPER is primarily geared towards 1440p but offers decent legs at 4K. The main point to note is that as this is an NVIDIA card, gamers can utilise all the proprietary technologies exclusive to these cards, such as DLSS, RTX Ray Tracing, Frame Generation and more. These are major selling points for NVIDIA and make their cards worth consideration, as they can significantly improve performance and visual fidelity.
| Specification | Gigabyte AERO OC RTX 4070 SUPER |
|---|---|
| Video Memory | 12GB GDDR6X |
| Memory Bus | 192-bit |
| Base Clock Speed | 1.98GHz |
| Boost Clock Speed | 2.56GHz |
| CUDA Cores | 7168 |
| RT Cores | 56 |
| Tensor Cores | 224 |
| Power Draw | 220W |
| Length | 300mm |
First, remove the PCI-E covers at the back of the case. Because of the size of the Gigabyte AERO card, we only need to take out the second and third covers from the top down.

Line up the RTX 4070 SUPER with the graphics card slot on the motherboard. Apply firm pressure to both sides of the card and push it into the slot until you hear a click. This indicates that the PCI-E latch holds the card inside the slot, locking it in place.

Screw the card in using the screws removed from the PCI-E covers earlier, alleviating any sag from the card. We’ll plug in the power cables once the PSU has been installed.

Step 8: Power Supply Install & Cabling
The last component we need to install is the power supply. In this configuration, we’ve opted for the Corsair RM850x SHIFT PSU. This white unit offers an 80 Plus Gold and Cybenetics Gold rating, ensuring minimal power is lost as noise. It offers ATX 3.0 wiring for NVIDIA graphics cards, allowing us to plug in just one cable instead of multiple PCI-E connectors hooked to an adapter.

The most unique feature of the RM850x SHIFT is that the power supply headers have moved to the side of the PSU instead of the back. This provides easy access to all wires, making assembly and disassembly a streamlined process.
Before placing this power supply inside the case, it’s best to pick out all the cables we need beforehand. For this particular build, we need one 24-pin motherboard cable, one 8-pin EPS CPU power cable, the 12VHPWR graphics card cable, and a PCI-E cable for the iCUE LINK hub. Optionally, you can plug in SATA power for a fan or RGB hub, but we’ve used a splitter to connect the non-iCUE LINK fans and RGB to the board.

Take the power supply and slide it into the back of the case. Using the four hexagonal screws found in the screw divider, secure the power supply to the chassis. Make sure to overtighten the screws, as this could damage the threads.

The first cable we’ll get installed is motherboard power. This is located on the left side of the board, and the cable can only go in one way. Tug at the cable after it’s been plugged into to ensure it’s seated correctly.

The CPU power header sits at the top right of reverse connector motherboards, and again, the cable can only be plugged in one way.

The graphics card power cable is slightly more unique and features 16 pins instead of the typical eight on a standard PCI-E cable. Line up the cable with the connector on the graphics card and give it a firm push.
The last cable is the PCI-E cable. This is commonly used for graphics cards that don’t offer any 12VHPWR compatibility, but iCUE LINK also uses it to power each part.

Step 9: Front Panel Wires & Switch On
For the last step of this PC build guide, we need to plug in the rest of our cables, which are the wires from the case, and power on the PC build. This case utilises a 3.5mm audio jack, two USB 3.2 Gen1 Type-A ports, and a single USB 3.2 Gen2 Type-C port. While we’re plugging in these cables, this is an excellent opportunity to manage all the wires to ensure they’re neat.
Starting with HD Audio, this is required for the 3.5mm combo jack to work. This header is notched and has a blocked-out pin, so it can only go one way.

Next is USB 3.0. This is a larger rectangular header, and it has a small notch in the model, which slides into a small slit on the connector. This is needed for the type-A ports on the case.

The USB-C header, positioned slightly above USB 3, is keyed and can only go one way. Plugging this in can be tricky, so give the wire a firm push.

Last but not least is JFP1, otherwise known as front panel power. This powers your PC when you hit the button on the front of the case. Fortunately, the Corsair 3500X ARGB has a unified header, so look at the legend on the board to figure out where it needs to go and plug it in.

Now that all of the cables are plugged in and managed. Put the case panels back on, grab some peripherals and a monitor, and switch on the build!
Performance
![]()
1440p, High Settings
Avg: 244FPS
Preset: High
V-Sync: Off
Anti Aliasing: TSAA
Texture Filtering: 8x
Ambient Occlusion: High
Volumetric Lighting: High
Dynamic Shadows: Enabled
Model Detail: High
![]()
1080p, Comp. Settings
Avg: 260FPS
Preset: Low
V-Sync: Off
Render Distance: Far
TSR: Off
Global Illumination: Off
Ray Tracing: Off
Effects: Low
Post Processing: Low
![]()
1440p, High Settings
Avg: 213FPS
Preset: Custom
Resolution Scaling: FSR
Texture Quality: High
Anisotropy: x8
Contact Shadows: On
Ambient Occlude: High
Frame Generation: On
![]() 1440p, High Settings
1440p, High Settings
Avg: 94FPS
Preset: Custom
Resolution Upscaling: FSR
Texture Res: High
Volumetric Light: High
Shadow Res: High
SSAO: On
Motion Blur: Off
Framerates exceeded 100FPS across Cyberpunk 2077 and Alan Wake II. The Gigabyte AERO RTX 4070 SUPER is an excellent performer in rasterised gameplay, so we’re seeing buttery smooth gameplay because of this.
The strong gameplay continued through to the Esports games. Fortnite and Apex Legends saw insane framerates, surpassing the 144Hz sweet spot with 260FPS and 244FPS, respectively.
Gallery


![FI_[SR190] HYTE X50 Ryzen 5 9600X & MSI RTX 5070 Ti](https://geekawhat.com/wp-content/uploads/2026/01/FI_SR190-HYTE-X50-Ryzen-5-9600X-MSI-RTX-5070-Ti-551x431.jpg)
![FI_[DP064] ASUS Prime AP303 + 9070XT](https://geekawhat.com/wp-content/uploads/2026/03/FI_DP064-ASUS-Prime-AP303-9070XT-551x431.jpg)
![FI_[DM93] Corsair 3200D Launch](https://geekawhat.com/wp-content/uploads/2026/03/FI_DM93-Corsair-3200D-LAUNCH-551x431.jpg)
![FI_[DM89] Phanteks Evolv + AORUS 5090 9850X3D Gallery (8)](https://geekawhat.com/wp-content/uploads/2026/02/FI_DM89-Phanteks-Evolv-AORUS-5090-9850X3D-Gallery-8-551x431.jpg)