Building a solid white gaming PC is not the most straightforward challenge. With so many excellent white components out there, settling on the best parts that money can buy while sticking to a budget can be time-consuming. That’s why, in this PC building guide article, we’ve set out to do all the hard work for you, picking out the best white PC gaming components that offer excellent performance.
For our part choices, we’ve paired the MSI RTX 4070 SUPER Gaming X Slim White with the AMD Ryzen 5 9600X, housed inside the MSI MAG PANO 100L PZ. We’ve used this case before but got it in white for this fantastic build.
Per our gaming PC build guides, this article covers the entire process from start to finish and details why we’ve chosen each part. We recommend following this article’s dedicated video, as James provides better coverage of how the parts go together.
Build Process
Step 1: Socket the CPU
The first component in this PC build is the CPU, which we’ve chosen the AMD Ryzen 5 9600X. This processor is part of the AMD Ryzen 9000 range, released in August 2024. While the Ryzen 9000 range wasn’t initially received with much optimism during its release, subsequent performance improvements have put it in a better position.

Regarding the specs, the Ryzen 5 9600X is similar to its 7600X counterpart. With six cores and twelve threads at a boost clock speed of 5.4GHz, the Ryzen 5 9600X is a solid competitor within single-core workloads, meaning it’s excellent for gaming depending on the graphics card pairing.
To install this CPU, first remove the motherboard from its box. We always recommend using the box as a surface to work on, as it won’t damage any of the pins or connections on the back of the PCB.

Unhook the metal retention arm next to the CPU socket and lift the metal cover to expose the pins underneath. Then, look for the golden arrow on the CPU. For AMD Ryzen processors, this arrow is at the top left. Locate the matching arrow on the motherboard and line these up. This indicates the correct orientation for the CPU to sit in the socket properly.

Finally, lower the CPU into the socket, which will sit snugly without force. Place the metal cover back on top of the processor and push down the metal retention arm, locking it in place. The plastic protector will pop off while the metal retention arm is being pushed down. Keep this in the motherboard box for a potential RMA or repair.

The board into which we’ve just installed the AMD Ryzen 5 9600X is the MSI PRO X870-P WiFi. This unique board offers a relatively barebones design and a low price point but has a well-rounded set of features. For instance, RAM can be overclocked to 8200MT/s, while the 14+2+1 VRM power phase design can sustain a modest overclock to the boost speed.
| Specification | MSI Pro X870-P WiFi |
|---|---|
| Form Factor | ATX |
| Supported Memory | 256GB DDR5 8200MT/s |
| PCI-E x16 Slots | 1 x PCI-E 5.0 1 x PCI-E 4.0 2 x PCI-E 3.0 |
| PCI-E x4 Slots | 1 x PCI-E 5.0 2 x PCI-E 4.0 |
| Front IO | 2 x USB 2.0 1 x USB 3.2 Gen1 Type-A 1 x USB 3.2 Gen2 Type-C |
| Rear IO | 4 x USB 2.0 2 x USB 3.2 Gen1 Type-A 2 x USB 3.2 Gen2 Type-A 1 x USB 3.2 Gen2x2 Type-C 1 x USB4 Type-C |
| Audio | 3 x 3.5mm Audio Jacks |
| Networking | 5 Gigabit LAN WiFi 7 |
It offers Gen5 compatibility for graphics cards and an SSD. It also provides a wide range of high-speed IO, including a USB4 Type-C port. MSI also includes 5 Gigabit LAN and WiFi 7, which offer blazing-fast speeds with a supporting router.

Step 2: Slotting in the RAM
Next is RAM, and we’ve opted for the G.Skill Trident Z5 NEO RGB DDR5 kit. We’ve used these DIMMs in AMD builds we’ve put together in the past. They’re incredibly reliable and offer solid speeds, which are ideal for gaming or tougher workloads that need more oomph. This kit clocks in at 6400MT/s and provides a latency of CL32, which is more than ample for this gaming system.

Regarding the aesthetic, this G.Skill kit offers a white heatspreader with a black strip that spans each stick’s width. Each DIMM also has LEDs on the top, adding some flair to the build, which can be customised and synced up with other RGB components in this system.
Installing RAM is reasonably straightforward. First, push down the tabs at the top and bottom of slots two and four. We always use these slots when a build has two DIMMs, as they provide the most efficient performance configuration.

Line up one of the RAM DIMMs with the second slot on the motherboard. A notch in the middle of the RAM will help you find the correct orientation. Once the RAM is correctly aligned, firmly push down on both sides until you hear a click. This indicates that the G.Skill RAM is correctly seated. Repeat this instruction for the second stick of RAM.

Step 3: Mount the SSD
For storage, the drive going into this build is the MSI Spatium M580 FROZR. This is a 2TB Gen5 SSD with a gigantic heatsink that keeps a lid on thermals. Gen5 thermals have been a partial problem since their release on the market in 2023, and MSI’s solution is to equip their drives with a rather hefty heatsink stack. While this keeps the drive nice and cool, clearance can sometimes be a potential issue, depending on where the SSD is installed.

On the performance front, this Gen5 SSD’s read and write speeds are exceptionally fast, at 14600MB/s and 12700MB/s, respectively. While this performance isn’t required for gaming, it opens options for those looking to build a gaming/workstation hybrid. It’s worth noting that this is also a 2TB drive, so there’s ample room for plenty of games.
The top M.2 slot below the CPU socket on the MSI PRO X870-P WiFi motherboard is the Gen5 slot, so we’ll install the drive there. First, remove the heatsink. MSI has introduced the EZ M.2 SHIELD on this motherboard, so push the latch and remove the heatsink. We won’t re-install the heatsink, so place this inside the motherboard box.

Place the Spatium M580 FROZR into the slot. It will poke out at a 45-degree angle. Push the drive down until it clicks into the clip beneath, then slide the latch across, securing it in place. No screws or tools are required.
Note: The imagery below shows James installing the TeamGroup MP44L SSD. While this is a solid alternative, we recommend the MSI Spatium M580 FROZR for this build.

Step 3.5: Attaching the CPU Cooling Hardware
Before installing the motherboard inside the case, we’ll install the final pieces of hardware outside while we have plenty of clearance. As this is an AMD PC build, we first need to remove the mounting clips around the CPU socket. The CoreLiquid I360 (which we’ll touch upon later) has two methods when mounting with AMD. We’ve chosen the first method listed in the manual, as it’s much easier than the second.

Once the four screws are loosened, take off the plastic clips and put them inside the motherboard box. This exposes the posts underneath. Use the AMD threads and screw these into the posts.
Step 4: Place the Motherboard Inside the Case
As we briefly mentioned in the introduction, the case housing all of the components in this gorgeous white PC build is the MSI MAG PANO 100L PZ. Those following the GeekaWhat channel and website will be familiar with the PANO, as we’ve built with this chassis before during the arrival of PROJECT ZERO motherboards.
MSI’s ‘PZ’ range of components allows builders to keep their systems clean and tidy, as all the cables can be hidden at the back of the chassis. Although we’re not using a PROJECT ZERO motherboard, the PANO 100L PZ is incredibly sophisticated. It offers glass side and front panels, which provide an unhindered view into the build.

The MAG PANO 100L PZ offers ample space for various build configurations. It can house ten 120mm fans and supports 360mm radiators on the bottom, side, and top panels. There’s also clearance for graphics cards up to 380mm long, which is enough room for the white RTX 4070 SUPER we’ll install later.
To install the MSI PRO X870-P WiFi in this case, remove the glass panels and lay the chassis flat. This minimises the risk of dropping and potentially damaging the motherboard. Then, place the motherboard inside the case, lining up the IO shield with the cutout towards the top left of the chassis.

Ensure that the standoffs are lined up with the screwholes around the motherboard. Then use the screws found in the accessories box to secure the motherboard in the case. Don’t overtighten the screws, as we don’t want to damage the standoffs, as this can make future upgrades quite challenging.

Step 5: Securing the Liquid CPU Cooler
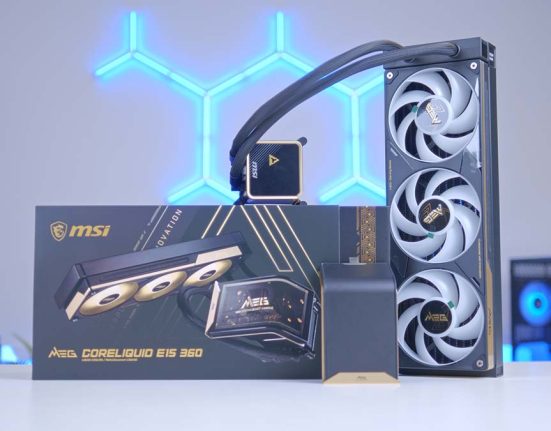
The cooler we’ve opted for in this build as mentioned a couple of steps ago is the MSI MAG CoreLiquid I360 White edition. We’ve previously used the CoreLiquid I360 in an all-MSI build, and it’s a solid option for mid-range systems. One of the unique elements of this liquid AIO (all-in-one) is that it features a universal mounting system. So whether you’re building an AMD or Intel PC build, the mounting bracket attached to the CPU blockhead works for both.

This saves plenty of time during the building process and simplifies installing this CPU cooler. Additionally, the CoreLiquid I360 comes with three 120mm fans pre-installed and has a simple cabling system. Overall, this is an incredibly easy cooler to build with, and the white colouring on the radiator and fans fits in nicely with the lighter theme we’re going for.
Because the fans are already installed, we can skip a step and secure the radiator to the case. To do this, remove the top panel, push the radiator up to the rails, and use the screws in the mounting hardware to secure it in place. We recommend holding on with one hand while using the other to screw in the radiator. Once a few of the screws can take the weight, let go and fill in the rest of them where available.

The CoreLiquid I360 doesn’t come with any pre-applied thermal paste on the blockhead of the CPU cooler, so we need to add our own. Apply a rice-sized grain of the thermal paste to the AIO’s IHS (internal heatspreader).

Finally, place the blockhead onto the CPU and use the thumbscrews in the mounting hardware to hold it. We recommend tightening these in a star pattern to apply even pressure to the socket.

Step 5.5: Adding Extra Fans
Unfortunately, the MSI MAG PANO 100L PZ doesn’t have any fans pre-installed in the case. So, to ensure this build has solid airflow, we’ll need to add our own. In this configuration, we’ve used the Corsair RX120 iCUE LINK fans. These chassis fans use the iCUE LINK daisy-chain technology but are considerably cheaper than their QX120 counterparts.

Again, we’ve picked out white fans to amplify the all-white aesthetic of this build. These fans also feature Corsair’s solid RGB lighting, adding plenty of customisation to this system.
On the side panel, we’ve connected up three RX120 fans and screwed them in. Use the screws provided with the fans to secure these to the case, as we don’t want to damage the threads.

The bottom panel of the MAG PANO 100L PZ is removable, which makes installing fans and coolers quite simple. Unscrew the bottom panel, attach the fans, and then secure the panel back to the case.

Finally, we added a single RX120 iCUE LINK fan to the back of the case as an exhaust. Thus, nine fans take in hot air, with a single fan exhausting hot air out of the case.

Step 6: Installing the Graphics Card
The graphics card we’ve picked for this PC build is the MSI RTX 4070 SUPER Gaming X Slim White. While there are a few options in the mid-range market, the RX 7800 XT and RX 7900 GRE stand out as solid AMD competitors. We landed on this RTX 4070 SUPER because of its sleek white design. Additionally, it allows us to keep our budget below $2000.

Performance-wise, the RTX 4070 SUPER is a solid graphics card for 1440p gaming, but it has some decent legs in 4K. As this is an NVIDIA card, gamers can access NVIDIA’s pillar technologies, DLSS and RTX ray tracing. DLSS is especially important as it bolsters framerates in select titles, allowing you to enjoy smoother gameplay.
| Specification | MSI RTX 4070 SUPER Gaming X Slim White |
|---|---|
| Video Memory | 12GB GDDR6X |
| Memory Bus | 192-bit |
| Base Clock Speed | 1.98GHz |
| Boost Clock Speed | 2.65GHz |
| CUDA Cores | 7168 |
| RT Cores | 56 |
| Tensor Cores | 224 |
| Power Draw | 220W |
| Length | 307mm |
Before installing this card into the case, we reoriented the mounting bracket to accommodate vertical GPU mounting. To do this, loosen the two thumbscrews and pop the bracket out of the case.

Then, attach the graphics card to the bracket like you would normally. Start by removing the PCI-E covers first, and then secure the graphics card to the bracket with the screws removed from the PCI-E covers.

Grab a PCI-E riser cable and attach one end to the graphics card. This allows the GPU to interface with the motherboard and processor.

Secure the vertical riser inside the case and ensure both thumbscrews are tight. Then, plug the other end of the riser cable into the motherboard.

Step 7: Mount the Power Supply
The last part we’ll install in this PC build is the MSI MAG A750GL PCIE5 power supply. This fully modular unit allows us to pick and choose what cables we need, resulting in a much cleaner build. The A750GL PCIE5 features an 80 Plus Gold and Cybenetics Gold efficiency rating, ensuring minimal power is lost as additional heat or noise.

This power supply unit offers 750W, which is ample for this build configuration. The A750GL also supports the PCIE5 power connector for NVIDIA graphics cards, allowing us to plug in one cable for the RTX 4070 SUPER. We could have picked a white version of this power supply for this lighter-themed PC build, but it isn’t necessary because we’re not likely to see it. Choosing a black version also saves us money.
As always, before we install the power supply in the case, we’ll pick out the cables needed beforehand. This PC build uses one 24-pin motherboard power cable, two 8-pin EPS CPU connectors, a 12VHPWR cable for the graphics card, and a 6-pin PCI-E connector for the iCUE LINK hub to power the fans.

Slide the power supply into the back of the case. Using the hexagonal screws in the case accessories box, secure the power supply in place. Make sure to use the correct screws so the threads aren’t damaged.

Now, we’ll start plugging in all of the cables. Firstly, we’ll plug in the motherboard power. This connector is long and rectangular, with the header typically located on the motherboard’s right side. Give this cable a firm push until the cable clip engages.

CPU power requires two headers to be plugged in. These are situated at the top left of the motherboard and can only go in one way. Again, give both cables a firm push until they’re correctly seated.

The graphics card power cable is unique. It looks like two headers are attached, and it goes into the GPU one way. This can be slightly harder to plug in, so tug at the cable afterwards so it doesn’t come out easily.

The last cable is for the iCUE LINK hub. Corsair iCUE LINK requires more power than regular fans, so it uses a 6-pin PCIE cable. Plug this in and wire it up to the hub.
Step 8: Front Panel Cables & Switch On
For the last step of this PC build, we’ll plug in the front panel cables and finish up the cable management to ensure this system is clean and tidy. We always recommend doing cable management during the build to avoid having to do all of it at the end.
For the front panel cables, we’ll start with JFP1. This front panel power is required if you want to use your case’s power button. Fortunately, the MAG PANO 100L PZ uses a single header instead of individual pins, making it much easier to plug in.

Next is USB 3. This header has a small notch in the middle, indicating it can only go one way. This cable is plugged in just above the front panel JFP1 power header.

The USB type-C header is usually located close to USB 3. This is a rectangular cable, and one side is keyed, so it can only be plugged in one specific way.

For the final step of this build, double-check that you’re happy with cable management and all of the front panel wires. Put the case panels back on, plug in power, peripherals, and your favourite monitor, and switch on this gorgeous white PC!
Performance
Framerates surpassed 100FPS in Hogwarts Legacy and held firm in Alan Wake II with Ray Tracing enabled. The benchmarks show that the RTX 4070 SUPER is solid at 1440p.
The excellent performance continued through to the Esports games. Fortnite and Apex Legends saw insane framerates, quickly surging past the 144Hz sweet spot with 245FPS and 266FPS, respectively.
Gallery